If you’re running a website or planning to host a web application, knowing how to install PHP on any server is a must. PHP is one of the most popular server-side scripting languages, powering millions of sites and widely used platforms like WordPress, Joomla, and Drupal. Without PHP, many modern websites and applications simply wouldn’t function.
In this guide, we’ll show you how to install PHP on Linux, Windows, and macOS servers. You’ll also learn to configure it with Apache or Nginx, add key extensions, and test your setup for a smooth, working installation.
Key Takeaways
- Troubleshoot common issues such as unrecognized PHP commands, missing extensions, or server misconfiguration.
- PHP is essential for running dynamic websites and applications on Linux, Windows, and macOS servers.
- Always check prerequisites: command-line familiarity, admin access, and system updates.
- Installation steps vary by OS:
- Linux: Use
apt,yum, ordnfto install PHP and extensions. - Windows: Download PHP from php.net, configure
php.ini, and integrate with Apache or IIS. - macOS: Use Homebrew to install and manage PHP.
- Linux: Use
- Configure your web server (Apache, Nginx, or IIS) to process PHP files correctly.
- Install necessary PHP extensions for applications like WordPress, Laravel, or Magento.
- Test PHP installation using a simple
phpinfo()file to verify configuration. - Keep PHP updated and secure by regularly applying patches and running supported versions.
Prerequisites Before Installing PHP
Before you begin the installation, make sure you have the right setup and access. Skipping these steps can lead to errors or failed installations.
- Basic knowledge of the command line (for Linux/macOS): Many PHP installation steps require running commands in the terminal. Familiarity with basic navigation and package management will make the process smoother.
- Admin/root access to the server: You’ll need elevated permissions to install software, update packages, or configure the server environment. Without root or administrator rights, you won’t be able to complete the installation.
- Ensure the system is updated: Running a quick update before installation helps avoid compatibility issues. For example, use
sudo apt update && sudo apt upgradeon Ubuntu/Debian orsudo yum updateon CentOS. - Check if PHP is already installed: Some systems come with PHP pre-installed. Run
php -vin your terminal (or command prompt on Windows) to check. If PHP is installed, the version number will display; if not, you’ll see an error message.
Installing PHP on Linux Servers
Linux is the most popular environment for hosting PHP websites, and the installation steps vary slightly depending on your distribution. Let’s go through them one by one.
For Ubuntu/Debian-Based Systems
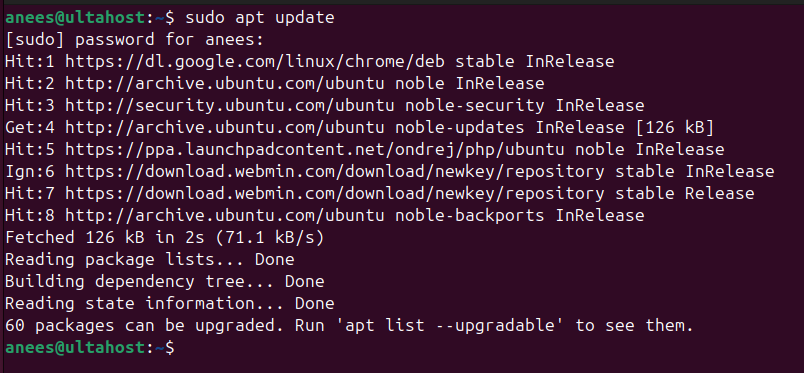
1 – Update package lists
Updating ensures your server downloads the latest PHP version and dependencies available in the repository. sudo apt update
2 – Install PHP with common modules
This command installs PHP along with the Apache integration module and MySQL support, which are needed for most applications. sudo apt install php libapache2-mod-php php-mysql
3 – Verify installation
After installation, check the version to confirm PHP is installed correctly. php -v
4 – Configure Apache or Nginx to work with PHP
For Apache: Restart the service so it can recognize PHP. sudo systemctl restart apache2
For Nginx: You’ll need PHP-FPM to process PHP files. Install it and restart Nginx. sudo apt install php-fpm sudo systemctl restart nginx
For CentOS/RHEL-Based Systems
1 – Update the system
Keeping your system updated ensures compatibility and stability before installing PHP. sudo yum update
2 – Install PHP and extensions
This command installs PHP, the command-line interface (CLI), and MySQL support, which are essential for web applications. sudo yum install php php-cli php-mysqlnd
3 – Verify PHP version
Confirm the installation by checking the installed version of PHP. php -v
4 – Restart the web server
Restarting Apache or Nginx ensures the server can load and process PHP scripts properly.
Apache: sudo systemctl restart httpd
Nginx: sudo systemctl restart nginx
For Fedora
1 – Install PHP using dnf
Fedora uses dnf as its package manager. This command installs PHP along with commonly used modules like CLI and MySQL support. sudo dnf install php php-cli php-mysqlnd
2 – Check installation
Run this command to verify that PHP has been installed successfully. php -v
3 – Restart the web server
Restart Apache or Nginx to make sure PHP is active and ready to run. sudo systemctl restart httpd # for Apache sudo systemctl restart nginx # for Nginx
At this stage, PHP should be successfully installed and running on your Linux server. You’re now ready to move on to configuration and testing.
Looking For a Reliable PHP Hosting Solution?
Choose Ultahost for fast, secure, and scalable hosting that supports the latest PHP versions. Get 24/7 customer support and high-performance servers tailored to your website’s needs.
Installing PHP on Windows Server
Unlike Linux, Windows does not come with PHP pre-installed, so you’ll need to set it up manually. Here’s how you can install and configure PHP on a Windows Server.
Download PHP from the official website
Go to php.net and download the latest stable version of PHP for Windows. Make sure to choose the correct build (Thread Safe for Apache, Non-Thread Safe for IIS, depending on your setup).
Extract files
Once downloaded, extract the PHP files to a folder on your server, for example:
C:\php
This makes it easier to manage and reference in configurations.
Configure php.ini
Inside the extracted folder, locate the file named php.ini-development or php.ini-production. Rename a copy of it to:
php.ini
Then open it in a text editor and configure key settings, such as enabling required extensions (like extension=mysqli) or setting timezone.
Add PHP to system environment variables
To run PHP commands from anywhere in Command Prompt or PowerShell, add PHP’s folder to your system PATH:
- Right-click This PC → Properties → Advanced system settings.
- Go to Environment Variables.
- Under System variables, find and edit the
Path. - Add:
C:\php - Save and restart the server to apply changes.
Configure PHP with Apache or IIS
- Using Apache:
Open thehttpd.conffile in your Apache installation folder. Add these lines at the end to load PHP as a module:LoadModule php_module "C:/php/php8apache2_4.dll" AddHandler application/x-httpd-php .php PHPIniDir "C:/php"Save and restart Apache. - Using IIS:
For IIS (Internet Information Services), download and install PHP Manager for IIS. This tool helps you register PHP easily and configure it without manual editing.
Verify installation by creating a PHP info file
Create a new file in your web root directory (e.g., C:\inetpub\wwwroot\phpinfo.php):
<?php
phpinfo();
?>
Open a browser and navigate to:
http://localhost/phpinfo.php
If PHP is installed correctly, you’ll see a detailed PHP configuration page.
Installing PHP on macOS
macOS makes it fairly simple to run PHP, though the process differs depending on the version you’re using.
Check if PHP is pre-installed
Older versions of macOS used to ship with PHP out of the box. To check, open Terminal and run:
php -v
If PHP is installed, the version number will appear. If you see an error, you’ll need to install it manually.
Install Homebrew (if not available)
On the latest macOS releases, PHP is no longer pre-installed. The easiest way to install it is through Homebrew, a popular package manager. If you don’t have it yet, install it by running:
/bin/bash -c "$(curl -fsSL https://raw.githubusercontent.com/Homebrew/install/HEAD/install.sh)"
Install PHP using Homebrew
Once Homebrew is set up, install PHP with a single command:
brew install php
This will download and install the latest stable version of PHP.
Start PHP service
To make sure PHP runs in the background and is always available, start it as a service:
brew services start php
Verify installation
Finally, confirm the installation by checking the version:
php -v
If the command shows a version number, PHP is now ready to use on your macOS system.
Installing PHP Extensions
PHP extensions add extra functionality to your server, enabling features required by many applications and frameworks. For example, WordPress needs the mysqli or pdo_mysql extension for database connectivity, Laravel relies on extensions like mbstring, and image-related tools often require gd or imagick. Installing the right extensions ensures your applications run smoothly without errors.
Installing Extensions on Ubuntu/Debian
On Ubuntu or other Debian-based systems, you can use the apt package manager to install extensions. For example, to install commonly used ones like XML parsing, cURL support, and image processing:
sudo apt install php-xml php-curl php-gd
You can replace or add other extension names depending on your project requirements. Restart Apache or Nginx after installation for changes to take effect.
Installing Extensions on CentOS/RHEL
CentOS and RHEL use yum as the package manager. To add the same popular extensions, run:
sudo yum install php-xml php-curl php-gd
As with Ubuntu, you can include any other extensions you need. Don’t forget to restart your web server afterward to activate them.
Installing Extensions on Windows
On Windows, extensions are included with the PHP download but are not always enabled by default. To enable them:
- Open your
php.inifile (located in your PHP installation folder). - Find the line for the extension you want, such as:
;extension=curl ;extension=gd ;extension=xml - Remove the semicolon (;) at the beginning of the line to activate it.
- Save the file and restart Apache or IIS.
By installing and enabling the right PHP extensions, you ensure that your server is fully prepared to handle frameworks, CMS platforms, and custom applications.
Boost Your Website With Reliable VPS Hosting!
Ultahost offers quick setup, high-speed servers, and full control to meet your growing business needs. Enjoy top-notch security, scalability, and 24/7 support. Upgrade to fast VPS hosting now!
Testing PHP Installation
Once you’ve installed PHP, it’s important to verify that it’s working correctly with your web server. The simplest way to do this is by creating a test file that outputs PHP’s configuration details.
Create a test file
Navigate to your web server’s root directory (commonly /var/www/html on Linux) and create a new PHP file:
nano /var/www/html/phpinfo.php
Add PHP info code
Inside the file, add the following line of code:
<?php
phpinfo();
?>
This built-in function displays information about your PHP installation, including version, extensions, and server configuration.
Open in a browser
Save the file, then open your browser and go to:
http://your-server-ip/phpinfo.php
Replace your-server-ip with your actual server’s IP address or domain name.
Check the results
If PHP is installed and configured correctly, you’ll see a detailed page showing your PHP version, enabled extensions, and configuration settings. If the page doesn’t load or downloads instead, it means the server isn’t processing PHP files correctly, and you may need to revisit your web server configuration.
After testing, remember to delete the phpinfo.php file, as leaving it accessible can expose sensitive server details to the public.
Common Issues and Troubleshooting
Even with a smooth installation, you may run into a few common PHP issues. Here’s how to resolve them:
- PHP not recognized in the command line
If runningphp -vgives an error, it usually means PHP isn’t in your system’s PATH. Add the PHP installation directory (e.g.,C:\phpon Windows) to your environment variables or check your shell configuration on Linux/macOS. - Apache or Nginx not processing PHP files
If PHP files download instead of executing, the web server isn’t configured to work with PHP. Check that the PHP module is enabled for Apache or that Nginx is set up to use PHP-FPM. Restart the server after making changes. - Wrong PHP version installed
Sometimes your system installs an older PHP version by default. To fix this, install a specific version such as PHP 8.1 using versioned packages (e.g.,sudo apt install php8.1). On Windows, download the exact version you need from php.net. - Missing extensions
If your application throws errors about missing extensions, install them individually through your package manager (apt,yum,dnf) or enable them in thephp.inifile on Windows.
Keeping PHP Updated and Secure
Running an outdated version of PHP can expose your server to performance issues and security risks. Always ensure you’re using a supported version.
- Importance of updates
Newer versions of PHP bring security patches, bug fixes, and performance improvements. Unsupported versions are more vulnerable to attacks. - Updating PHP on Linux
Use your system’s package manager:- Ubuntu/Debian:
sudo apt update && sudo apt upgrade - CentOS/RHEL:
sudo yum update - Fedora:
sudo dnf upgrade
- Ubuntu/Debian:
- Updating PHP on Windows
Download the latest version from the official PHP site, extract it to your server, update yourphp.iniif needed, and restart Apache or IIS. - Apply patches and updates regularly
Set reminders to check for PHP updates and apply them on a schedule. This helps maintain both security and performance for your applications.
Conclusion
Installing PHP on your server is a critical first step in hosting dynamic websites and applications. In this guide, we walked through how to install PHP on Linux, Windows, and macOS, configure it with Apache or Nginx, add extensions, and verify your setup.
Always remember to test your installation and secure it by keeping PHP updated. Running a supported version ensures your server is stable, fast, and protected against vulnerabilities.
From here, you can take the next steps by learning how to connect PHP with databases, frameworks like Laravel, or CMS platforms like WordPress. With PHP installed and configured correctly, your server is ready to power a wide range of web projects.
For a reliable hosting solution, check out UltaHost Windows Hosting with SSD storage, free DDoS protection, and unmetered bandwidth, perfect for your PHP projects.
FAQ
How do I check if PHP is already installed on my server?
Run the command php -v in your terminal or command prompt. If PHP is installed, you’ll see the version number; if not, you’ll get an error message.
Which PHP version should I install?
It’s best to install the latest stable version (currently PHP 8.x) because older versions may no longer receive security updates. Always check compatibility with your applications before upgrading.
Do I need Apache or Nginx to run PHP?
Yes, PHP works alongside a web server. Apache and Nginx are the most common choices, though you can also run PHP with IIS on Windows or use PHP’s built-in development server for local testing.
How do I install PHP on Linux if I need a specific version?
Most Linux distros support version-specific packages. For example, on Ubuntu you can install PHP 8.1 with:
sudo apt install php8.1
How do I enable PHP extensions on Windows?
Open your php.ini file, find the extension line (e.g., ;extension=curl), and remove the semicolon (;). Save the file and restart your web server to apply changes.
Why is my PHP file downloading instead of running?
This usually happens when the web server isn’t configured to handle PHP. Double-check your Apache or Nginx configuration and ensure PHP-FPM or the PHP module is enabled.
How do I keep PHP updated on my server?
- On Linux: use your package manager (
apt,yum,dnf) to upgrade. - On Windows: download the latest PHP release from php.net and replace your current installation. Always restart your web server after updating.