You might find it interesting that WordPress didn’t start out as a platform for online stores. It was originally built as a content management system (CMS) to help users publish and manage blogs or websites more easily.
Over time, WordPress has evolved in many things, Among these WooCommerce stands out as the most powerful and widely-used tool for turning a standard WordPress site into a fully functional ecommerce store. Its flexibility and rich feature set make it the go-to choice for anyone looking to sell online.
Key Takeaways
- WooCommerce stands out as the go to eCommerce plugin for WordPress users because it’s free, flexible, and fully open-source. It gives you complete control over your store, from design to functionality. Plus, the large community and thousands of extensions make it easy to grow your business at your own pace.
- Setting up WooCommerce involves more than just installing a plugin. You’ll go through a setup wizard, configure payments and shipping, add products, and personalize the look of your store.
- Many first time store owners overlook key things like optimizing product images, setting tax and shipping zones correctly, or forgetting mobile responsiveness. We’ll show you how to avoid these slipups and build a smooth shopping experience from day one.
- WooCommerce pairs perfectly with WordPress SEO tools like Yoast, allowing you to fine-tune every product page for search engines. You can create clean URLs, add meta descriptions, and structure your content to make it easy for Google and customers to find your products.
- Whether you have a brand-new website or an established blog, WooCommerce integrates seamlessly. You can keep your existing content and simply add a store section without disrupting your site’s structure.
- One of WooCommerce’s biggest strengths is its scalability. Whether you’re selling one product or thousands, it adapts to your needs. You can add new features, automate tasks, and even integrate with third-party tools as your business expands.
The only thing left to figure out is: how do you actually get WooCommerce set up and working smoothly on your WordPress site? To make that process easier, we’ve created a complete, step-by-step WooCommerce tutorial to guide you through everything from installation to launching your online store.
Why Prefer WooCommerce on Your Online Store
WooCommerce stands out because it’s free, open-source, and seamlessly integrates with WordPress. It gives you full control over your store’s design, products, payments, and shipping. You can sell physical goods, digital downloads, or even subscriptions all with customizable features. It supports hundreds of extensions, making it easy to scale as your business grows. Plus, with a huge community and frequent updates, WooCommerce stays secure, flexible, and reliable for store owners.
Have a read a series of comparative articles between:
How to Install and Set up WooCommerce (Step by Step guide for Beginners)
To get started, you’ll first need to install and activate the WooCommerce plugin. Whether you’re working with a fresh WordPress installation or adding it to an existing site, the setup is straightforward. In the steps below, we’ll guide you through installing WooCommerce and show you how to configure its key settings to get your store up and running smoothly.
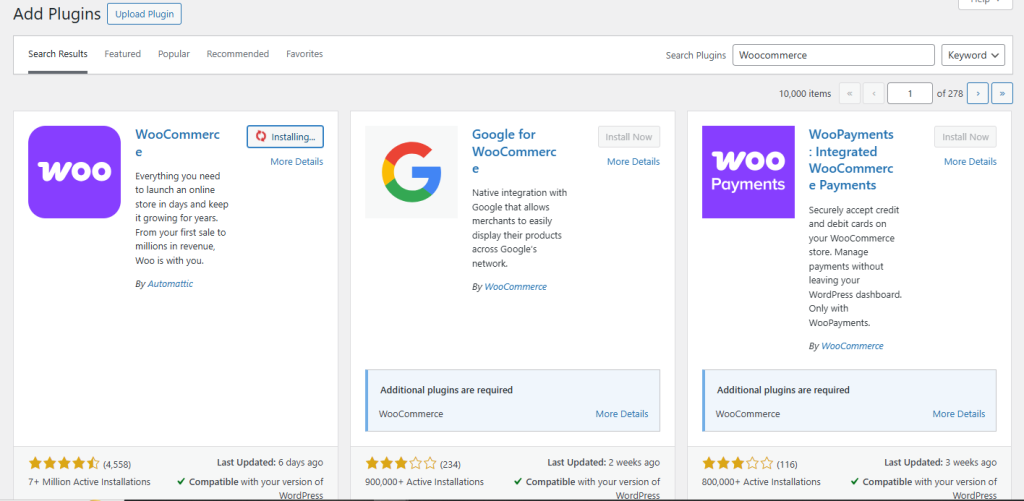
Step 1: Get Started by Installing the WooCommerce Plugin
Setting up your WooCommerce store begins with installing the WooCommerce plugin on your WordPress site. This is a quick and easy process:
- Go to your WordPress dashboard.
- Click on Plugins > Add New.
- In the search bar, type WooCommerce.
- Click Install Now, and then hit Activate once the installation completes.
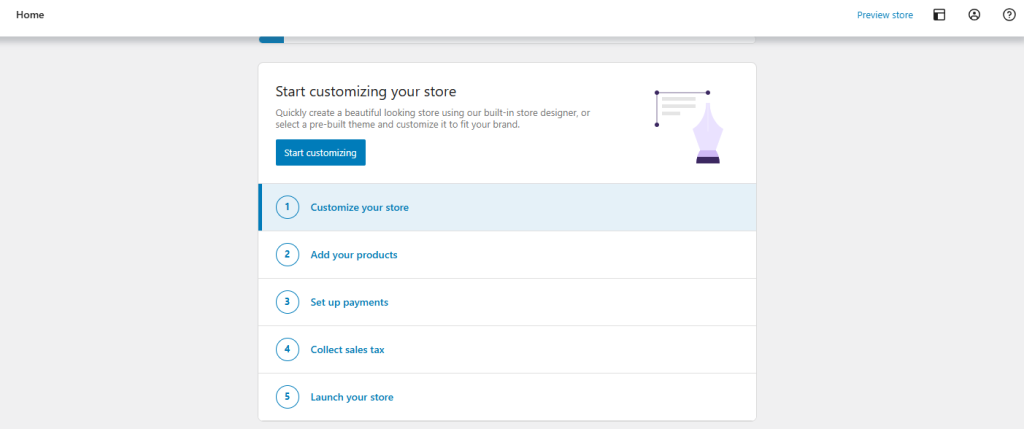
Once activated, WooCommerce will immediately prompt you to begin setup using its onboarding wizard. This helps simplify the initial configuration for store owners.
Step 2: Launch the Setup Wizard
After activating the plugin, WooCommerce will launch its Setup Wizard. This tool walks you through the fundamental configurations for your store. Here’s what you’ll be prompted to fill out:
- Store Details: Enter your business location, currency, and product type (physical, digital, or both).
- Industry Type: Choose your store’s niche (e.g., fashion, tech, education).
- Product Type Selection: You can stick with the free version or select paid product types like subscriptions or memberships.
- Business Details: Tell WooCommerce how many products you plan to sell and whether you’re setting this up for a client.
Once your store settings are in place, it’s time to add your first products. You can do this manually, or by importing a CSV file if you have many items.
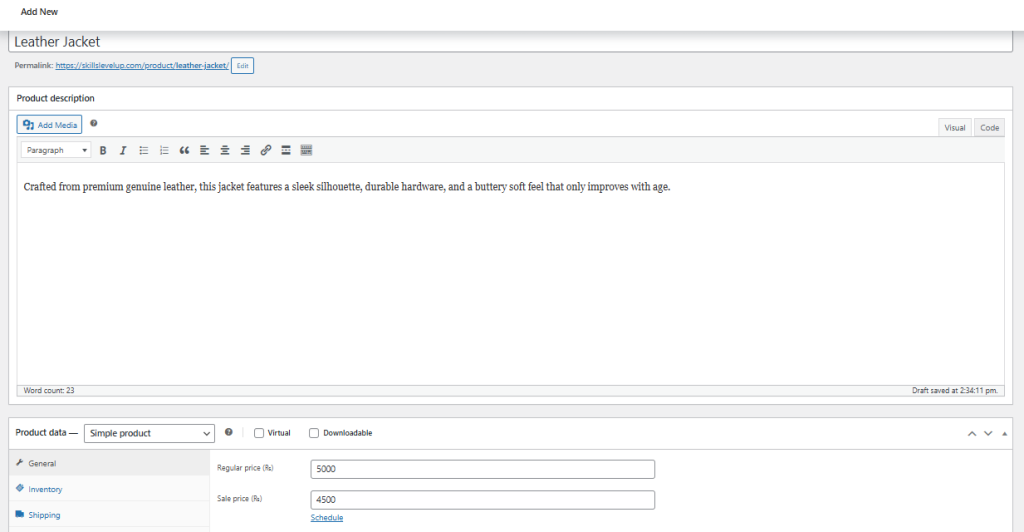
Step 3: Add Your First Products and Organize Your Catalog
To add a product manually:
- Go to Products > Add New in your dashboard.
- Enter a product name, description, image, and price.
- Choose the product type (simple, variable, grouped, or external).
- Set inventory details like SKU, stock quantity, and whether it’s in stock.
Here is the detailed guide about Discover the Best Plugins for WooCommerce Product Add-Ons in 2025.
Step 4: Set Up Payment Methods to Accept Orders Seamlessly
WooCommerce supports various payment gateways by default including:
- PayPal: It is still one of the most trusted online payment systems worldwide. Many customers prefer it because they don’t need to enter card details every time.
- Stripe: It is a top choice if you want professional-level payment handling with custom branding options.
- Cash Of Delivery: You can enable COD for specific shipping zones. Just keep in mind that it comes with extra handling risk, so it’s best used locally.
- Manual Payment: It is useful if you’re dealing with bulk orders or B2B sales. WooCommerce lets you manually confirm payments once you receive the transfer.
During the Setup Wizard (or anytime later under WooCommerce > Settings > Payments), you can:
- Enable or disable payment options.
- Configure credentials (e.g., your PayPal email).
- Choose your default currency.
If you plan to expand globally, enabling credit cards via Stripe is often the most seamless solution.
Step 5: Configure Shipping Details and Apply Tax Rules
Handling taxes and shipping correctly is key for running a compliant, customer-friendly store.
To Set Up Taxes:
- Enable tax calculations in WooCommerce > Settings > General.
- Go to WooCommerce > Settings > Tax, where you can:
- Define standard, reduced, and zero rates.
- Apply tax rates based on billing, shipping address, or your store’s location.
- Choose whether to include or exclude taxes in product pricing.
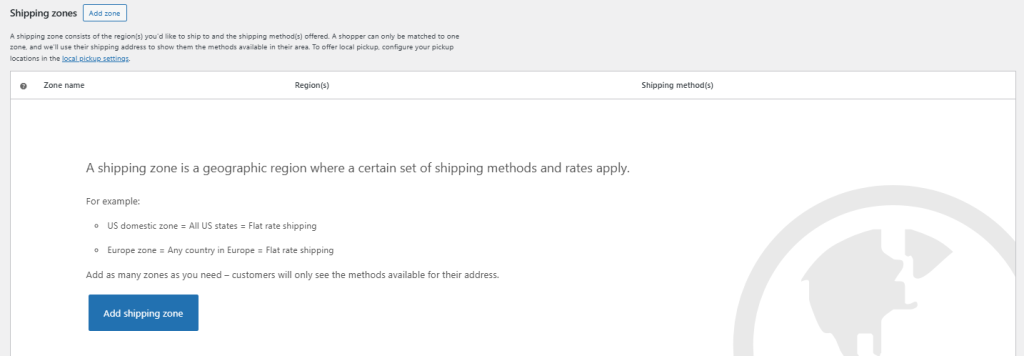
To Configure Shipping:
- Go to WooCommerce > Settings > Shipping.
- Create Shipping Zones (e.g., USA, Europe, or local delivery).
- Set flat rates, free shipping, or local pickup for each zone.
Step 6: Enhance Your Store with Recommended Extensions
WooCommerce has a powerful ecosystem of extensions to extend your store’s functionality. Some popular categories include:
- Marketing Tools: Mailchimp, Google Ads, and Facebook integrations.
- Product Enhancements: Product bundles, dynamic pricing, or wishlists.
- Customer Experience: Live chat, loyalty points, and product reviews.
- Security & Optimization: Payment fraud protection, performance boosters, backups.
You can browse the official WooCommerce marketplace or third-party plugins to find the features that best match your business needs.
Step 7: Customize Your WooCommerce Store
Tweak your design, layout, branding, and user experience using themes and customization tools to make your store truly yours, give your WooCommerce website a professional look and feel. Here’s how:
a. Choose a WooCommerce-Compatible Theme
Select a responsive, customizable WordPress theme designed specifically for WooCommerce. Options like Astra, GeneratePress, or Storefront offer built-in support and styling.
b. Customize Store Layout
Using the WordPress Customizer or a page builder (like Elementor), you can tweak:
- Header and footer
- Product category layouts
- Homepage sections
- Color schemes and typography
c. Set Up Key Pages
WooCommerce automatically creates essential pages (Cart, Checkout, My Account, Shop). Ensure these are visible in your site’s navigation.
d. Install a Cache Plugin
Improve performance and speed with a cache plugin like WP Rocket or LiteSpeed Cache.
e. Mobile Optimization
Ensure your site looks great and loads fast on mobile. Google favors mobile-friendly designs in its rankings.
Choosing the Right Hosting Environment for WooCommerce
Before you install WooCommerce, it’s crucial to set the foundation with a fast, secure, and scalable hosting provider. A poor hosting plan can make even the best-looking WooCommerce site slow, which affects your sales and search rankings.
A WooCommerce website performs best when it’s backed by optimized hosting solutions that can handle high traffic, frequent plugin updates, and secure transactions. For instance, UltaHost offers robust WooCommerce-optimized hosting that includes pre-installed WooCommerce, faster page loads, and 24/7 expert support.
Elevate Your Business with WooCommerce Hosting
Turn up the speed and boost your sales with Ultahost’s WooCommerce Hosting solutions. Our servers are powered by LiteSpeed for blazing-fast performance. Sell with confidence as our WooCommerce Hosting solutions are secure and scalable. Unleash 5x speed, boost sales, and keep customers happy.
How To Customize Your WooCommerce Store
Launching your WooCommerce store is only the beginning. To truly stand out in today’s crowded ecommerce landscape, you need a store that doesn’t just function well it needs to feel like you. That means customizing every element to reflect your brand’s tone, values, and customer experience. Thankfully, WooCommerce is incredibly flexible and designed to help you do exactly that.
From selecting the right theme to personalizing your checkout page, every customization you make can help strengthen your brand identity and improve conversions. Let’s walk through the essential areas you’ll want to focus on while tailoring your WooCommerce store to make it truly your own.
WooCommerce-Compatible Theme
The first big decision in customizing your store starts with your WordPress theme. While WooCommerce works with most modern themes, choosing one that’s built specifically for ecommerce will save you a lot of hassle down the road. Discover 5 Best Corporate themes for WordPress Websites.
Themes like Storefront, Astra, OceanWP, and Kadence are built to be WooCommerce-ready, meaning they support product pages, cart layouts, and customization options out of the box. You can install your theme directly from the WordPress dashboard, then head over to the Customizer to start shaping your store’s design. This includes uploading your logo, choosing your typography, and applying a consistent color scheme that matches your brand’s visual identity.

Keep in mind that your theme sets the tone for the entire customer journey so choose one that feels trustworthy, modern, and intuitive.
Customize Store Design with WordPress Customizer
Once your theme is in place, the WordPress Customizer gives you powerful tools to personalize your storefront without touching a single line of code. You’ll find it under Appearance → Customize. From here, you can modify your site’s header, footer, product catalog layout, and even enable or disable breadcrumbs.
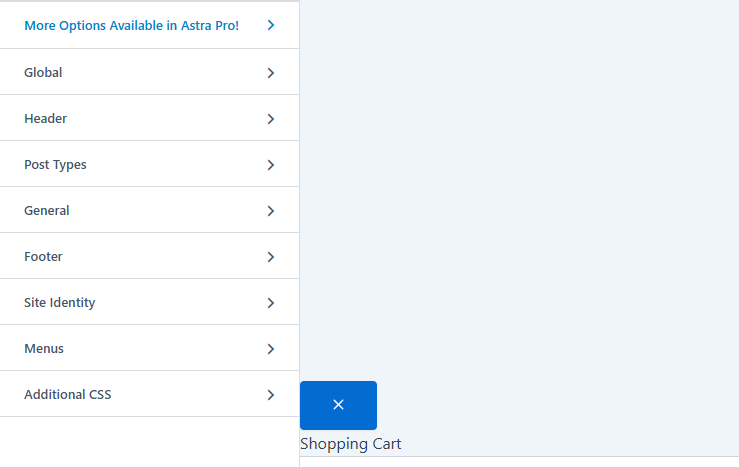
Want a minimalist store that lets your products shine? You can remove unnecessary clutter and keep only the essentials. Prefer a bold and vibrant design that stands out? The Customizer lets you play with fonts, colors, and spacing until everything looks just right.
This tool also gives you a live preview, so you can see exactly how your changes will appear before you hit “Publish.” It’s a safe and beginner-friendly way to test different design elements.
Use Page Builders to Create Advanced Layouts
For store owners who want more control over their site’s layout, using a page builder plugin like Elementor, Beaver Builder, or Divi can be a game-changer. These tools allow you to create custom pages for your homepage, product collections, landing pages, and more all using a drag-and-drop interface.
With a page builder, you can highlight featured products in stylish grids, display customer testimonials with visual flair, and even add countdown timers for sales events. It’s an excellent way to create an immersive and branded shopping experience that feels professional and thoughtfully designed.
Showcase Products with Visual Enhancements
One of the most powerful ways to improve the shopping experience is by customizing your product display. WooCommerce allows for standard product galleries and images, but you can take it further by installing plugins that add zoom functionality, hover effects, or carousel sliders.
If you’re selling products with multiple colors or sizes, adding variation swatches instead of simple dropdowns can make your site feel more modern and user-friendly. Clear, high-quality visuals can make a huge difference when convincing shoppers to hit “Add to Cart.”
Your product pages should feel like a showroom so take time to make them clean, interactive, and visually appealing.
Sidebars and widgets are subtle but powerful tools for enhancing your WooCommerce store’s navigation and usability. Whether it’s a search bar, a product category menu, or a newsletter signup form, these sections help guide users where you want them to go.
You can customize these areas under Appearance → Widgets, and depending on your theme, you might have multiple widget-ready sections (such as sidebar, footer, or homepage blocks). Be strategic include only the widgets that support your user journey, and keep it clutter-free.
Adding recent product reviews or trust badges here can also help boost conversions by building credibility without interrupting the shopping flow.
Customize the Checkout Page
The checkout page is where conversions either happen or don’t. That’s why it’s crucial to make this experience as frictionless as possible.
By default, WooCommerce offers a solid checkout form, but you can personalize it using plugins like Checkout Field Editor or WooCommerce Blocks. These tools allow you to add, remove, or rearrange form fields to collect exactly the information you need (and nothing more).
You can also brand your checkout with custom thank-you messages, shipping information, and security assurances. The easier and more reassuring the checkout experience feels, the more likely your customers are to complete their purchase.
Tailor the My Account Page for Better Customer Retention
The “My Account” page is often overlooked, but it’s a critical part of the customer experience. It’s where users manage orders, downloads, addresses, and account details. A customized “My Account” page can enhance functionality, reduce support requests, and encourage repeat purchases.
Plugins like Customize My Account for WooCommerce let you add new tabs, create personalized dashboards, and even integrate loyalty programs or customer notes. Make sure this page looks just as good and functions just as smoothly as the rest of your store.
Common WooCommerce Troubleshooting
Even though WooCommerce is a powerful and reliable ecommerce plugin, it’s not immune to hiccups. From plugin conflicts to checkout glitches and display issues, store owners often run into technical problems especially as their site scales or incorporates more features.
Fortunately, most WooCommerce issues can be resolved quickly once you understand where to look. Below, we’ll walk you through the most common WooCommerce problems, how to identify their causes, and the steps to fix them without panicking or breaking your site.
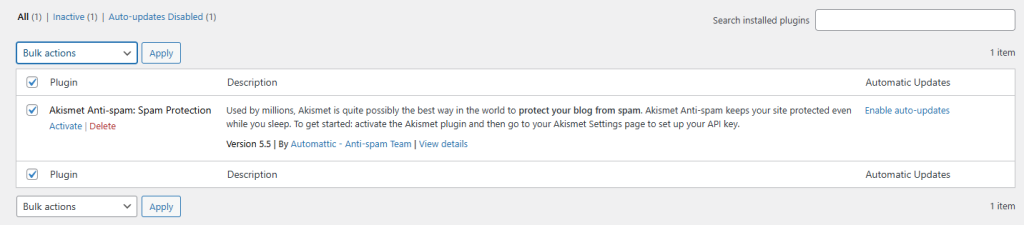
Plugin Conflicts
One of the most frequent causes of WooCommerce issues is a conflict between plugins. Since WordPress is open-source, many plugins are created by different developers with different standards. When two plugins try to modify the same function say, how your checkout page works it can cause errors or even crash your site.
How To fix It?
Start by deactivating all plugins except WooCommerce. Then, reactivate them one by one while checking if the issue returns. This process, known as conflict testing, helps you isolate the problematic plugin. Once identified, check for updates, switch to a compatible alternative, or contact the plugin developer.
One of the common plugin conflicts is WooCommerce abandoned cart, Luckily, a WooCommerce abandoned cart recovery plugin can help you re-engage customers who leave your site without completing their purchase.
Also, avoid running multiple plugins that offer overlapping functionality like two SEO tools or two payment gateway managers.
Theme Compatibility Issues
Sometimes the issue isn’t a plugin, but your theme. WooCommerce relies on certain templates and CSS classes to display your products, cart, and checkout pages correctly. A poorly-coded or outdated theme might not support these, leading to design problems or broken layouts.
How To fix It?
Switch temporarily to a default WooCommerce-supported theme like Storefront. If the issue disappears, your current theme is likely to blame. Either update the theme (if updates are available) or consider contacting the theme developer for WooCommerce compatibility fixes.
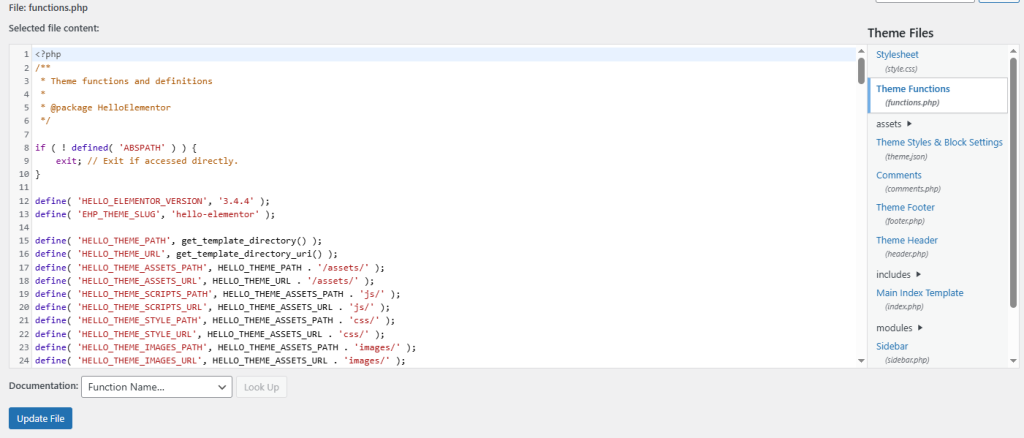
For custom-built themes, a developer might need to override WooCommerce templates manually or add specific support functions in the theme’s functions.php file.
Checkout or Payment Failures
Few things are more stressful than a checkout process that doesn’t work—especially when customers abandon their carts due to errors. These issues can arise from misconfigured payment gateways, plugin conflicts, or JavaScript errors on the checkout page.
How To fix It?
First, ensure your payment gateway (e.g., Stripe, PayPal, etc.) is properly configured with the correct API keys. It’s crucial to verify API credentials during setup to avoid failed transactions or checkout issues. You can usually find this information in your payment provider’s dashboard. Next, inspect your browser console (F12 in Chrome) for JavaScript errors that may be blocking functionality. Disabling conflicting plugins or switching to a default theme can help narrow down the root cause.
Also, make sure SSL is properly enabled across your website. A non-secure checkout page will trigger browser warnings, making users abandon the transaction.
Product Images Not Displaying Correctly
Images are essential to ecommerce but WooCommerce image display issues are surprisingly common. Sometimes images look blurry, misaligned, or completely missing. This can be due to wrong image sizes, a poorly optimized theme, or server-side issues like low memory.
How To fix It?
Go to WooCommerce → Settings → Products → Display and ensure your image dimensions match what your theme expects. You can also regenerate thumbnails using the Regenerate Thumbnails plugin to resize all images based on new settings.
Also, double-check that your image files are properly uploaded and not corrupted. Hosting issues (like limited PHP memory) can also prevent images from rendering.
Shipping or Tax Settings Not Working
Incorrect shipping zones or missing tax calculations can disrupt the entire purchase process and lead to unhappy customers. These problems are often caused by misconfigured settings or outdated database tables.
How To fix It?
Revisit WooCommerce → Settings → Shipping and ensure all zones are accurately defined. For tax issues, check WooCommerce → Settings → Tax to make sure rates are added and tax options (like “prices entered with tax”) are properly selected.
If automated taxes (like from Jetpack or TaxJar) are enabled but not working, check for plugin updates or re-authenticate the service under the Integrations tab.
WooCommerce Pages Missing or Not Displaying Properly
WooCommerce requires several key pages to function properly like Cart, Checkout, My Account, and Shop. If these are missing or broken, customers can’t complete their shopping journey.
How To fix It?
Navigate to WooCommerce → Status → Tools and click “Create default WooCommerce pages.” This will recreate any missing essential pages. If the pages exist but aren’t working properly, make sure they’re assigned correctly under WooCommerce → Settings → Advanced.
Avoid using the same slug (URL) for multiple pages, and verify that your permalinks are not causing conflicts. You can reset permalinks under Settings → Permalinks by simply clicking “Save” to refresh the structure.
Database or Update Errors After Upgrading WooCommerce
When WooCommerce updates, it sometimes modifies database tables or introduces new functions. Occasionally, updates can break certain features if your site hasn’t been fully synced or prepared.
How To fix It?
Always back up your website before updating WooCommerce. If you notice errors post-update, go to WooCommerce → Status and look for database update notifications. Click “Update Database” if prompted.
If issues persist, you can roll back to a previous version using plugins like WP Rollback—but only as a temporary fix. Contact WooCommerce support or consult documentation for update logs and patches.
Website Speed and Performance Issues
A slow WooCommerce store leads to high bounce rates and abandoned carts. Performance issues can stem from too many plugins, bloated images, or underpowered hosting environments.
How To fix It?
Use tools like GTmetrix or PageSpeed Insights to diagnose what’s slowing your site down. Compress images, enable caching (via plugins like WP Rocket or W3 Total Cache), and consider upgrading to a WooCommerce-optimized host.
Also, avoid loading unnecessary scripts or large product variations without optimization. Faster stores always outperform their slower competitors.
Conclusion
Building an online store with WooCommerce is more than a setup task it’s a journey. From choosing the right theme to customizing the product pages, configuring taxes, optimizing performance, and understanding your audience it all plays a role in turning casual visitors into loyal buyers.
This guide gave you everything you need, from How to use woocommerce to launch your WooCommerce website, from the first install to running a professional-grade eCommerce business. But remember success doesn’t come from the platform alone. It’s about consistency, listening to your customers, and improving day by day. Stay curious. Test new things. And always keep your user experience top of mind. Now it’s time to go live and make those first (or next) sales roll in.
Are you looking for the most reliable eCommerce hosting plan for your online store? Choose Ultahost’s eCommerce Web Hosting Plans to jumpstart your business. Enjoy SSD NMVe storage, free SSL certificates, and built-in security updates.
FAQ
What is WooCommerce and why should I use it?
WooCommerce is a free plugin that turns your WordPress site into a powerful online store. It’s flexible, beginner-friendly, and trusted by millions globally.
Can I set up WooCommerce without any coding knowledge?
Absolutely! WooCommerce is designed for non-tech users. With a few clicks, you can install, set it up, and manage your products using simple options.
What payment methods can I use with WooCommerce?
You can use PayPal, Stripe, credit cards, bank transfers, and many more. WooCommerce supports tons of built-in and third-party payment gateways.
Do I need a special hosting provider for WooCommerce?
While you can use shared hosting, it’s better to choose a WooCommerce-optimized host like UltaHost WooCommerce Hosting for performance and security.
Is WooCommerce secure for handling payments and customer data?
Yes, but only if your site is secured with HTTPS, a good host, updated plugins, and a reliable firewall. WooCommerce itself follows WordPress security standards.
How many products can WooCommerce handle?
WooCommerce can scale to thousands of products. It depends on your server resources and how well your site is optimized.
Can I use WooCommerce to sell digital products or subscriptions?
Yes! WooCommerce supports digital downloads, subscription products, bookings, and more via official extensions.