


In the post apocalyptic world of 7 Days to Die, crafting is a crucial aspect of survival. Among the numerous items that players can craft, an anvil stands out as one of the most important ones due to its versatility and functionality. An anvil enables players to repair durable weapons and armor, making it an indispensable tool in this challenging environment. Here’s our complete guide on how to make an anvil in 7 Days to Die.
Before we dive into the crafting process, it’s essential to gather the required resources and meet specific prerequisites. First, obtain the Hammer & Forge perk, which is mandatory to craft an anvil. This important perk significantly enhances your crafting capabilities and opens up avenues for creating intricate items. Additionally, prepare sufficient amounts of forge iron and clay since these two elements form the core components of an anvil.
Big fan of survival games? Look into Valheim, loved by tons of players! Get ready for creepy monsters and cool crafting in our helpful guide. Jump into this popular game now!
Crafting Procedure

Now that you’ve gathered the necessary resources and acquired the requisite perks, let’s move on to the actual crafting procedure:
Step 1: Locate a Forge
Begin by finding a forge in your base or any other suitable location. Once located, interact with the forge to initiate the crafting process.
Step 2: Prepare the Clay
Take out the clay from your inventory and place it inside the forge. You will need eight units of clay to proceed further. Use the hammer icon displayed on the screen to start shaping the clay into bricks. Keep in mind that each brick requires two pieces of clay. Therefore, you should end up with four clay bricks once you’re done.
Step 3: Create Iron Bars
Next, focus on transforming the iron ore into usable iron bars. To do so, open your inventory and combine five iron ores with one piece of charcoal. The resulting item will be a single iron bar. Repeat this step until you have obtained enough iron bars equivalent to twenty times the weight of a single iron bar (this might vary depending on your game settings).
Step 4: Craft the Base Plate
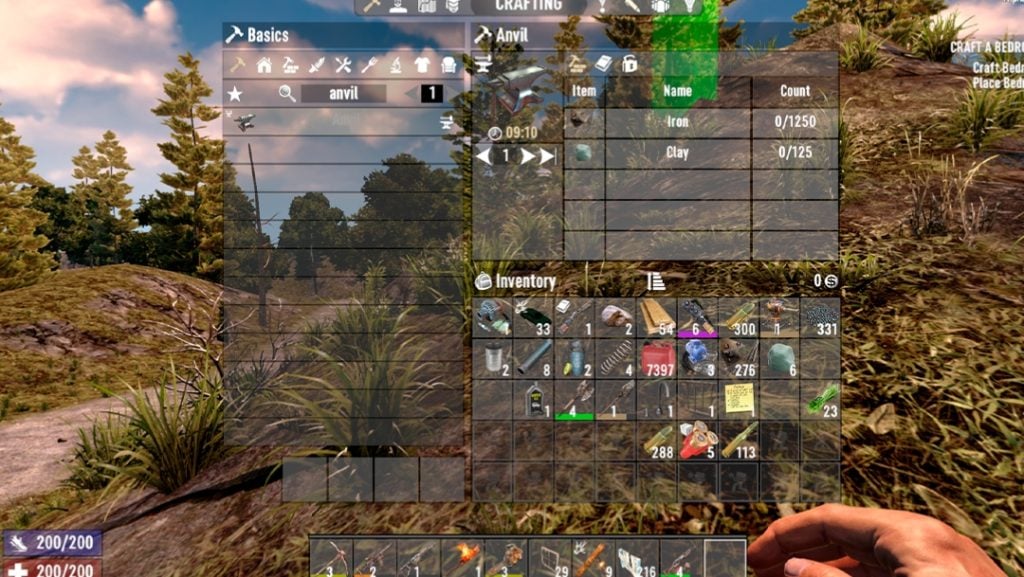
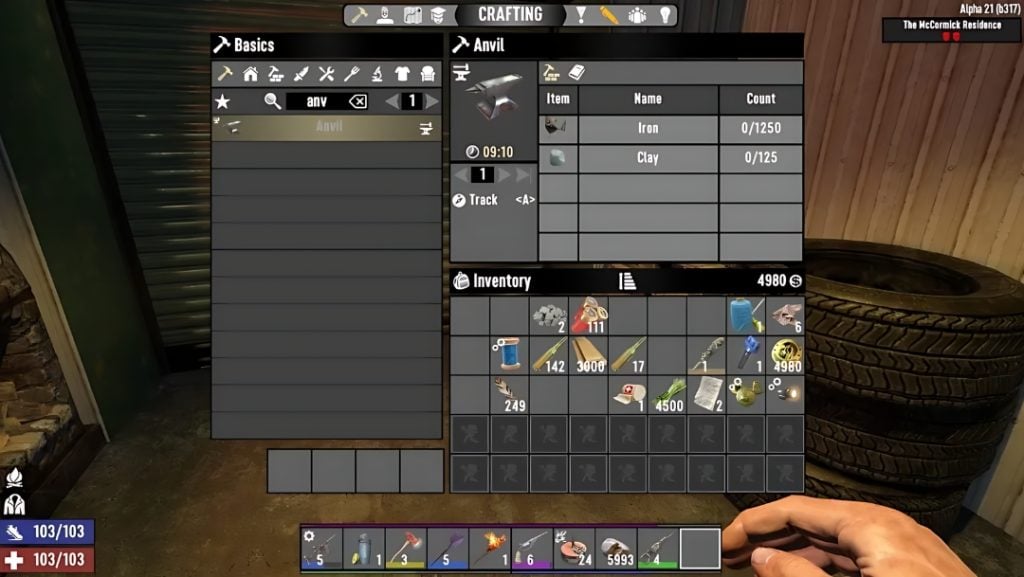
Using the iron bars you just created, begin crafting the anvil’s base plate. Open the forge interface again and select “Craft” followed by “Anvil”.
Step 5: Assemble the Anvil
Now that you have the base plate, it’s time to assemble the anvil. Place the four clay bricks and the iron base plate into the forge. You will see the it take shape as you combine these components.
Step 6: Add the Final Touches
With the anvil’s structure complete, you’ll need to add the finishing touches. Open the forge interface once more and select “Anvil” from the crafting menu. The anvil will now be fully assembled and ready for use.
Step 7: Place the Anvil
Finally, find a suitable location for your newly crafted anvil and place it in your base or workshop. With the anvil in place, you can now use it to repair and upgrade your gear.
Tips and Tricks
- Make sure to have enough space in your inventory to store the anvil’s components and the finished product.
- If you’re having trouble finding clay, try searching near water sources or in areas with high humidity.
- Consider crafting multiple anvils to place in different locations, making it easier to access and use them.
- Don’t forget to upgrade your anvil as you progress through the game, as this will allow you to craft more advanced items.
Enhance Your 7 Days to Die Experience Now!
Elevate your gameplay with Ultahost’s Server Hosting. Enjoy low latency, smooth performance, and customizable settings. Dominate the apocalypse with our exclusive resources and expert support. Level up your gaming experience with unparalleled reliability and speed.
Common Issues and Troubleshooting
- If you’re having trouble crafting the anvil, ensure that you have the required resources and perks. Double-check that you have the Hammer & Forge perk and sufficient iron and clay.
- If the anvil is not appearing in the crafting menu, try restarting the game or reloading the save.
- If you’re experiencing issues with the anvil’s functionality, check that it’s properly placed and that you have the necessary materials to repair or upgrade your gear.
Anvil Upgrades
- As you progress through the game, you’ll have the opportunity to upgrade your tool. This will allow you to craft more advanced items and repair higher-level gear.
- To upgrade your anvil, you’ll need to gather additional resources and meet specific requirements. These can be found in the game’s crafting menu or by experimenting with different combinations of materials.
Anvil Uses
- Repairing gear: Use the anvil to repair damaged tools, armor, and other equipment.
- Upgrading gear: Upgrade your gear to increase its durability and effectiveness.
- Crafting new items: Use the anvil to craft new items, such as tools, armor, and other equipment.
- Salvaging materials: Use the anvil to salvage materials from broken or damaged items.
Tips for Advanced Players
- Consider building a dedicated workshop or crafting area to house your anvil and other crafting stations.
- Experiment with different crafting combinations to discover new recipes and items.
- Keep your anvil well-maintained and upgraded to ensure optimal performance.
Additional Resources
- For more information on crafting and gameplay mechanics, check out the official 7 Days to Die wiki.
- Join online communities and forums to connect with other players and share tips and strategies.
- Experiment with different mods and custom maps to expand your gameplay experience.
By following this guide, you’ll be well on your way to crafting a functional anvil and taking your 7 Days to Die gameplay to the next level. Happy crafting!
Conclusion
Crafting an anvil in 7 Days to Die is a crucial step in advancing your survival capabilities. By following these steps and gathering the necessary resources, you’ll be able to create a functional anvil that will aid you in repairing and upgrading your gear. Remember to stay vigilant and keep exploring, as the world of 7 Days to Die is full of dangers and opportunities waiting to be discovered.
If you enjoy reading about how to craft anvil in 7d2d, you can deploy your gaming concept online with Ultahost’s Dedicated Game Server Hosting, also deploy your gaming concept online and easily host a wide range of tools. Benefit from multiple locations, managed servers, DDoS protection, and SSD NVMe storage for optimal performance.
FAQ
What is the primary purpose of an anvil in 7 Days to Die?
An anvil is used to repair and upgrade gear, making it a crucial tool for survival in 7D2D.
What perk is required to craft an anvil?
The Hammer & Forge perk is mandatory to craft an anvil in 7D2D.
What materials are needed to craft an anvil?
Iron and clay are the core components required to craft an anvil in 7D2D.
How many clay bricks are needed to craft an anvil?
Four clay bricks are needed to craft an anvil in 7D2D.
What is the purpose of the anvil’s base plate?
The base plate is a crucial component of the anvil, providing a foundation for the anvil’s structure in 7D2D.
Can I upgrade my anvil in 7 Days to Die?
Yes, you can upgrade your anvil to craft more advanced items and repair higher-level gear in 7D2D.
Where can I find more information on crafting and gameplay mechanics?
You can find more information on crafting and gameplay mechanics on the official 7 Days to Die wiki in 7D2D.


