
How to Install Node.js in MacOS
Developers can run JavaScript code on the server side w...


Docker is known as the industry leader when it comes to containerizing applications because of their portability and scalability. With Docker, deploying applications is far simplified since the containerized applications can perform uniformly regardless of the environment. It simplifies the distribution of your application while avoiding issues that arise from several machine configurations.
In this guide, we will explore all possible steps for building a Node.js application and containerizing it with Docker.
Docker simplifies the workflow of developers, designers, and engineers. Before creating a Node.js App with Docker, you need to install Docker.
Build Node Apps with Ultahost Node.js Hosting!
Power up your Node.js applications with a robust KVM Node VPS that’s fully scalable and hassle-free. Enjoy top-tier performance and the flexibility to upgrade your managed Node.js plan anytime.
Follow the given steps to install Docker on the Ubuntu machine:
In order to keep Ubuntu packages and known vulnerabilities in the system free, this step is very important for Ubuntu users. The apt update command retrieves the list of packages from the repositories:
sudo apt update

Now, install the required dependencies so that there is no issue during the Docker installation:
sudo apt install -y apt-transport-https ca-certificates curl software-properties-common

Read also How to Install Docker on Debian
This step retrieves the official GPG keys for Docker and adds them to your system’s keyring. This key will be used to check whether the key is downloaded with curl and processed into the format the system requires.
curl -fsSL https://download.docker.com/linux/ubuntu/gpg | sudo gpg --dearmor -o /usr/share/keyrings/docker-archive-keyring.gpg

Getting the official Docker repository as it automatically detects the architecture and Ubuntu version to provide the correct packages. Let’s configure the Docker repository:
echo "deb [arch=$(dpkg --print-architecture) signed-by=/usr/share/keyrings/docker-archive-keyring.gpg] https://download.docker.com/linux/ubuntu $(lsb_release -cs) stable" | sudo tee /etc/apt/sources.list.d/docker.list > /dev/null

With the new repository added, we freshened up the package list:
sudo apt update

At this step, we install four core Docker components:
sudo apt install -y docker-ce docker-ce-cli containerd.io docker-compose-plugin

The components being installed:
After you run this command, you are given a test image to download; the image is dubbed hello-world. If everything is installed in the right way and the command is executed successfully, a message is shown confirming that the command is run, showing that Docker is in good form.
sudo docker run hello-world

As seen, running Docker commands requires elevated permissions (sudo). Now, add your user account to the “docker” group for admin permission:
sudo usermod -aG docker ${USER}

A balance between convenience and productivity can streamline workflows, but one needs to log out and in for the settings to apply. Log out and log back in for the changes to take effect, or run:
newgrp docker

Let’s create a sample Node.js application, which we will dockerize:
This creates a dedicated folder for our project and moves into it. The folder name will also give us an idea of what the project contains:
mkdir nodejs-docker-app && cd nodejs-docker-app

Now, start by creating a package.json file, which is the manifest file and will contain the dependencies and configuration for the project, thus initializing a new Node.js Project. The -y flag automatically accepts all standard input, making for a basic configuration:
npm init -y

Now, install Express.js, which is flexible as well as a minimal Node.js web app framework. It offers robust features for web as well as mobile apps.
npm install express

This creates an empty JavaScript file named app.js that will hold the main code for our application. For every Node.js application, it is a convention to have a main file, which is the entry point to the application:
touch app.js

This is the code for creating a simple web server using Express.js:
const express = require('express');
const app = express();
const PORT = process.env.PORT || 3000;
app.get('/', (req, res) => {
  res.send('Hello from Node.js in Docker on Ubuntu 24.04!');
});
app.listen(PORT, () => {
  console.log(`Server running on port ${PORT}`);
});

This command runs your node application without Docker on your machine to check that it works correctly:
node app.js

Once the application is running, navigate to http://localhost:3000 in your browser, and you will see the message “Hello from Node.js in Docker!”.

Now, let’s containerize our Node.js application:
Now, create a new Docker file for Node JS application with no extension, simply named Dockerfile. As a text document, a Dockerfile contains all the instructions that Docker needs to build the image of an application:
touch Dockerfile

Now, add the below content inside the created Dockerfile:
FROM node:20-slim
WORKDIR /usr/src/app
COPY package*.json ./
RUN npm install
COPY . .
EXPOSE 3000
CMD ["node", "app.js"]

Now, create a file named “.dockerignore”. This file works like “.gitignore”, but for Docker. It adds files and folders that you do not want to copy when building files into the Docker image:
touch .dockerignore

In this step, each line represents the files or folders that do not need to be added in the building of the particular Node Docker image:
node_modules
npm-debug.log
Dockerfile
.dockerignore
.git
.gitignore

The above entries make sure the Docker image does not contain extra files.
In this final section, we build and run the Docker container:
Now, utilize the below command to build a Node JS Docker image from the instructions specified in the Dockerfile:
docker build -t nodejs-app .
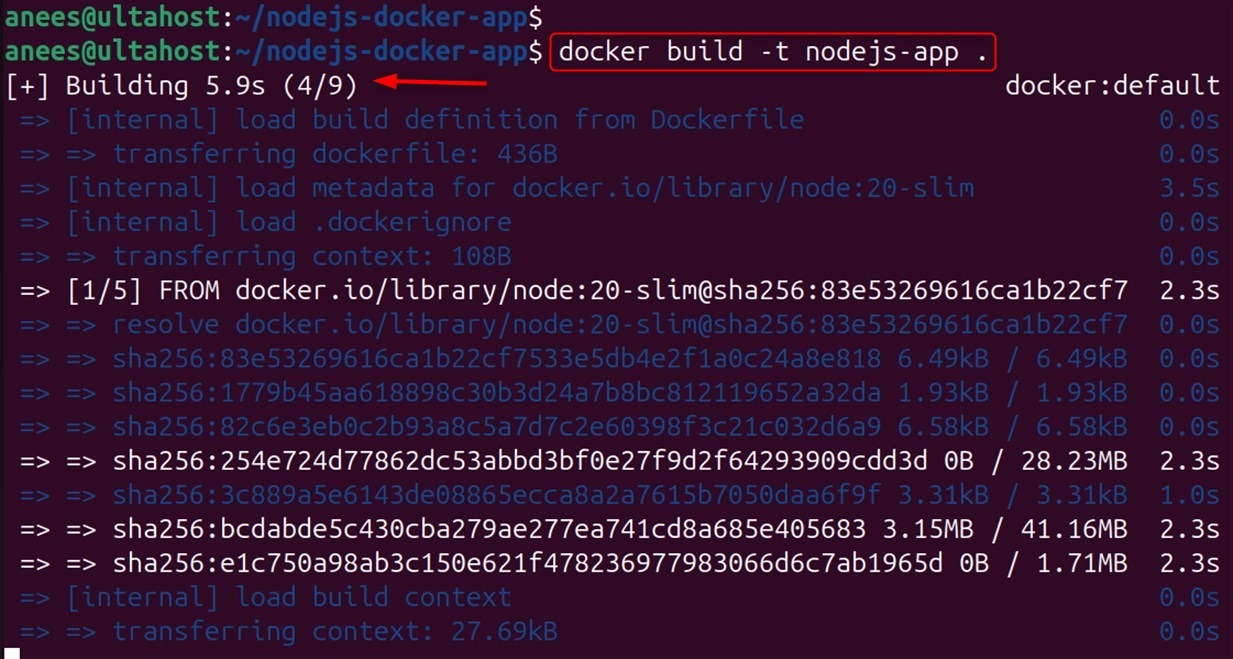
During the build process, see each step executed along with the corresponding output/messages.
To start or create a container from the image you created, use this command:
docker run -p 3000:3000 -d --name my-nodejs-app nodejs-app

This command reviews all currently running containers:
docker ps

If your container is running all right, you should find, surprisingly, “my-nodejs-app” on the list.
Using the browser, go to http://localhost:3000. The output will still be the same; however, it will now be coming from the Docker container:

This serves as a confirmation that the Node.js application is executing in the Docker container and responds correctly to requests coming from the host machine. The application is encapsulated, portable, and can be deployed with ease to any system that supports Docker.
Build and run applications with ease using Docker containers. Docker simplifies the workflow of developers, designers, and engineers working in the same or associated teams, enabling smooth collaborations regardless of location or system. Following this guide improves your enterprise application development, deployment, and operations.
Deploy Docker on UltaHost’s DDoS-protected VPS Hosting to easily build Node.js apps and streamline your workflows. Enjoy ultra-fast SSD NVMe storage, DDoS protection up to 3500+ Gbps, and lightning-fast server deployment at a competitive price. Safeguard your business or online service with our top-tier firewalls!
Containerizing a Node.js application with Docker improves its reliability, facilitates easier resource handling, provides seamless expansion, increases security through resource confinement, and advances CI/CD processes.
Your Dockerfile should include the following sections: a base image of Node.js, setting up the working directory, copying the required files, installing dependencies, projecting application code, exposing ports, and setting up the command that runs during startup.
To optimize your image size, use multi-stage builds with lightweight base images like Alpine, install only production dependencies, purge npm cache, and structure your .dockerignore to include patterns for files that should not be included.
Avoid hardcoding sensitive values and instead use ENV in the Dockerfile, the ‘-e’ flag with docker run, or docker-compose.yml environment sections for flexible value injection.
Data can be persisted across container instantiations using Docker’s volume mounts or persistent storage options.
Always execute as an unprivileged user, reference specific image tags as opposed to the latest, signal and process final clean up, implement health checks, and build with a cache-friendly architecture.
Expose the debugging ports with Docker’s port mapping, mount the source code to volumes for hot reloading, apply Docker’s logging tools, and utilize specialized software like the features of the debugging container in VS Code.