How to Fix WordPress RSS Feed Errors
RSS feeds continue to be a stable presence in the const...
WordPress Multisite is a powerful feature that allows you to manage multiple WordPress websites under a single installation. This is particularly useful for organizations with multiple blog networks of sites or businesses that want to create a community of sub-sites.
In this post, we will cover the step-by-step process of installing and setting up a WordPress multisite network so you can streamline your website management and enhance scalability.
WordPress Multisite is a feature that allows you to manage multiple WordPress websites under one WordPress installation. It is like a parent site that oversees a network of child sites. This approach is useful for organizations with multiple blogs, networks of sites, or businesses that want to create a community of sub-sites.
Following are some benefits described below while WordPress multisite setup network:
Before you create WordPress multisite network ensure you have the following:
Following are the steps described below to install WordPress multisite network:
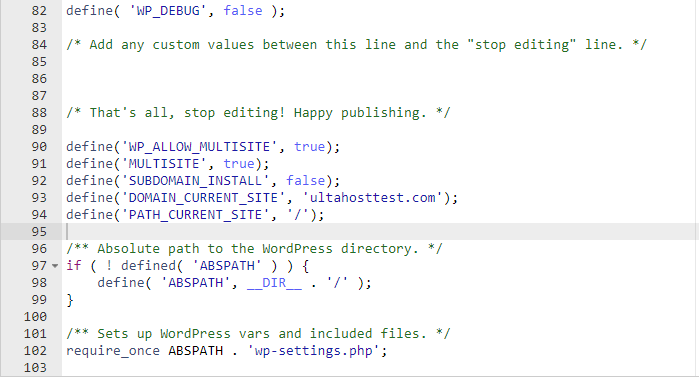
Login to your cPanel or using FTP locate the wp-config.php file in your WordPress root directory.

Add the following lines before the /* That’s all, stop editing! Happy publishing. */ line:
define('WP_ALLOW_MULTISITE', true);
define('MULTISITE', true);
define('SUBDOMAIN_INSTALL', false);
define('DOMAIN_CURRENT_SITE', 'yourdomain.com');
define('PATH_CURRENT_SITE', '/');

Replace yourdomain.com with your actual domain name. If you are using subdirectories replace / them with your desired subdirectory path.
The .htaccess file is a configuration file used by web servers like Apache to control how the server processes requests. In the WordPress multisite tutorial, it plays an important role in defining the structure and behavior of the network. If you have chosen a subdomain installation the .htaccess file is essential for mapping subdomains to their corresponding sub-sites.
Navigate to the “public_html” directory of your WordPress installation. Look for the .htaccess file.

Once you have access to the .htaccess file you can map the subdomain blog.yourdomain.com to the sub-site blog you would add the following lines to your .htaccess file:
RewriteEngine On
RewriteCond %{HTTP_HOST} ^blog\.yourdomain\.com$
RewriteRule ^(.*)$ /blog/$1 [L]
Save the changes to your file. Make sure to create a backup of your old .htaccess one to revert the changes.
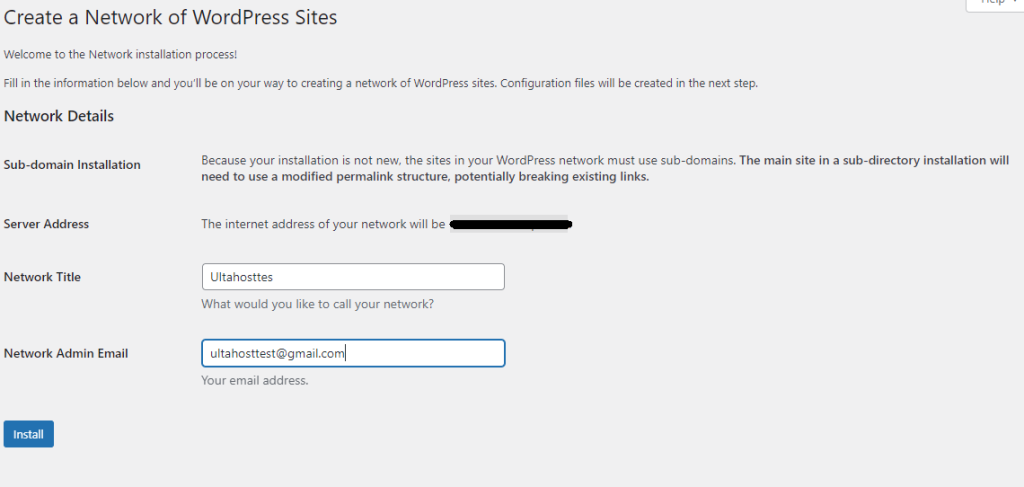
To WordPress network setup access your WordPress dashboard. Go to Tools the Network Setup.

Follow the instructions to configure your network settings. You will be asked to choose a network name, email address, and site address.
Setting Up WordPress Multisite Network on Our Cheap Hosting!
Increase the speed of your website with Ultahost’s cheap WordPress hosting and provide your visitors with the best possible faster page-loading experience.
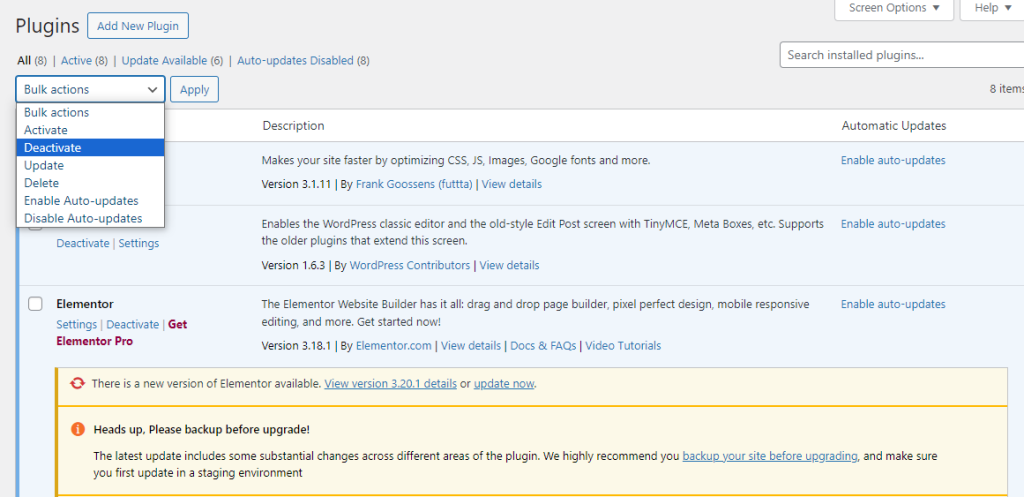
Some plugins might not work correctly in a Multisite environment. Review your plugins and ensure compatibility. You can do this by deactivating the plugins and then reactivating them one by one. To perform deactivation navigate to the “Plugins” section in your WordPress dashboard. Deactivate all plugins from “Bulk Actions”.

Install and activate any necessary Multisite-compatible plugins.
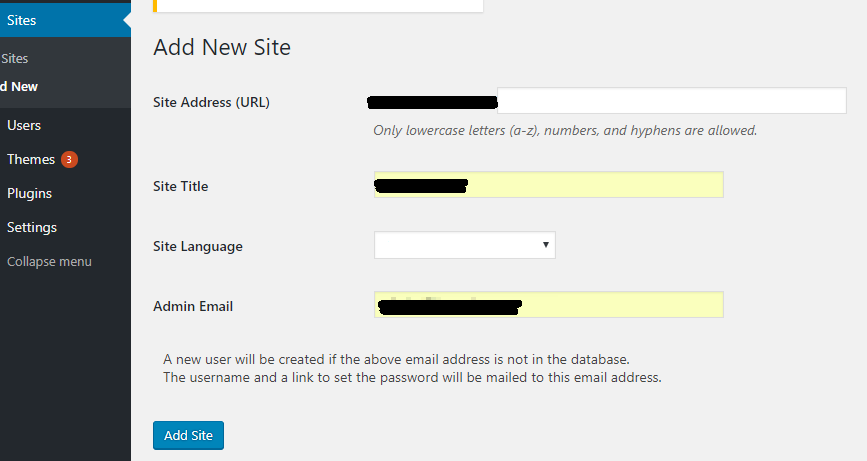
Navigate to “Network Admin” then “Sites” click “Add New” and fill in the required information for your sub-site such as site title, URL, and email address.

You can see the pages indicate the domain or subdomain name which means you have successfully configured the WordPress multisite network.
Following are some important considerations after installing WordPress multisite network:
WordPress Multisite offers a flexible and efficient way to manage multiple websites. By following these steps and considering the additional factors you can successfully set up and maintain a Multisite network according to your specific needs.
Hope you find this guide valuable. Ultahost provides WordPress hosting for agencies that host their client’s websites. Our service helps them to quickly set up client websites by providing the capability to install and manage WordPress themes and plugins with a single click.
WordPress Multisite lets you manage multiple websites from a single WordPress installation.
Yes, but it’s best to use a hosting plan that supports multisite networks for better performance.
Add a line of code to your wp-config.php file, then follow the setup instructions in your WordPress dashboard.
Yes, you can convert an existing site to a multisite by enabling the network feature.
Multisite is more complex than a regular WordPress site, so some experience with WordPress is helpful.
Yes, you can assign user roles that apply across the entire network or specific sites.
Yes, you can install plugins and themes that are available for all sites in the network.