


Ever wondered who really controls all the features and functions of your WordPress website? Maybe someone new has come along on your team, and you’re thinking about how to change their permissions. Are you going to raise or lower them? Or, maybe there is a person who has unlimited access, and you have given them the power to make changes. While they were supposed to do nothing but edit some posts. If these examples are similar to yours, then you should know that you can solve it easily. Assigning WordPress user roles is a very important part of making sure that the website is safe, working properly, and ready for expansion.
Actually, user roles in WordPress are sets of permissions given to a user that decide which actions they can do and which they cannot. It’s like a company’s organizational chart where the different roles have different access levels and the assigned tasks. A poor strategy for the management of the roles may lead to the highest exposure to security incidents, data breaches, and productivity loss.
This tutorial will explain to you how to manage and customize user roles in WordPress step by step. First, we will have a look at the default roles that WordPress grants. Second, when discussing the necessity of creating custom roles. We will introduce the use of plugins and some code snippets for the adventurous.
Key Takeaways: Mastering WordPress User Roles
- Control-wise, Roles Are a Must: User roles in WordPress give the admin the power to restrict or allow specific activities on the website. These powers (capabilities) represent particular user “rights” for keeping the site safe and well-managed by a group of users.
- The Role of Default (Built-in) WordPress Roles: The default roles in WordPress are (Administrator, Editor, Author, Contributor, Subscriber, Super Admin for Multisite). Look at their set capabilities to better understand the baseline for user access.
- Custom Roles Provide You Accuracy: The default roles are usually not enough. Defining custom roles lets you give just the right permissions that fit your site’s particular requirements (e.g., Shop Manager, SEO Editor), thus improving security and flow of work to a great extent.
- Using Plugins is Mostly (Easily) the Way: Plugins are for most users the easiest, safest, and most feature-rich option to create, alter, and manage user roles and capabilities without the need for code writing.
- Code is for Precise Control of the Highest Level: Developers are able to make use of WordPress’s inbuilt functionalities (such as
add_role()) to directly create, and handle roles through code, thus, providing the most customization and integration. - Efficient User Management Needs Ongoing Effort: Not just about role creation, you also have to know how to assign them to new and existing users, change them over time, and remove them when no longer needed. Besides limiting dashboard access to front-end roles is also very important.
- Prioritize Security Best Practices:
- Least Privilege: Users should be given just the minimum set of rights that they need to perform their job.
- Regular Audits: In addition to checking user accounts and roles, you should also do this kind of work through different time intervals.
- Strong Security: Apart from enforcing strong passwords, you should also consider using 2FA (Two-Factor Authentication).
- Backups & Testing: Before you make any significant changes to your site, ensure you have a backup. In addition, any new custom roles should be fully tested.
- Choose the Right Tools: The first step is to pick user role management plug-ins that
Explore the Default WordPress User Roles
We will discuss custom permissions, but initially, let’s look at the most interesting custom permissions. That come from default roles and are set automatically in every WordPress installation. A role is basically a set of capabilities (permissions) that can be carried out. For example, a capability edit_posts grant the user the right to edit posts. While manage_options allows the user to change the site settings.
Let’s go over the primary WordPress user roles and their respective functions:
- Administrator: This role is regarded as the site owner or super user. It is the most powerful one. An Administrator has complete access to almost everything in your WordPress site. Including: installing and deleting themes and plugins, creating and managing all users (even other Administrators), editing all content, managing settings, and virtually everything else on the site.
- When to use: This person can technically engage the primary editable controls of the site; however, it is wise to limit this role to only the main site owners and primary developers.
- Security warning: The more Administrator accounts there are, the more vulnerable the site becomes. As such, it is extremely critical to limit the number of users with this role, given the sensitive access it provides.
- Editor: Managing content with this role is made easier for users. As the Editor role gives them the ability to manage all content on the site without restrictions. Editors can create, edit, publish, and delete any post or page, as well as comment, category, and tag files. They can also manage media library uploads.
- When to use: As described, this role can be assigned to members of the content editorial team or those tasked with managing content on a multi-authored blog or news platform.
- Author: An Author’s actions are limited to writing, editing, publishing, and deleting only their posts. They can also upload files to the media library. Authors are blind to other users’ posts and cannot manage comments, tags, categories, or any other form of content moderation. Regular blog contributors are responsible for the entire writing process from creating a draft to publishing.
- When to use: Best suited for those who regularly write for the blog and are completely in charge of the whole
- Contributor: An Author has a lesser degree of capability to publish content than a Contributor. Only writing and editing of their posts are allowed to a Contributor. But they cannot publish. An Editor or Administrator has to confirm that their posts are published before they can be published. By default, Contributors are also not permitted to upload media files.
- When to use: Suitable for a guest blogging team of writers, junior reporters and anyone whose content must be checked for approval, this tool is an aid in maintaining high quality and ensuring compliance with the publication’s standards.
- Subscriber: A Subscriber is the default role with the most limited privileges. Such users can only change their personal profile information and read the site’s content. Subscribers are not allowed to create, edit or publish any content and they are out of the WordPress dashboard except their profile settings.
- When to use: Membership websites are the main beneficiaries here and also the forums or blogs where users must register to comment, to have access to exclusive content, or to carry out their public profile’s management (the function is usually used along with other plugins).
- Super Admin (for WordPress Multisite): The Super Admin role in a WordPress Multisite network has been thus explicated for this. A Super Admin is the person who oversees the whole network. It has the ability to add and delete sites, manage themes and plugins at a network level. And access all users for all sites within the network. To put it simply, they have Administrator-level access to the entire multisite environment.
- When to use: Protect this user for the main administrator of a WordPress Multisite setup.
Here is a reference table summarizing the core functions of default WordPress user roles:
| User Role | Key Capabilities | Ideal For |
|---|---|---|
| Administrator | Complete control (settings, plugins, themes, users, all content) | Site owner, leading developer |
| Editor | Manage all posts/pages, comments, categories, and tags | Content manager, editorial team |
| Author | Create, edit, publish, and delete their posts; upload files | Regular blog contributors |
| Contributor | Write/edit their posts (cannot publish); cannot upload media | Guest bloggers, new writers, and content requiring review |
| Subscriber | Manage own profile; read content | Basic site members, commenting users |
| Super Admin | Complete control over Multisite network (add/delete sites, network themes/plugins, users) | Network administrators (Multisite only) |
Knowing these default roles is definitely your initial step towards efficient WordPress user management. But, when your website expands and the needs of your team become more specialized, you will most probably realize that they standard roles are not suitable for every situation and at this point, the true power of custom roles becomes evident.
Beyond the Basics: Why You Need Custom WordPress User Roles
Although the default WordPress roles meet a variety of scenarios these cover only the most common ones. The truth is that eventually, most websites outgrow them. The specific way in which you operate may also require a more detailed approach to permissions. Just exactly here custom WordPress roles become irreplaceable.
Let us have a look at some of the frequent cases where default roles are not enough:
- E-commerce Sites: To illustrate this, let us say you operate a physical store and you want to create an online store. Besides running the store, you will need somebody who will be in charge of the product listing. He will keep the record of the orders, and will manage the refunds provided. An Editor would have too much power (e.g., changing your site’s design or settings), on the other hand, an Author or Contributor would be lacking in the e-commerce capabilities required. You need a task-specific Shop Manager role. The custom roles that re present in the e-commerce plugins such as WooCommerce, are often referred to as the roles that fit the exact need.
- Membership or Course Platforms: There are a few things you should definitely think over when it comes to designating user roles on the membership site. For example, you can assign Premium Members the role of those who have access to exclusive content, Course Instructors the role of those who manage their specific courses, and Free Members the role of those who view only public content. So the default Subscriber role is way too general and it does not give the possibility to differentiate the access tiers.
- SEO Agencies or Freelancers: In the case when resources are dedicated to an SEO professional, the latter may require access to your SEO plugin settings, make changes to meta descriptions on any post, and check site analytics. Giving them an Administrator role is like a security breach, however, an Editor might have limited access and therefore, be unable to use SEO plugins.
- Forum moderators: On a community forum, you might need moderators who can delete inappropriate comments, ban users, or manage forum topics, but you certainly don’t want them publishing blog posts or installing plugins.
- Event managers: For a site that hosts events, you might have a team member who needs to create, update, and manage event listings, process registrations, and view attendee lists, but shouldn’t have access to your blog posts or website themes.
The benefits of creating custom WordPress roles extend far beyond simply having more options:
- Security Improvement (Principle of Least Privilege): This may be the most important upside. The Principle of Least Privilege states that users should be given only the minimal permissions necessary to carry out their job functions. By establishing custom roles, you can set the access level accurately, which means that the risk of accidental deletions, unauthorized changes, or malicious activity is greatly reduced. hand out the Administrator role to everyone is equivalent to providing every employee in your company with a master key to the entire building – a very risky move.
- Simplified Workflow and Productivity: If each team member is given access to only those tools and content that are relevant to their tasks, they will be able to work more efficiently. Fewer items on their dashboard mean that they will make less mistakes and be less confused. It also lays down the responsibilities clearly, and thus makes it easier to understand.
- Better Scalability: Managing users with default roles as the team expands becomes more and more difficult, like a nightmare. Custom roles facilitate the process of incorporating new team members and assigning predefined permissions to them simultaneously, which is imperative for a growing organization.
- Tailored User Experience: Internally, a simplified dashboard designed for their position allows team members to have a better user experience. Front-end users on membership sites also benefit from custom roles as they can gain access to specific content or features, thus, their value proposition is improved.
To put it simply, custom WordPress roles give you the power to establish a permission scheme that exactly matches your company’s needs, thus creating a more secure, well-organized, and efficient website. Now, let’s see the ways you can achieve this.
WordPress Custom User Roles: Your Choices
If the point is to design custom WordPress roles that have capabilities far beyond default ones, you are basically limited to two paths: first, using a plugin (the most recommended way for most users), and secondly, writing code. Each of them has some good and bad sides, and the best choice depends on your coding skills and particular needs.
Method 1: Plugin Usage (Most Users)
In most cases, WordPress users, bloggers, and even developers agree that a plugin is the simplest and safest way to deal with user roles in WordPress. Those plugins provide a very easy and safe environment that really hides all the programming details, and you can create, change, and assign capabilities only with several clicks.
Reasons Why Plugins Are the Most Suitable
- No Coding Required: You do not have to write any PHP code or know even one line.
- Easy Interface: Most of the time, plugins are providing a simple interface with checkboxes which allow you to select capabilities.
- Security: They ensure that you do not unintentionally commit a mistake that will lead to a crash of your site or that you will be locked out.
- Updates: Usually, changes in plugins are compatible with WordPress core updates; however, direct changes in the code might be incompatible in some cases.
- Advanced Features: Many plugins, apart from the user roles changing function, also have features such as restricting content, multiple role assignments, and dashboard customization.
General Step-by-Step Guide Using a Plugin
Despite the fact that there are some differences between plugins, the basic technique remains almost unchanged.
- Set the New Role: Once having done this, you can either assign the new role to the current users by changing their profiles in the Users section or you can do so while adding new users to your site.
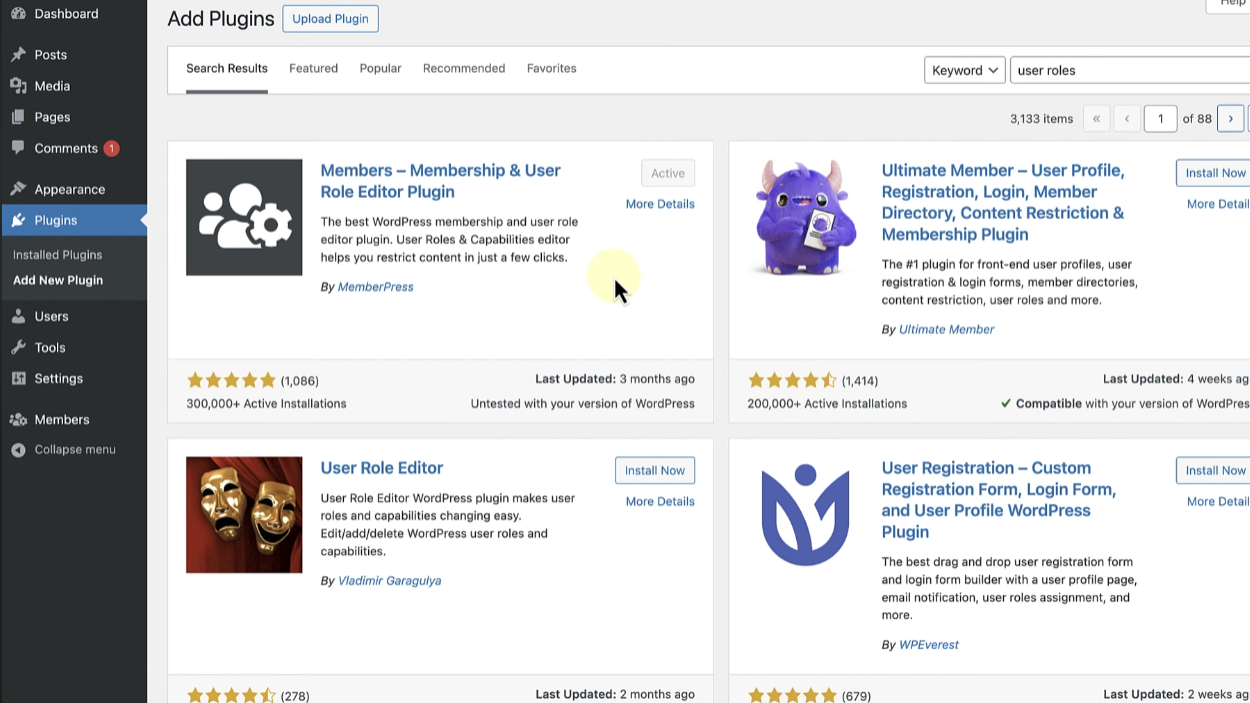
- Pick and install a Plugin: Look for a reputable WordPress role editor plugin in the WordPress plugin repository (a few popular ones will be proposed later). Just like with any other software, get, set up, and turn it on.
- Access Plugin Settings: Typically, after the activation, the location of the plugin settings is under Users in your WordPress dashboard or somewhat nowadays it can be found under a separate top-level menu.
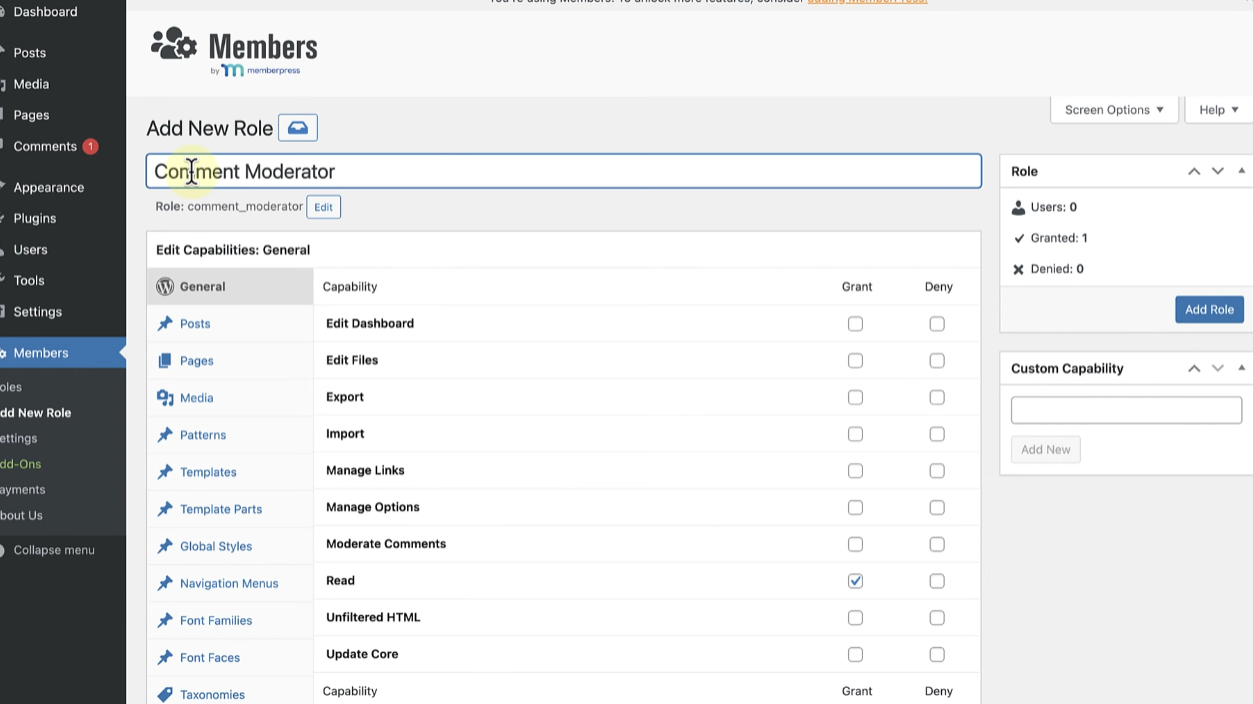
- Add a New Role: Locate an element like Add New Role, Create Role, or Add Role.
- Explain your role:
- Role Name (ID/Slug): It is the unique identifier of the role internally (e.g.,
product_manager). It has to be in lowercase and only letters, numbers, and underscores are allowed. - Display Name: It is the human-friendly term that will be registered on your WordPress dashboard (e.g., “Product Manager”).
- Copy From (Optional): Generally, plugins give you an option to take the capabilities of an existing role (e.g., Editor) and use them for your new role by copying them, which will be the quickest way for you.
- Role Name (ID/Slug): It is the unique identifier of the role internally (e.g.,
- Choose Skills: Firstly, you are supposed to select skills. It represents the most important step. You will get the entire list of WordPress user roles and permissions from which you will choose. Follow me in this one, you are to place marks only near those capabilities that will characterize your new role.
- Tip: Be very careful! Only mark those capabilities that are really needed for a job. This complies with the Principle of Least Privilege.
- Typical Capacities: For example, if you are setting up the Product Manager role on an online store, you may select a list of capabilities such as
read,edit_products,publish_products,delete_products,manage_woocommerce,view_woocommerce_reports, and similar.
- Save the Role: Click on the Add Role or Save Changes button.
- Set the New Role: Once having done this, you can either assign the new role to the current users by changing their profiles in the “Users” section or you can do so while adding new users to your site.
Build Smarter with UltaHost WordPress Hosting
No matter if you’re running a company website or pursuing your first online project, our WordPress Hosting combines reliability, flexibility, and ease of use. Experience faster loading times, rock-solid security, and the resources you need to stay ahead.
Example Walkthrough: Creating a Role with a Plugin
What if you have a special role of an SEO expert to optimize the content but the person should not have full rights of a publisher and be allowed to install no plugins?
In the case of a plugin such as User Role Editor (one of the best choices) here are some steps to take:
- Go to Plugins > Add New, search for “User Role Editor”, install it, and then activate.
- Navigate to Users > User Role Editor.
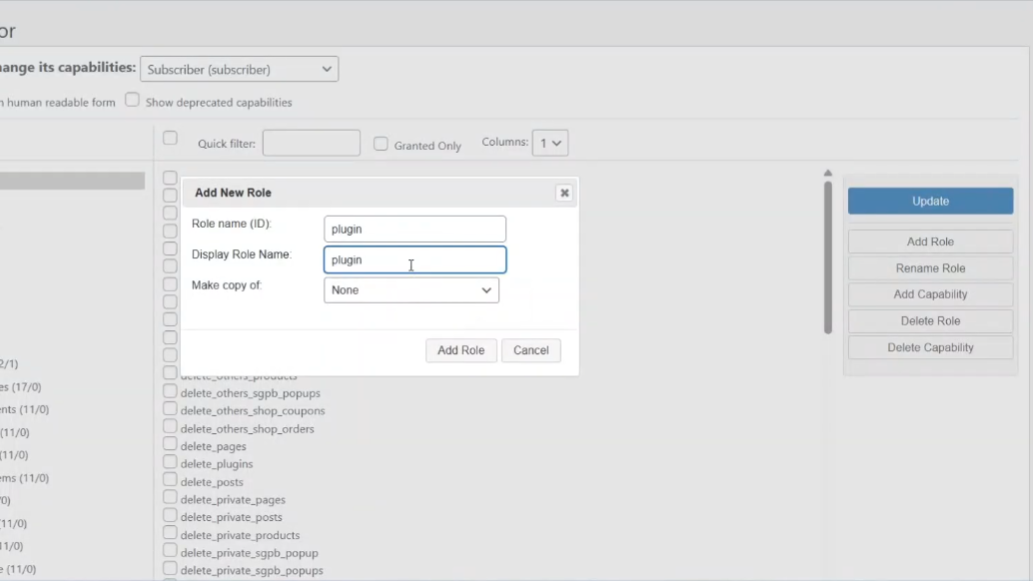
- At the top, select “Add Role”.
- Enter the Role ID as SEO Editor or
pluginand the Display Role Name as “SEO Editor orplugin“. You might choose to “Make a copy of” the Author as a starting point. - Click “Add Role”.
- Now, on the primary User Role Editor screen, select “SEO Editor or
plugin” from the dropdown menu. - Review the capabilities. You’ll want to ensure the read is checked. Then, you might specifically look for:
edit_posts,edit_others_posts(so they can edit all posts for SEO purposes).edit_published_posts(if you want them to be able to save changes to live posts).upload_files(to add images if needed for SEO).- Potentially capabilities related to specific SEO plugins (e.g., if you use Yoast SEO, you might find capabilities like
wpseo_manage_options,wpseo_edit_advanced_metadata, which you could check if the plugin integrates with URE). - Crucially, ensure capabilities like
install_plugins,manage_options,delete_users,switch_themes, etc., are unchecked.
- Click Update Role.
Just like that, if you assign a user to the “SEO Editor or plugin” role, they will have the exact same permissions that you have.
Method 2: Manual Code (For Developers or Advanced Users)
Without a doubt, if you are a PHP programmer and WordPress developer, you can also do the same things directly via code and create and manage WordPress user roles. This way you still have the highest level of flexibility but also a bit riskier if you are not careful.
Precautions You Must Take Before Starting To Write The Code:
- Backup Your Site: Before you make any changes to the code, ensure that you have a complete backup of the WordPress site which includes the database and all the files.
- Use a Child Theme or Custom Plugin: The safest way to add it is through a child theme or a custom plugin if you want to add code directly to your site. In other words, if you are not using a child theme, do not directly change the theme’s functions.php file. When a theme is updated, the changes made in the parent theme will be lost. The safest way to add your code for this site is through a small custom plugin.
- Know the Capabilities: You need to be sure of the exact names of the WordPress capabilities that you want to assign. The WordPress Codex (developer documentation) is a very thorough source where you can find this information.
Core WordPress Functions for Role Management:
- add_role( $role, $display_name, $capabilities ): This function is used to create a new user role in the system.
- $role: (string) The ID of the role that has to be unique (e.g.,
product_manager). - $display_name: (string) It is a name that is easily understood by the users (e.g., “Product Manager”).
- $capabilities: (array) This represents a key-value pair where the keys are the names of the capabilities (e.g., ‘
edit_posts‘) and the values are booleans (true for grant and false - remove_role( $role ): Eliminates a user role that is present.
- add_cap( $capability, $grant ): Allows a capability to be assigned to a role that is already there.
- remove_cap( $capability ): Revokes a capability from a role
Sample Code Snippet for Adding a Custom Role:
Below is just one of the ways you can add a role called Event Manager. Usually, this code should be inserted in the functions.php file of your child theme or better still in a custom plugin file.
<?php
/**
 * Plugin Name: Custom User Roles Manager
 * Description: Manages custom user roles for the site.
 * Version: 1.0
 * Author: Shahrukh Sial
 */

// Hook into WordPress's 'init' action to add our custom role
function my_custom_add_roles() {
    // Check if the role already exists to prevent errors on multiple runs
    if ( get_role( 'event_manager' ) === null ) {
        add_role(
            'event_manager', // Internal name (slug) of the role
            __( 'Event Manager', 'your-text-domain' ), // Display name for the role
            array(
                'read'                  => true,    // Can read posts and pages
                'edit_posts'            => true,    // Can edit their own posts
                'edit_others_posts'     => true,    // Can edit posts by other users
                'publish_posts'         => true,    // Can publish posts
                'delete_posts'          => true,    // Can delete their own posts
                'delete_others_posts'   => true,    // Can delete posts by other users
                'edit_pages'            => true,    // Can edit their own pages
                'edit_others_pages'     => true,    // Can edit pages by other users
                'publish_pages'         => true,    // Can publish pages
                'delete_pages'          => true,    // Can delete their own pages
                'delete_others_pages'   => true,    // Can delete pages by other users
                'manage_categories'     => true,    // Can manage categories and tags
                'upload_files'          => true,    // Can upload files to the media library
                'moderate_comments'     => true,    // Can moderate comments
                // Custom capabilities specific to event plugins (examples might vary)
                'edit_events'           => true,
                'publish_events'        => true,
                'manage_event_registrations' => true,
                'delete_events'         => true
            )
        );
    }
}
add_action( 'init', 'my_custom_add_roles' );

// Important: To remove a role, you would use this code *once*, then delete it
// function my_custom_remove_roles() {
//     remove_role( 'event_manager' );
// }
// add_action( 'init', 'my_custom_remove_roles' ); // Uncomment to run, then remove this line!

// Example: Adding a specific capability to an existing role (e.g., Editor)
function my_custom_add_cap_to_editor() {
    $editor_role = get_role( 'editor' ); // Get the Editor role object
    if ( $editor_role ) {
        // Add a new capability for managing specific SEO settings
        $editor_role->add_cap( 'manage_seo_settings' );
    }
}
// add_action( 'init', 'my_custom_add_cap_to_editor' ); // Uncomment to run, then remove this line!
Explanation of the Code:
- my_custom_add_roles() function: The function that wraps the
add_role()call is this one. - add_action( ‘init’, ‘my_custom_add_roles’): This line tells that our function is to be executed at the time WordPress is initializing, which is the right moment to register new roles.
- get_role( ‘event_manager’ ) === null: The condition protects the code from generating an error from the add_role function when you execute it several times (e.g., every page load). The role is added only if it doesn’t exist yet.
- ‘event_manager’: The name of your new role which will be in the code.
- __( ‘Event Manager’, ‘your-text-domain’ ): This is the display name that users will see in the dashboard. Your-text-domain must be replaced with the theme or plugin’s text domain for translation.
- array(…): The list of capabilities. True grants the capability, false denies it. I have used a mix of standard WordPress capabilities and ones that are possibly created by the event plugin that are registered (e.g., edit_events)…
- my_custom_remove_roles() function: (Commented out) This is basically how you remove a role by way of the
remove_role()function. Generally, you would execute this once when you decide to delete the custom role and then remove this code from the file. - my_custom_add_cap_to_editor() function: (Commented out) This shows how to add one capability to a certain role with
get_role()and the role object’sadd_cap()method.
Though coding gives the most control, it demands meticulousness and a deep understanding of WordPress capabilities. However, plugins significantly reduce this effort for most users, thus making WordPress role editor jobs much easier to perform.
Mastering User Management: Changing and Allocating Roles
After you configure your custom and default WordPress roles, the following significant step is to administer and give those roles to your users effectively. This means that you do not only put users in the correct roles but also learn how to change the permissions if the situation changes, or even how to limit dashboard access for certain roles.
Modifying Default and Custom Roles
Things change and, therefore, your team members’ responsibilities may also. You may have to insert a new permission into a role of the existing ones or get rid of the one that is no longer required.
With a Plugin (Recommended)
This method is extremely the easiest for you to change the roles that already exist.
- Open up the interface of the WordPress role editor plugin you use (for example, Users > User Role Editor).
- Pick the role you want to change in the dropdown list (it can be a default one such as “Editor” or a custom one like “Product Manager”).
- Capability list will be shown. Just check or uncheck the boxes next to the permissions that you want to add or delete for the role in question.
- Press the “Update Role” or “Save Changes” button.
Default Roles
A Word of Caution. While plugins permit you to change the default roles, it is still generally considered a best practice to create a new custom role with the desired permissions and use it instead of changing default ones directly.
This not only avoids possible conflicts with future WordPress updates and provides a cleaner separation. It enables you to switch back to the standard setup, if required. But also keeps things tidy and makes it easier to update new releases by using the plugin with any unmanaged VPS hosting service.
Manually via Code
When you created roles by code to modify them, you would change the capabilities array of your add_role() function, or use add_cap() and remove_cap() functions.
Don’t forget to run these modification functions once (typically by uncommenting them temporarily in your init hook) and then remove or comment them out to stop them from running on every page load. This method is more complicated and therefore, a better decision for developers.
Assigning Roles to Users
After you have specified your roles, it is simple to assign them to your users.
Adding New Users
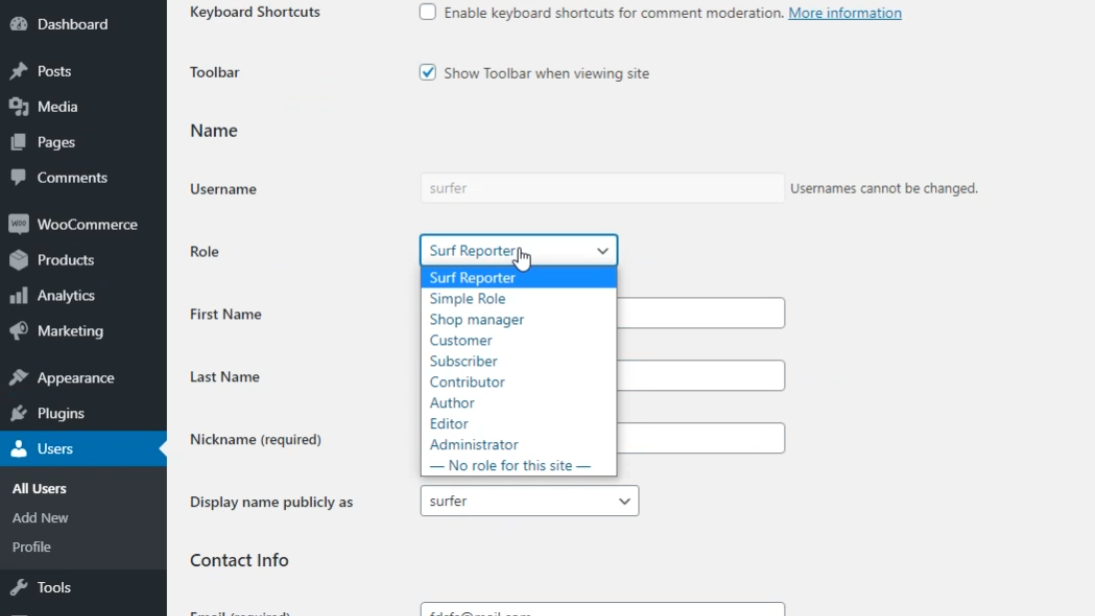
- Navigate to Users > Add WordPress and add user role in your dashboard.
- Provide all necessary information for the new user (username, email, password, etc.).
- From the “Role” dropdown menu, select the appropriate role (default or custom) for the new user.
- Click Add New User.
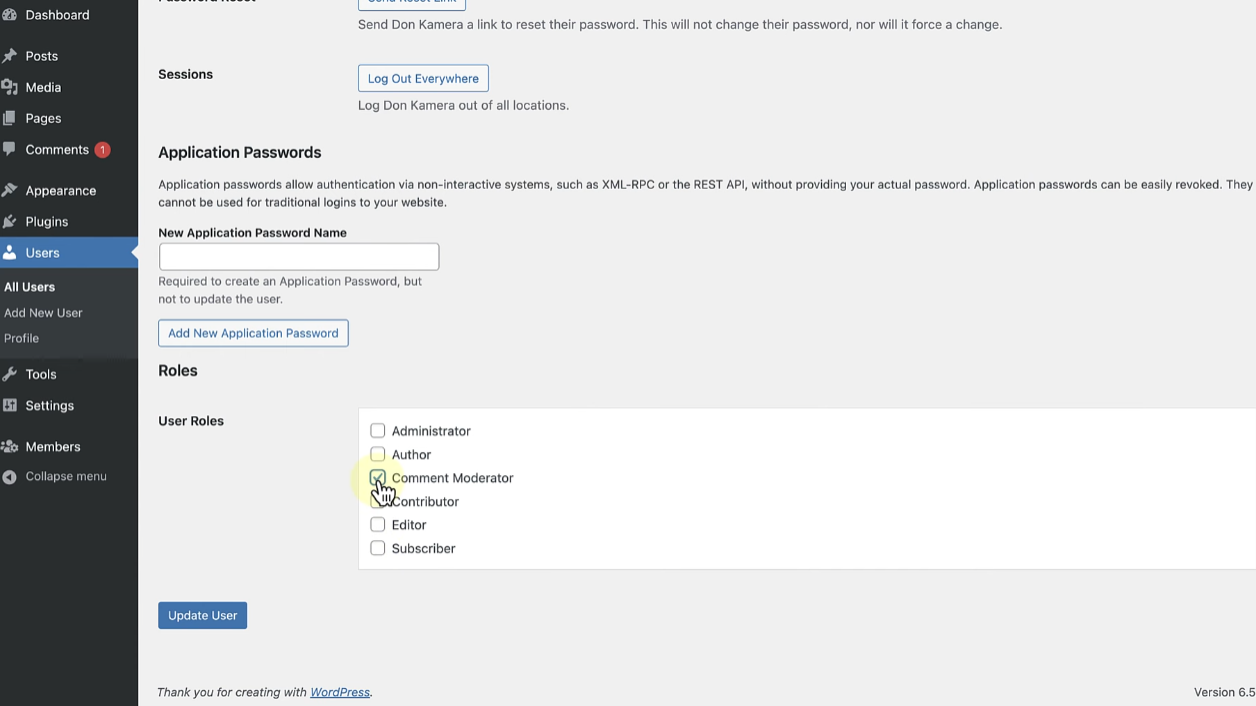
For Existing Users
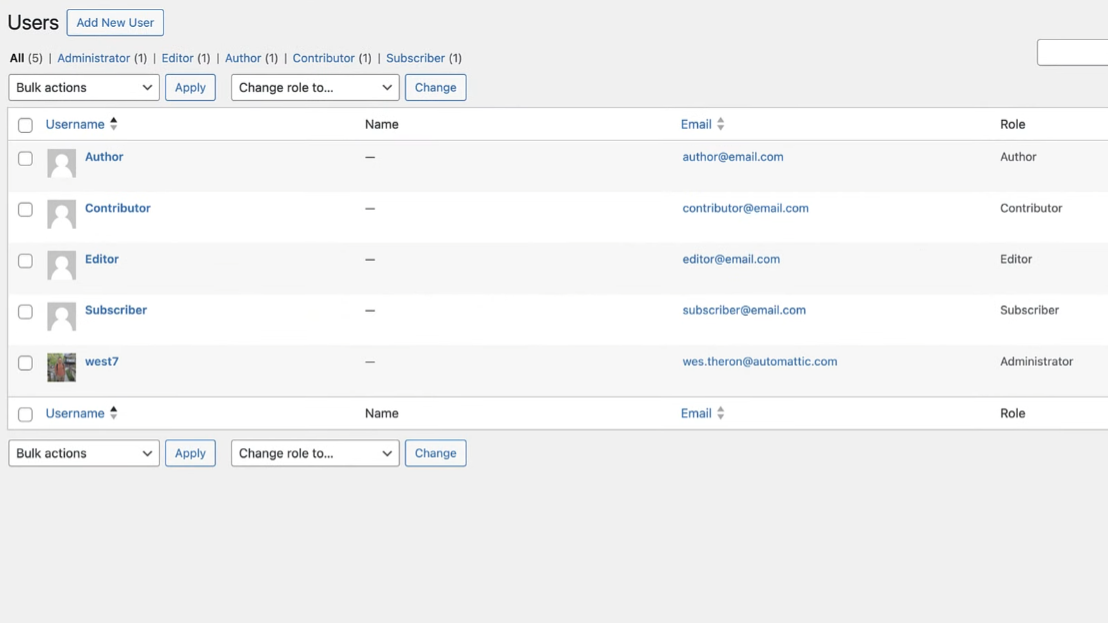
- Navigate to Users > All Users in your WordPress dashboard.
- Move the mouse over the user you want to change and click “Edit”.
- Go down to the “Role” dropdown menu.
- Pick up the new role you want to give them.
- Click Update user role WordPress.
Bulk Editing Roles
If you are looking to give a new role to multiple users at a time:
- Go to Users > All Users.
- Tick the boxes next to the users you want to change.
- In the “Bulk Actions” dropdown at the top of the list, select “Change role to…”
- From the second dropdown that appears, choose the role you want.
- Click “Apply”.
Removing User Roles
Removing a custom WordPress user role should be done very cautiously.
- Using a Plugin: Most WordPress role editor plugins provide the feature of a “Delete” or “Remove” custom role in the first place. In most cases, the plugin will give you a prompt. To reassign the users currently using the role to another role before it is deleted.
- Manually via Code: In case the role was created with the
add_role()function, it can be deleted by invoking theremove_role('your_role_slug')within an init hook in turn. However, this action shall be done only once, further, it is necessary to remove the code. - What Happens to Users? If a role is completely removed, then there will be no users with that role in the system. In this instance, the only option would be the solution implemented by WordPress where the users will be assigned the “Subscriber” role by default or another role of your choice. Therefore, reassigning them before deletion via a plugin is safer.
Restricting WordPress Dashboard Access (WordPress dashboard access, edit user permissions WordPress)
Typical end-user issues revolve around preventing current subscribers or new front-end roles created from accessing the dashboard behind-the-scenes at any time. An important aspect of editing user permissions in WordPress involves access control and simplifies the interface to make it more user-friendly.
Using a Plugin
The easiest method to restrict dashboard access is by utilizing the appropriate user management tools for WordPress. That allows for a simple restriction setting. For example, with the “User Role Editor” or “Members” feature, unchecking the read capability (which is necessary to access the dashboard) for specific roles can be a way of achieving this, or simply just turning the “Prevent Dashboard Access” option on, if available. The only place they can be after this is the site front-end. So, if someone with such role attempts to access the backend, they will be automatically switched to the front-end.
Manually via Code (Advanced)
You can also do this by writing your own code that verifies a user’s role on a dashboard entry and hence redirects them. But this method is more complicated and less suitable for non-developers than using a reliable plugin.
By realizing how to change, give, and limit roles, you are given strong control over the user environment of your WordPress site. Which allows you to make sure that everyone has the acceptable level of access for their work.
Top WordPress Plugins for User Role Management
It is possible to handle WordPress user roles by writing code. But plugins are far the easiest, safest and most feature-rich option for the majority of users. They make it a cakewalk to come up with custom roles, assign WordPress capabilities, and manage WordPress plugins for user administration. Now, let us consider some of the best ones:
| Plugin Name | Key Features | Ideal For | Pricing (Free/Pro) |
|---|---|---|---|
| User Role Editor | Create/edit custom roles, add/remove capabilities (granular control), assign multiple roles per user (Pro), migrate users between roles, manage capabilities for custom post types, and export/import roles—all with a User-Friendly interface. | Beginners to advanced users need granular control over permissions without coding. | Free & Premium |
| Members | Create/ WordPress edit roles, assign capabilities, and utilize built-in content restriction (shortcodes & blocks). Additionally, use shortcodes for conditional display, enable the Private Site option, and control widget visibility. Focuses on content access alongside roles. | Bloggers, content creators, or small membership sites need simple content restriction based on user roles. | Free |
| PublishPress Capabilities | Granular control over specific content types (posts, pages, custom post types), taxonomies, and custom statuses. Includes revision control, front-end editing permissions. Excellent for editorial workflows. | Multi-author blogs, news sites, or anyone needing exact control over publishing and content workflows. | Free & Premium |
| Advanced Access Manager (AAM) | Highly granular access control for almost everything: content, pages, posts, custom post types, categories, tags, menus, widgets, plugins, media, even specific parts of the dashboard. Login/logout redirects, content protection, and time-based access. | High-security needs, complex multi-user environments, or developers needing fine-grained control and custom rules. | Free & Premium |
| WP User Manager | Beyond just roles: front-end user profiles, custom registration forms, custom user fields, content restriction, password reset, email notifications. Integrates with WooCommerce, Mailchimp, etc. | Membership sites, community sites, or anyone needing a robust front-end user dashboard and registration system. | Free & Premium |
| MemberPress | (Full-fledged Membership Plugin) Manages membership levels, content protection (rules), payment gateways, subscriptions, online courses (add-on), user management, and custom roles tied to membership levels. | Serious membership sites or online course platforms where user roles are intrinsically linked to paid subscriptions. | Premium |
Conclusion
WordPress user roles are definitely not technical specifications alone. They are an indirect method of increasing your website’s security, productivity, and harmony. If roles are managed correctly, you get the power to decide who can or cannot perform various functions on your site.
Three main steps are there to carry out a user roles management in an efficient manner:
- Get acquainted with WordPress roles by default
- Recognize the situation when it is necessary to make a new custom role
- For complex user management, use plugins (or custom code) which are going to help a lot.
Look for a WordPress role editor plugin that is simple, matches your purposes, and inspires you. If you’re a developer, it’s even possible to write custom code. Thus create the roles that are customized according to your site’s requirements.
If you’re exploring flexible hosting solutions, check out Ultahost VPS hosting for affordable and reliable options that meet your growing business needs. Whether you need scalability, security, or better SEO rankings, a VPS Server can make a big difference.
FAQ
Why can’t I see the option to add or edit user roles in my WordPress dashboard?
You likely don’t have the necessary permissions. Only Administrators can typically manage user roles. If you’re a lower-level user, ask an Administrator to help or adjust your role. Sometimes, security plugins can also hide these options, so check your plugin settings.
Is it safe to give multiple users the Administrator role?
No, it’s generally not safe. The Administrator role has full control over your WordPress site. It’s best to keep the number of Administrators to a bare minimum, adhering to the Principle of Least Privilege to boost your site’s security.
What’s the main difference between creating a custom role with a plugin versus using code?
Using a plugin is easier and doesn’t require coding, making it ideal for most users. Using code offers more precise control and avoids third-party software but demands technical knowledge and careful implementation to prevent issues with your WordPress site.
If I delete a custom user role, what happens to the users assigned to it?
When a custom user role is deleted, any users previously assigned to it will automatically revert to the default Subscriber role. Their content usually remains, but their permissions will be severely limited. Always reassign them to an appropriate role immediately.
Can I assign a single user more than one role at a time?
By default, WordPress only allows one role per user. However, some plugins, like User Role Editor’s Pro version, allow you to assign multiple roles to a single user for more flexible permission management.
Will custom user roles disappear if I switch themes?
If your custom roles were created using code placed directly in your theme’s functions.php file, yes, they will disappear with a theme switch. To make them permanent, place the code in a custom plugin instead. Roles created with a plugin typically persist as they’re stored in the database.
Why would a Contributor not be able to upload images?
The Contributor role is intentionally restricted for security and workflow. By default, they lack the upload_files capability, meaning they can’t upload media. Their posts are meant for review by Editors or Administrators. To allow a Contributor to upload files, you’d need to create a custom role or modify their existing permissions via a plugin.


