
How to Install Dev-C++ on Windows 10
Dev-C++ is a lightweight and user-friendly integrated d...


Rust, a systems of rust programming language, is gaining traction in the developer community due to its focus on safety, performance, and conciseness. By design, Rust prevents common errors like null pointer dereferences, data races, and undefined behavior, ensuring that your code is memory-safe and thread-safe. This modern language is built to empower developers to craft robust, efficient, and maintainable software systems. With Rust, you can write low-level code such as C or C++, but with the added benefits of modern abstractions and safeguards.
As Rust’s popularity grows, so does the demand for a seamless installation experience on Windows. Fortunately, the Rust team has made it easy to get started with install rust windows on your system. By following a few simple steps, you can install Rust and start exploring its features. This guide will walk you through the process, from downloading the Rust installer to verifying your installation and setting up your development environment. By the end of this tutorial, you’ll be ready to start building Rust projects on your Windows machine, leveraging the language’s unique strengths to craft faster, safer, and more reliable software.
To get started with Rust on Windows, you’ll need to download rust for windows and install the Rust compiler and its dependencies. Follow these step-by-step instructions to ensure a smooth installation process.
Step 1: Download the Rust Installer
Visit the official Rust installation page to download the Rust installer. On this page, you’ll find two types of installers: 32-bit and 64-bit. It’s essential to choose the correct installer for your system architecture:
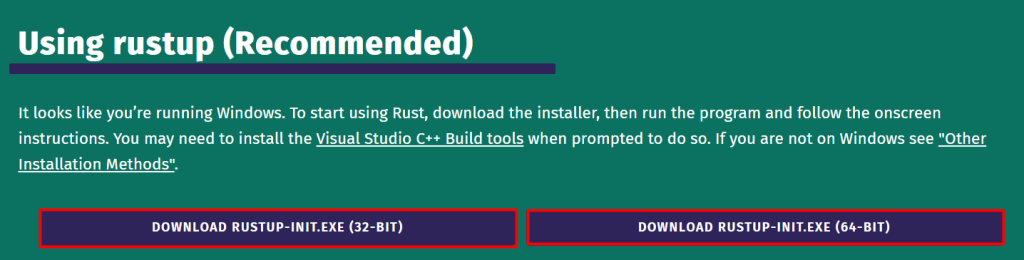
Once you’ve selected the correct installer, click on the download link to save the file to your computer.
Explore the Blazing Fast Speed of Windows VPS!
With Ultahost, hosting a Windows VPS is now more straightforward and faster than ever. Enjoy ultra-fast SSD NVMe speeds without any interruptions or slowdowns.
Step 2: Run the Installer
After downloading the installer, navigate to your Downloads folder (or wherever your browser saves files) and locate the downloaded file. Double-click on this file to run the installer.
The Rust installer will launch in a command prompt window. You will be presented with several options:
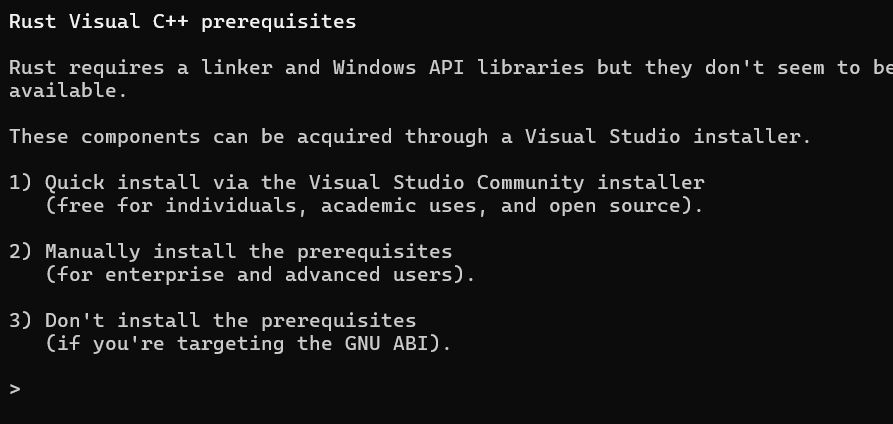
So after pressing 1, the first thing it will do is to download Visual Studio.
As you progress through the Rust installation process, you’ll encounter a few additional components that are required to ensure a seamless development experience. Let’s break down what these components are and why you need them:
Learn about How to Install Eclipse on Windows.

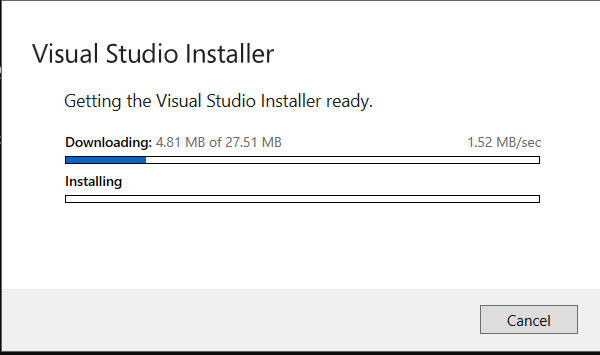
The installer will download and install the necessary Rust components. This may take a few minutes depending on your internet speed. Once the installation is complete, you will see a message confirming the successful installation.

Now that you’ve installed Visual Studio and the additional components, it’s time to install Rust and its various components. To do this, simply press 1 again to continue with the installation process.
The Rust installer will now download and install the Rust compiler, Cargo (Rust’s package manager), and other essential tools. This may take a few minutes, depending on your internet connection and system speed.
During the installation process, the Rust installer will automatically configure the PATH environment variable for you. This means you don’t need to manually add any paths to the environment variables, as the installer will take care of this step for you.
Step 3: Verify the Installation
Once the installation is complete, open a new command prompt or terminal to verify that Rust has been installed correctly. To do this, type the following command and press Enter:
rustc --version

This command should display the version of the Rust compiler you just installed, along with other information.
If you see an error message or no output, check that you’ve configured the PATH environment variable correctly and try again.
By moving the verification step to after setting up the PATH environment variable, you should be able to successfully verify that Rust is installed and ready to use.
Rust is a powerful and versatile programming language that offers numerous benefits when used on Windows. Here are some of the advantages of using Rust on Windows:
Memory Safety
Rust is designed with memory safety in mind, which means that it prevents common errors like null pointer dereferences and data races. This ensures that your code is secure and reliable, even in the face of complex and concurrent programming.
Performance
Rust is a systems programming language that is capable of producing highly optimized machine code. This means that Rust programs can run at incredible speeds, making it an ideal choice for applications that require raw performance.
Concurrency
Rust provides a robust concurrency model that makes it easy to write concurrent code. This allows you to take full advantage of modern multi-core processors, ensuring that your programs are fast and responsive.
Cross-Platform Compatibility
Rust is a cross-platform language that can run on multiple operating systems, including Windows, macOS, and multiple Linux distributions. This makes it an ideal choice for developers who need to deploy their applications on multiple platforms.
Installing Rust on Windows is a straightforward process that requires just a few simple steps. By following this guide, you’ve successfully downloaded and installed the Rust compiler and its dependencies, including Visual Studio and the Windows 11 SDK. You’ve also configured the PATH environment variable and verified that Rust is installed correctly.
With Rust now set up on your Windows machine, you’re ready to start building fast, safe, and reliable software applications that take advantage of Rust’s unique strengths. By choosing Rust, you’ll benefit from its memory safety features, high performance, robust concurrency model, and cross-platform compatibility.
Having completed these steps, you have successfully installed Rust on your Windows system. You are now prepared to develop robust and powerful applications with Rust. Remember, for optimal performance and seamless development, consider using Ultahost Windows hosting. You get reliable and high-speed hosting tailored to your needs.
Rust is a systems programming language focused on safety, speed, and concurrency. It is designed to be a safe alternative to languages like C and C++
Before installing Rust, ensure you have:
To install Rust on Windows, follow these steps:
rustup is an installer for the Rust programming language. It manages Rust versions and associated tools.
After installing Rust, you can verify the installation by opening a Command Prompt or PowerShell window and typing:
rustc –version
Dev-C++ is a lightweight and user-friendly integrated d...
VMware is a virtualization software that allows users t...
Python is a versatile and widely used programming langu...
Chocolatey is a package manager for Windows 10 that sim...
Filmora Video Editor is a versatile video editing softw...
If you're looking for a simple guide on how to restart ...