
How to Create a Bash Script: Step-by-Step Gui...
Bash scripts are powerful tools that allow you to autom...


It is important to create and configure a swap file on the Linux Virtual Private Server (VPS) to enhance the performance and stability of the server. The VPS swap space acts as a virtual RAM, allowing the server to process heavy operations when physical RAM is low. Efficient creation and management of the swap space can help avoid application crashes and system slowdowns even when the RAM is in high demand.
This tutorial will demonstrate how to create and manage the swap space on your Linux VPS.
Use fallocate /swapfile -l 2G to create swap space for a Linux VPS. Then, set permissions using chmod 600. Then, you can enable it with mkswap and swapon to use the space immediately. Follow the steps below for creating a swap file on a Linux VPS:
Check your system for existing swap space before creating a new swap file. For most VPS setups, a single swap file is sufficient. Run the following command to verify current swap usage.
sudo swapon --show

If the output is blank, there is no swap room available on your system. You can use the command below to verify swap space on your system.
free -h

The swap with 0B indicates that the system does not have swap space.
Experience Ultahost’s Linux VPS Today!
Unlock the full potential of a VPS at an affordable price. With our Linux VPS, you get fast, reliable, and secure hosting that scales with your needs.
Check the available disk space before adding swap space. You can check if your disk space is sufficient to add swap by using the following command.
df -h
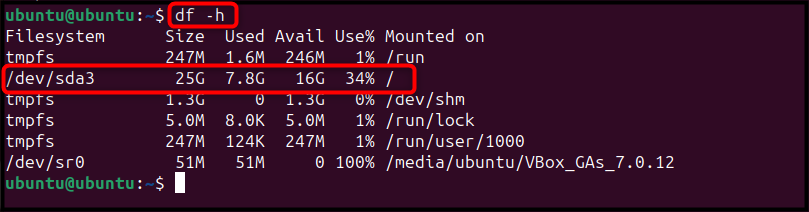
The system will mount the hard drive as /dev/sda.
After you have determined the amount of disk space available, it is time to create your swap file. This will depend on what your system requires. In general, you can create a swap file based on your RAM. You can either keep your swap space equal to the RAM size or double it.
As an example, here is how I create a 1.5GB swap space for a server with 2GB RAM using the fallocate command.
sudo fallocate -l 1.5G /swap_file_name.img

Note: You can change the swap_file_name and swap_space according to your preference.
You can verify the swap file using the following command once you have created it.
ls -lh /swap_file_name.img

Use commands such as swapon, free -h, and swapoff to manage swap space in a Linux Virtual Private Server. You can adjust performance by changing the “vm.swappiness” setting in the system configuration.
You must now convert the swap file that you created to the swap space in order for your system to detect it. Before you proceed, you should lock down the permissions of the swap files so that only root users can read their content. You can set the swap file permissions on a Linux VPS using the following command.
sudo chmod 600 /swap.img

You can mark the swap file on a Linux VPS as a swap area by using the command below.
sudo mkswap /swap.img

After this, you can then enable swap space on your system by using the following command.
sudo swapon /swap.img

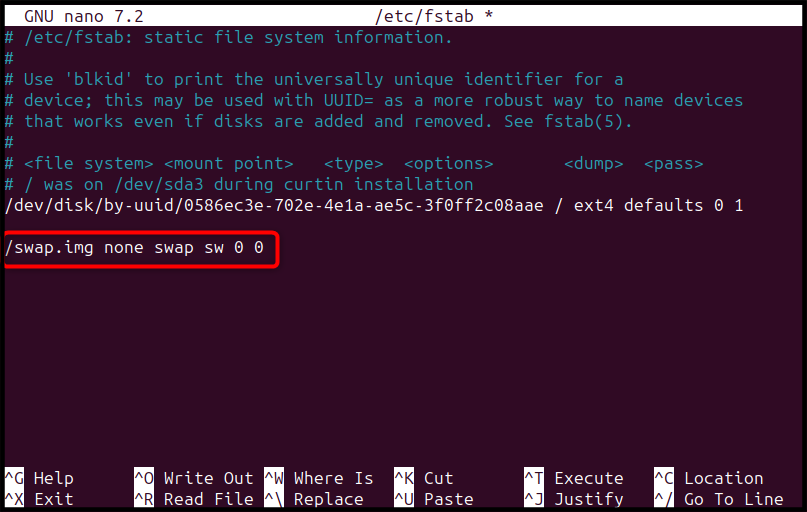
The system applies the changes you made above to enable swap space only to the current session. You will lose the changes if you restart the system. However, you can make them permanent by adding the file swap to the fstab. The command below will open the fstab on a Linux VPS.
sudo nano /etc/fstab
Add the following line to the file and save it using CTRL+X. Then add Y, and press Enter.
/swap.img none swap sw 0 0
The following command will allow you to check swap information for a Linux VPS.
sudo swapon --show

You can also check the swap space information by using the free command with the h flag.
free -h

The swappiness control parameter determines how often the system uses swap files (disk space). The swappiness value is between 0 and 100. A value near 0 makes the system avoid using the disk unless necessary. If the value is close to 100, the system swaps programs to the disk immediately. You can check the default swappiness value of 60 for Linux VPS systems by running the following command.
cat /proc/sys/vm/swappiness

The swappiness close to 60 value is a good choice for a Linux VPS desktop. For a server, you can use the following command to change the value so that it is close to zero.
sudo sysctl vm.swappiness=20

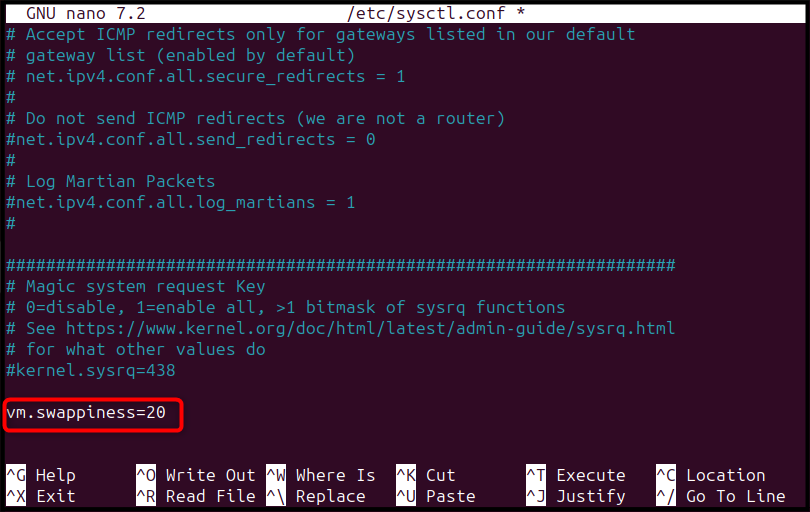
When you use the sysctl command, the system applies the swappiness value only to the current session. After you reboot the system, it removes these changes. You can set the swappinness permanently by opening the “sysctl.conf” on Linux VPS using the below command.
sudo nano /etc/sysctl.conf
Add the swappiness to the file at the end and save it.
vm.swappiness=20
Cache pressure is a key factor in determining how quickly the system Kernel can release cached memory to other processes on your system. You can change the default cache pressure value from 100 to 50-200. Use the following command to check the cache pressure on Linux VPS.
cat /proc/sys/vm/vfs_cache_pressure

Use the following command to change the cache value.
sudo sysctl vm.vfs_cache_pressure=120

Note: To set the cache-pressure value permanently on the system, add the value in the systl.conf and save it. For better performance and stability, you can manage and create it with commands such as fallocate and mkswap.
To remove the swap file on a Linux VPS, first deactivate the space using the following command.
sudo swapoff -v /swap.img

Remove the entry for the swap file from the file /etc/fstab. You can now remove the swap files from your system using the following command.
sudo rm /swap.img

The swap space of a Linux virtual private server supports RAM by acting as virtual memory when RAM is heavily used. To create a swap file on a Linux VPS, start by checking if swap already exists using the command swapon --show or free -h. If none is available, create a swap file by running sudo fallocate -l 2G /swapfile (replace “2G” with the desired size), then secure it with sudo chmod 600 /swapfile. Next, format it as swap using sudo mkswap /swapfile and enable it with sudo swapon /swapfile.
To make the change permanent, add the line /swapfile none swap sw 0 0 to /etc/fstab. You can verify it with swapon --show or free -h. To adjust swap usage, modify the swappiness value using sudo sysctl vm.swappiness=10 or by adding vm.swappiness=10 to “/etc/sysctl.conf”. Properly managing swap ensures stable performance by preventing memory exhaustion on your VPS.
A swap file in Linux acts as virtual memory. When RAM fills up, the OS moves inactive pages to swap, preventing crashes and improving stability, especially on VPSs with limited memory.
Most VPS plans have limited RAM. A swap file adds virtual memory, reducing OOM errors, crashes, and service interruptions during high load.
In computing, the system creates a swap file within a file system, while it uses a swap partition as a dedicated disk partition to store swap space. Because of this feature, swap files provide more flexibility and allow you to create them inside a disk partition that you can adjust to support your VPS settings.
Ideally, swap space should be based on your server’s RAM and workload. As a guideline: 1 GB RAM → 1–2 GB swap, 2–4 GB RAM → 2–4 GB swap. For high-performance workloads, however, treat swap space as additional memory, not as a replacement for sufficient RAM.
Yes. Since the system stores swap space on the disk, it works significantly slower than RAM. However, having slower swap memory is better than having none. Also, with the right configuration, such as setting the swappiness properly, it is possible to minimize the performance impact.
You can check if swap is active with swapon –show and free -h. These commands show the swap and virtual memory available.
Yes. To do this, just use swapoff to disable it, delete the swap file, create a new swap file with a different size, and turn it on again.
Experience Ultahost’s Cloudflare VPS Hosting!
UltaHost’s Cloudflare VPS Hosting provides fast, secure, and dependable performance. Its CDN boosts website speed, protects against threats, and manages traffic efficiently.