How to Use Docker for Visual Studio Code
An open platform for creating, distributing, and execut...
Adding an SSH key to Visual Studio Code (VS Code) is a fundamental skill for developers particularly when managing remote repositories and securing your Git operations. This allows developers to work on projects hosted on remote machines directly from their local VS Code environment.
In this article, we will guide you through the process of generating an SSH key pair adding it to your SSH agent, and configuring VS Code to use it for remote development.
Visual Studio Code (VS Code) is one of the most popular code editors today, known for its flexibility extensive extensions marketplace, and user-friendly interface. When working with version control systems like Git securing your connections to remote repositories is important. One effective way to achieve this is by using SSH keys.
SSH (Secure Shell) keys are a pair of cryptographic keys used to authenticate a user’s identity in the digital world. They are commonly used for secure access to remote servers and repositories. An SSH key pair consists of:
Before adding an SSH key to Visual Studio Code ensure you have the following prerequisites:
Here’s how you can generate an SSH key for Windows, Linux, and Mac operating systems:
Launch Git Bash from the Start menu. Run the following command to generate an SSH key:
ssh-keygen -t rsa -b 4096 -C "[email protected]"
Replace “[email protected]” with your email address. This command generates a new SSH key using the RSA algorithm with a 4096-bit key length.
You will be prompted to choose a file location to save the key. Press Enter to accept the default location which is C:\Users\your_user_name.ssh\id_rsa.

You can add an extra layer of security by entering a passphrase or press Enter to skip this step.
Launch Terminal from the Applications or Utilities folder. Run the following command to generate the key:
ssh-keygen -t rsa -b 4096 -C "[email protected]"
Press Enter to accept the default file location. Optionally, add a passphrase for added security.

Once you have generated the SSH key, the next step is to add it to the SSH agent, which manages your SSH keys and passphrases.
Open Git Bash and run the following command to start the SSH agent:
eval $(ssh-agent -s)

Add your SSH private key to the SSH agent by running:
ssh-add ~/.ssh/id_rsa

Open Terminal and run the following command:
eval "$(ssh-agent -s)"

Add the SSH private key to the SSH agent:
ssh-add ~/.ssh/id_rsa
Connect VScode with UltaHost SSH VPS!
Buy SSH Full Linux Root Virtual Private Servers with Instant Setup, Our VPS includes a free trial for 30 days, Choose different Linux-based operating systems.
Now that your SSH key is generated and added to the SSH agent, you need to add the public key to your Git hosting service for example GitHub, GitLab, and Bitbucket. Here we discuss two of them:
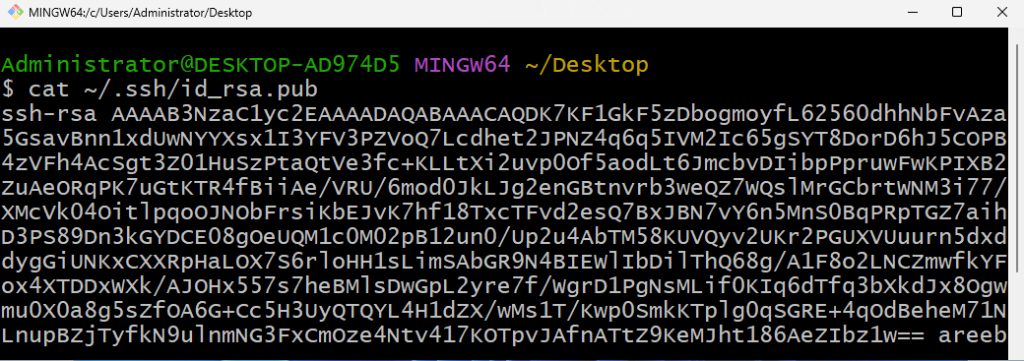
Copy your SSH public key to the clipboard. You can use the following command in Git Bash or Terminal:
cat ~/.ssh/id_rsa.pub
Select and copy the output.

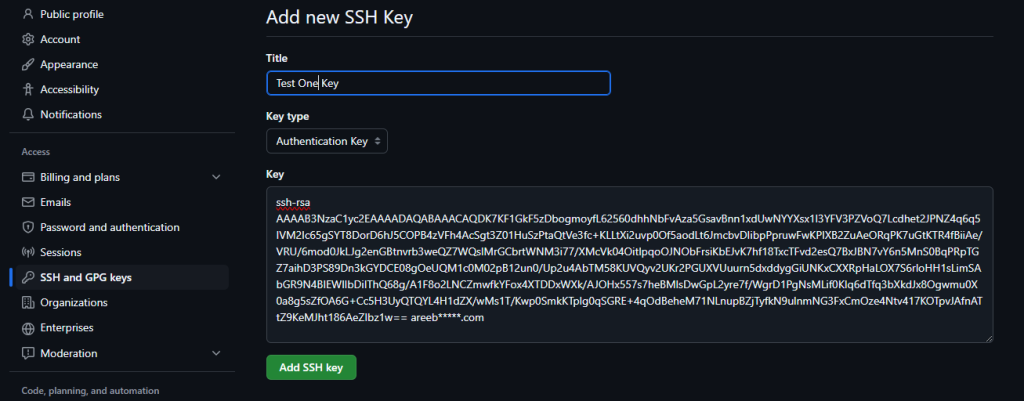
Go to GitHub’s website and log in to your account. In the top-right corner, click on your profile picture and select “Settings”.
In the left sidebar, click “SSH and GPG keys”. Click “New SSH key”, enter a title, and paste your public key into the “Key” field. Click the “Add SSH key” to save it.

Use the same command to copy your SSH public key:
cat ~/.ssh/id_rsa.pub
Go to GitLab’s website and log in to your account. Click on your profile picture in the top-right corner and select “Settings”.
In the left sidebar, click “SSH Keys”. Paste your public key into the “Key” field and click “Add key”.
With your SSH key set up and added to your Git hosting service, it’s time to add SSH key Visual Studio code.
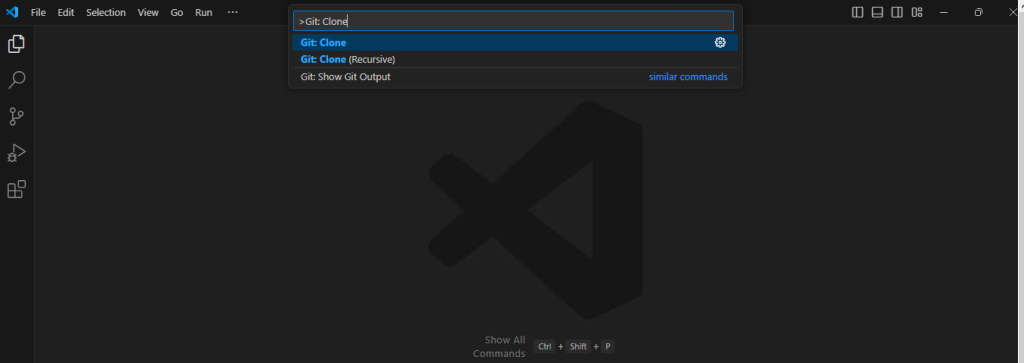
Launch Visual Studio Code in your system. Press Ctrl+Shift+P (Windows/Linux) or Cmd+Shift+P (macOS) to open the Command Palette.
Type Git: Clone and select Git: Clone from the list.

Enter the SSH URL of your repository. Enter the SSH URL of your repository [email protected]:username/repository.git and press Enter.
Select a local folder where you want to clone the repository.
To verify that your SSH key is set up correctly, you can run a simple test:
Run the following command to test your SSH connection:
ssh -T [email protected]
You should see a message like this if everything is set up correctly:

If you encounter issues while setting up your SSH key, here are some common troubleshooting steps:
Ensure your SSH private key has the correct permissions:
chmod 600 ~/.ssh/id_rsa
If the SSH agent is not running, restart it using:
eval "$(ssh-agent -s)"
ssh-add ~/.ssh/id_rsa
Double-check that you are using the correct SSH URL for your Git hosting service.
Adding an SSH key to Visual Studio Code enhances the security and efficiency of your development workflow. By following the steps outlined in this guide you can seamlessly configure your development environment to use SSH keys, ensuring secure connections to your remote repositories.
When you install Visual Studio Code on Windows to connect SSH, it is essential for setting up a robust development environment. Pairing this setup with Ultahost’s best Windows hosting can further enhance your workflow by providing a reliable and powerful platform for your development projects, ensuring optimal performance and scalability.
An SSH key lets you securely connect Visual Studio Code to remote servers.
Adding an SSH key makes remote work more secure and avoids password entry.
Go to the terminal, generate or add your key, and configure it in your settings.
Yes, you can add your existing SSH key without creating a new one.
Look under “Remote Explorer” or “Settings” in Visual Studio Code.
Yes, you need the “Remote – SSH” extension to connect via SSH.
You can test the connection by opening a remote folder or running a command on the remote server.