
How to Install PHP Dependencies on Docker
As a web developer, you're likely no stranger to the im...


An open platform for creating, distributing, and executing applications is called Docker. It enables you to release software more rapidly by separating your applications from your infrastructure. A robust free code editor that works with Windows, macOS, and Linux, Visual Studio Code is accessible online. Docker and Visual Studio Code work together to provide a robust development environment and containerization for standardized and repeatable processes.
The procedures for creating, managing, and deploying containerized apps using Docker with Visual Studio Code will be covered in this post.
Let’s examine the fundamental meaning and salient characteristics of Visual Studio Code and Docker:
Docker speeds up and streamlines your workflow. You can package your program and its dependencies into a single container by using containerization technology. Containers operate reliably in a variety of settings and are small and lightweight.
Numerous programming languages and frameworks are supported by the flexible code editor Visual Studio Code. Important characteristics include:
Before you can use Docker with VS Code, you need to install Docker on your Windows machine. After that open a command prompt and run the command:
docker --version
If you don’t already have Visual Studio Code installed refer to our guide on how to install Visual Code on Windows operating system. After that, open Visual Studio Code, you should see the welcome screen.
To integrate Docker with Visual Studio Code, you’ll need to install the Docker extension:
1. In VS Code, click on the Extensions icon in the Activity Bar on the side or press Ctrl+Shift+X.
2. Type “Docker” in the search bar.
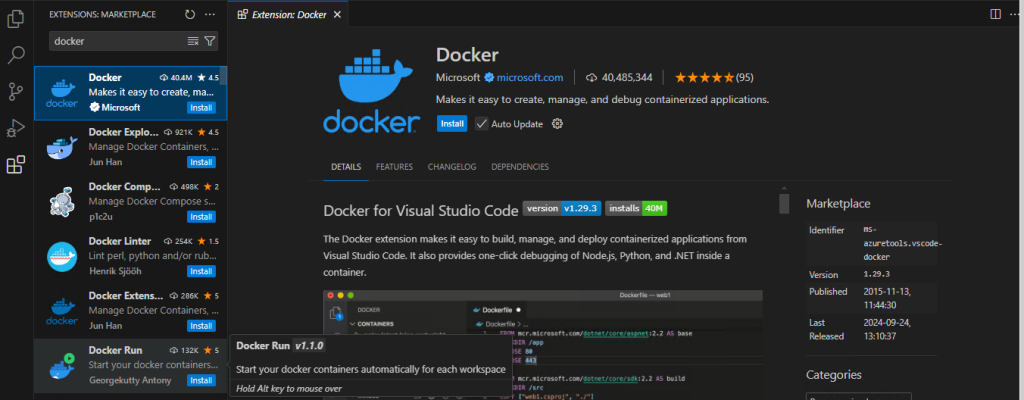
3. Click the “Install” button next to the Docker extension by Microsoft.
4. After installation, reload VS Code to activate the extension.
Install Docker and VScode on Windows Server!
Experience the ease and speed of Windows VPS at a low cost. Enjoy blazing-fast SSD NVME speeds without any interruptions or slowdowns.
Create a new folder for your project on your local machine. Go to “File” then “Open Folder” and select the newly created folder.
In the project folder, create a new file named Dockerfile with no extension. Add the following content to the Dockerfile. This example uses a Node.js application:
FROM node:14
WORKDIR /app
COPY package*.json ./
RUN npm install
COPY . .
EXPOSE 3000
CMD ["node", "app.js"]
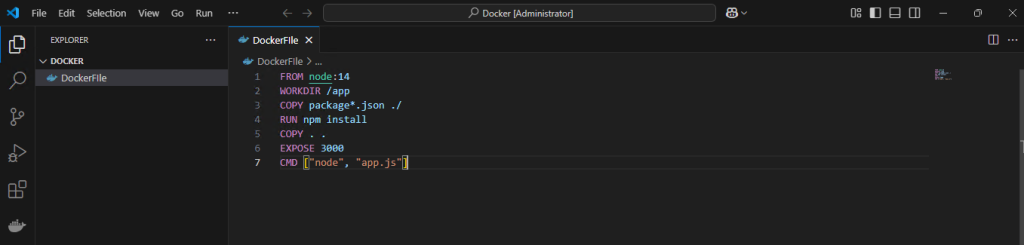
Ensure you save the file after adding the content.
Now, open the integrated terminal in VS Code using “View” and then “Terminal”, make sure you are in the project directory. Run the following command:
docker build -t my-node-app .
Run docker images to see your newly created image.
Use the following command to run the container from the image:
docker run -p 3000:3000 my-node-app
Open your web browser and go to http://localhost:3000 to see your running application.
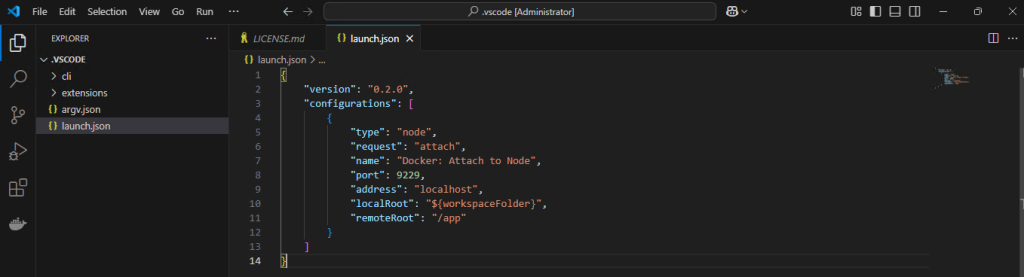
In VS Code, go to “Run” then “Add Configuration” and select Node.js: Attach from the dropdown.
Add the following configuration to .vscode/launch.json:
{
    "version": "0.2.0",
    "configurations": [
        {
            "type": "node",
            "request": "attach",
            "name": "Docker: Attach to Node",
            "port": 9229,
            "address": "localhost",
            "localRoot": "${workspaceFolder}",
            "remoteRoot": "/app"
        }
    ]
}
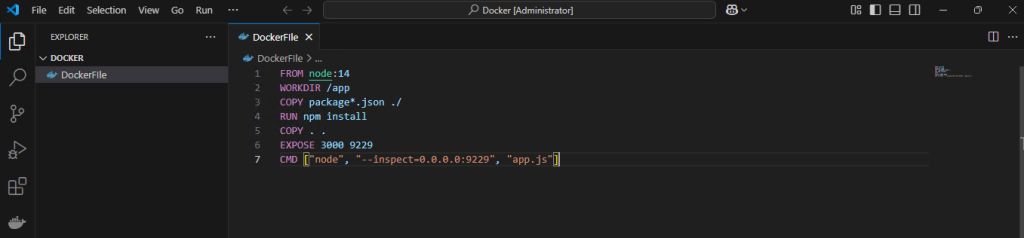
Modify your Dockerfile to enable debugging:
FROM node:14
WORKDIR /app
COPY package*.json ./
RUN npm install
COPY . .
EXPOSE 3000 9229
CMD ["node", "--inspect=0.0.0.0:9229", "app.js"]
Rebuild the Docker image with the debugging capabilities:
docker build -t my-node-app .
Run the container with the following command:
docker run -p 3000:3000 -p 9229:9229 my-node-app
Start the debugger in VS Code by going to “Run” then “Start Debugging” or pressing F5.
Using Docker with Visual Studio Code streamlines the development process, ensures consistency across environments, and enhances productivity. By following the steps outlined in this guide, you can create, run, and manage Dockerized applications efficiently. Whether you’re developing a small project or a large-scale application, the combination of Docker and VS Code provides a powerful and flexible development environment.
Take your virtualization journey to the next level with Ultahost’s VM hosting increasing the performance, flexibility, and security of Kernel-based Virtual Machine technology for your business. Host your VMs quickly and with VPS Server offering Windows and Linux virtual machines.
Docker in Visual Studio Code helps you manage and run containerized applications directly from the editor.
Install Docker Desktop and the Docker extension for Visual Studio Code from the Extensions Marketplace.
Yes, you can debug Docker containers using the built-in debugging tools in Visual Studio Code.
Yes, Docker must be installed on your system to use it with Visual Studio Code.
Use the Docker extension to pull an image and run the container directly from the Visual Studio Code interface.
Yes, you can create and edit a Dockerfile in VS Code to define your container setup.
Yes, both Docker and the Visual Studio Code Docker extension are free to use.
As a web developer, you're likely no stranger to the im...
Nginx is one of the most popular webserver and revers...
Adding an SSH key to Visual Studio Code (VS Code) is a ...
Setting up a private Docker registry can significantly ...

Deployment of Redis in Docker simplifies managing depen...