
How to Fix the “Warning: Remote Host Identi...
The "Warning: Remote Host Identification Has Changed" e...


Safe mode allows you to boot up your Windows system in a very basic state in order to potentially identify a particular problem and fix it. This starts up Windows in a state which uses a limited set of files and drivers in order to detect a problem. If the problem doesn’t occur while your system is in safe mode, this means that the default settings and basic device drivers are not the cause of the issue.
Safe mode in Windows is an excellent approach to deal with common difficulties such as malware, hazardous programs, and security vulnerabilities in your PC. As such, make sure you use the best hosting services, like Ultahost for Windows Hosting, for your website.
In this article, we will provide several methods which can be used in order to start your windows 10 in Safe Mode.
Safe mode in Windows 10 allows you to troubleshoot various problems on a computer and there are a few methods that can be used to boot your Windows 10 PC in this mode. These include:
Step 1: If you can log in to Windows 10, utilize the System Configuration tool to boot into Safe Mode Windows 10. Open your Start menu and search for system configuration, then open it.

Step 2: In the System Configuration window, click on the boot tab and select Safe boot from the Boot options. Click OK.

Step 3: A window will pop up saying “you may need to restart your computer to apply these changes.” If you still have unfinished tasks, choose “Exit without restart,” or restart you can choose to restart immediately. After restarting Windows 10, your system will enter Safe Mode.
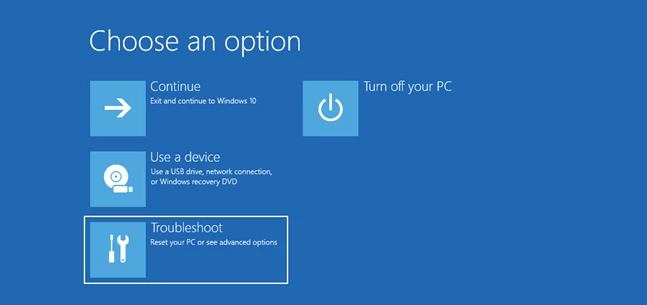
If you can’t log into Windows 10, then you can use this method to access the Safe Mode.
Step 1: To get started, hold down the Shift key on the keyboard, then click the Power button in the Start menu and select Restart.
Step 2: Your system will restart and ask you to select an option. Select Troubleshoot.
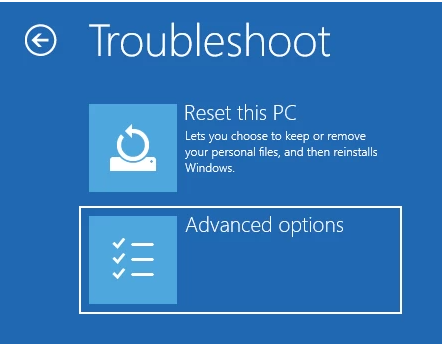
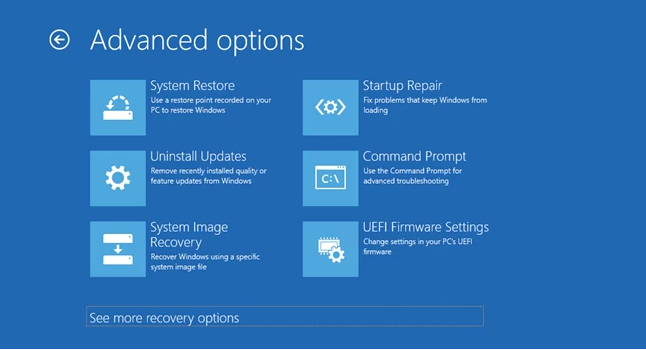
Step 3: On the Troubleshoot screen navigate to Advanced Options and select Startup Settings from the Advanced options screen.
Step 4: Depending on your Windows 10 system, you may not see the Startup Settings on the screen. If you don’t see it, click on “See more recovery options,” located on the bottom of the screen and then click the Startup Settings.
Step 5: Windows 10 will indicate that you can restart your device to change advanced boot options, then click on the Restart option.
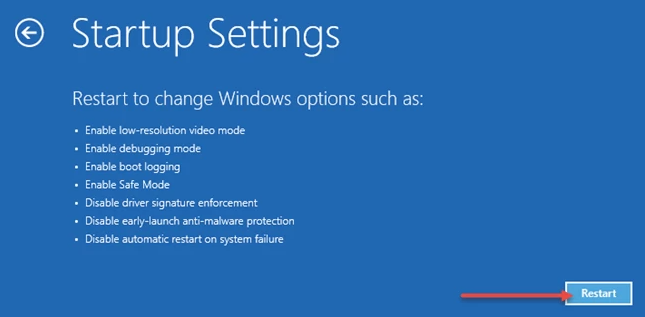
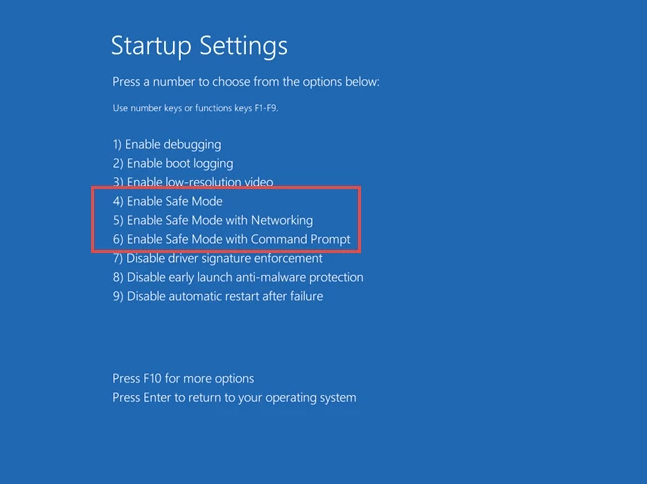
Step 6: After Windows 10 restarts one more time, you can select Safe Mode. There are three different options:
Standard Safe Mode: press the F4 key on your keyboard to start it.
Safe Mode with Networking: press the F5 key.
Safe Mode with Command Prompt: press the F6 key.
Step 7: Finally, log into Windows 10 with an administrator account and make the adjustments you want to make on your system.
Start your VPS hosting today and utilize the full potential of this tool on your Windows system.
This is how to start Windows 10 in Safe Mode without encountering any problems or difficulties. This feature is a terrific choice that provides an ideal solution to address a variety of system difficulties. If you find yourself in a position where you are confronted with malware or security difficulties, use this Mode to swiftly resolve these issues. In addition, take advantage of Ultahost’s cheap windows VPS to prevent any security issues from arising on your system.

The "Warning: Remote Host Identification Has Changed" e...

A Gmail profile picture adds a personal and confident t...