
Install and Run Vue on Ubuntu 19.04
Vue is a progressive JavaScript framework used for buil...


TeamSpeak 3 is a voice-over-internet protocol (VoIP) application that allows users to communicate and cooperate in real-time. It’s a stable and lightweight application with unique features like AES-256 encryption, low latency, and high audio quality.
TeamSpeak 3 is a versatile application used for various purposes. It is commonly used as a gaming-oriented communication app, allowing users to communicate and coordinate with their friends while playing games via voice chat.
This article will show you how to make a TeamSpeak server on Windows.
Voice over Internet Protocol (VoIP) is a technology that enables you to make voice calls over a broadband Internet connection as opposed to a traditional (or analog) phone line.
VoIP services convert your voice into a digital signal transmitted over the Internet. It enables groups or individuals to connect via internet calls while carrying out tasks simultaneously.
TeamSpeak is a desktop and mobile voice-over-Internet Protocol (VoIP) program. Its primary function is to allow users to chat on a channel, similar to how conferencing applications such as Zoom and Google Meet work. Furthermore, TeamSpeak works similarly to the instant messaging and digital distribution network, Discord.
TeamSpeak is a simple Internet voice communications program. It’s popular among gamers, but it’s not strictly just for in-game communication. Individuals looking for alternatives to other voice conferencing applications can also use TeamSpeak.
Step 1: Visit the official TeamSpeak website and download the appropriate TeamSpeak server files for your version of Windows.
Step 2: Open the extracted TeamSpeak server files and run the ts3server.exe executable file.
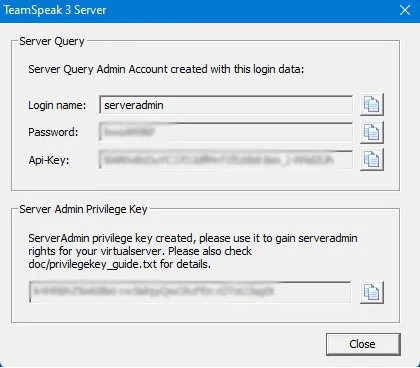
Step 3: Accept the license of agreement. You will then be given your login name, server password, API key, and server admin token. Copy all four numbers to an empty.txt file for future reference.
The TeamSpeak app icon will appear on your taskbar, indicating that the TeamSpeak 3 server is operational on your PC.
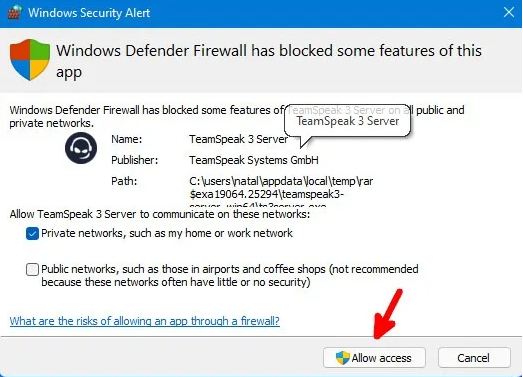
Step 4: Allow Windows firewall access to TeamSpeak 3 Server software.
Once the installation process is finished, the last step is connecting to the TS3 server.
Step 5: Visit the official TeamSpeak website, download the TeamSpeak client, and run the .exe installer.
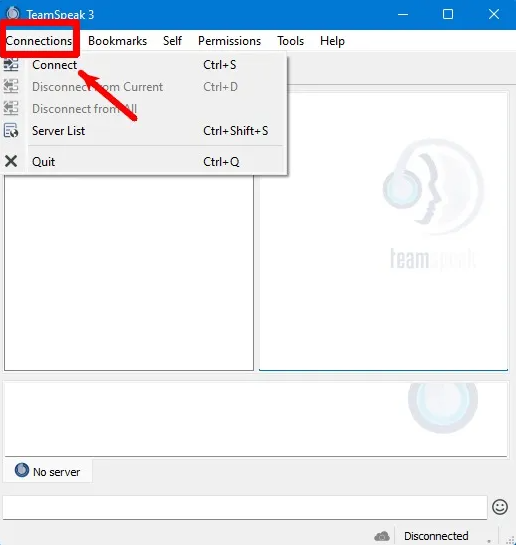
Step 6: Navigate to the Connections tab and click on connect.
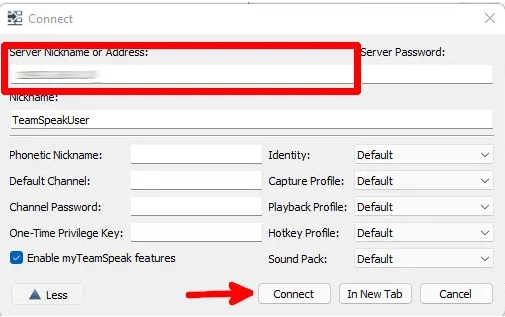
Step 7: Enter your VPS IP in Server Nickname or Address field and press Connect.
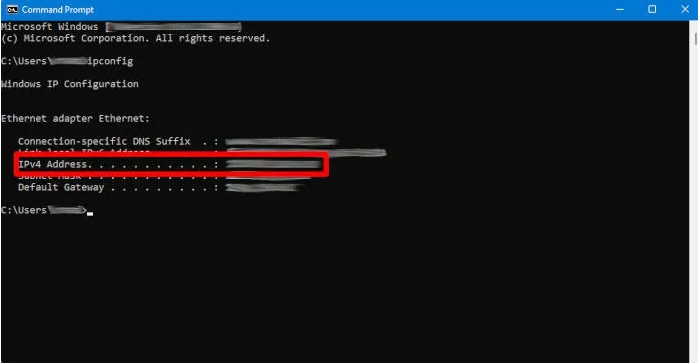
In case you’re not sure what IP address to use for connecting, open the Command Prompt and execute the following command:
ipconfig
Copy the IPv4 Address value.
Step 8: After successfully connecting to the TeamSpeak server as an admin, you must enter the privilege key you noted earlier into a text file. This key is only for administrators, such as yourself. You can also share this key with others if you want to provide them with administrator privileges.
TeamSpeak 3 is a voice chatting application popular among gamers and IT professionals. It has an easy-to-use interface that enables users to set up a server in minutes. This article has provided detailed information on how to set up TeamSpeak 3 server on Windows.