
How to Setup Next JS in Node JS
Next.js is a powerful React framework that enables deve...


Developers can run JavaScript code on the server side with Node.js, an open-source, cross-platform runtime environment. It’s crucial to have Node.js installed on your macOS computer since more and more websites and applications use it for backend development.
We will go over how to install Node.js on macOS in this post, making sure you have everything you need to begin creating and executing Node.js apps.
Make sure your macOS system satisfies the following prerequisites before we begin the installation process:
Node.js macOS can be installed in a number of ways, such as by:
Let’s examine each of the three approaches since they each have benefits.
Ready to Deploy Your Node.js App with Ease
Unlock the full potential of your Node.js applications with Ultahost’s reliable hosting solutions. From seamless deployment to robust performance, we’ve got you covered.
This method involves downloading and installing the Node.js installer directly from the official website.
Open the Safari web browser and navigate to the Node.js official website. On the homepage, you will see two versions of Node.js: LTS (Long-Term Support) and Current. For most users, the LTS version is recommended as it provides stability and long-term support.
Click the download link for the LTS version to download Node.js macOS.

Once the download is complete, open the downloaded .pkg file.
The installer will launch. The installer will prompt you to agree to the license agreement and choose an installation location. By default, Node.js will be installed in /usr/local.
After installation, open the Terminal app. Run the following command to verify that Node.js is installed and check its version:
node --version
You should see the version number of Node.js displayed, indicating a successful installation.
Node.js comes with npm by default. To check the installed version of npm, run:
npm -v
If npm is not installed, you can install it using the following command:
npm install -g npm
Homebrew is a popular package manager for macOS that simplifies the installation of software.
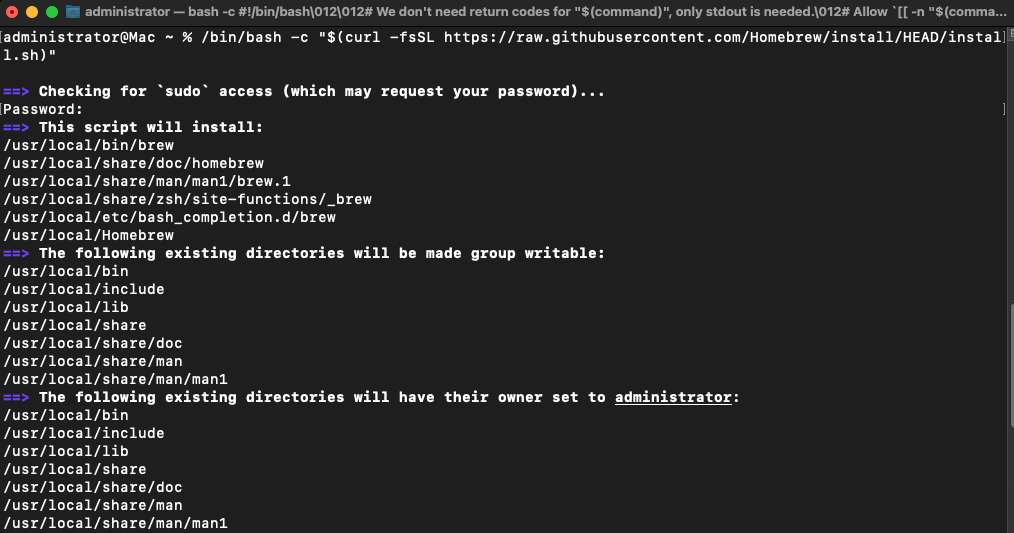
Open Terminal. Install Homebrew by running the following command:
/bin/bash -c "$(curl -fsSL https://raw.githubusercontent.com/Homebrew/install/HEAD/install.sh)"
After installing Homebrew, update it to ensure you have the latest version:
brew update
Use Homebrew to install Node.js by running the following command:
brew install node
Homebrew will download and install Node.js along with npm. Run the node and npm version command to confirm that Node.js is installed.
NVM allows you to manage and install multiple versions of Node.js on a single machine, making it easy to switch between versions.
Open Terminal. Install NVM by running the following command:
curl -o- https://raw.githubusercontent.com/nvm-sh/nvm/v0.39.1/install.sh | bash
Close and reopen the Terminal, or source your profile using:
source ~/.zshrc
Confirm NVM installation by running:
nvm -v
Use NVM to install the latest LTS version of Node.js:
nvm install --lts
Set the installed version as the default version:
nvm alias default node
Run the node and npm version command to confirm that Node.js is installed.
Also, Read How To Install Node.js on Ubuntu 22.04.
After installing Node.js, you can take a few additional steps to configure your environment and streamline your development workflow.
By default, npm installs global packages in a system directory that requires root privileges. To avoid using sudo it for every global package installation, create a new directory for global packages. After installing Node.js, you can take a few additional steps to configure your environment and streamline your development workflow.
Run the following commands in Terminal:
mkdir ~/.npm-global
npm config set prefix '~/.npm-global'
Add the following line to your shell profile ~/.zshrc:
export PATH=~/.npm-global/bin:$PATH
Apply the changes by running the following:
source ~/.zshrc
There are several npm packages you might find useful for development. Here are a few recommendations:
Node.js is a powerful tool for server-side development and having it installed on your macOS machine opens up possibilities for building dynamic applications. This comprehensive guide has provided step-by-step instructions for installing Node.js using three different methods via the official website, Homebrew, and NVM. Additionally, we covered configuration tips to streamline your project workflow.
Install Node.js efficiently with Ultahost Mac VPS hosting which is one of the quickest, most secure, and most affordable Macintosh hosting. Connect to a MacOS VPS from any device. Start your Mac hosting today!
Node.js is a JavaScript runtime that lets you run JavaScript code outside a web browser.
You can install Node.js using Homebrew or download it directly from the official Node.js website.
Homebrew is a package manager for macOS that makes it easy to install software like Node.js.
Run node -v in the terminal. If installed, it will show the version number.
Yes, you can use Node Version Manager (nvm) to manage multiple versions of Node.js.
Yes, Node.js is open-source and free for anyone to use.
Yes, you may need admin rights for installation, especially when using Homebrew.
Node.js is a powerful JavaScript runtime environment th...
TypeScript is a strong, statically typed superset of Ja...