
How to Install Docker on Windows
Docker is a containerization platform that enables the ...


SQLite is a self-contained, file-based relational database management system that allows users to store and manage data in a structured and efficient manner. Unlike traditional client-server databases, SQLite is serverless, meaning it doesn’t require a separate server process to operate. This makes it an ideal choice for embedded and standalone applications, as well as for developers who need a lightweight and easy-to-use database solution.
For Windows 10 users, SQLite offers a wide range of benefits. With SQLite, users can easily store and manage data for various applications, including web browsers, email clients, and games. SQLite’s compact size and low resource requirements also make it an excellent choice for devices with limited storage and processing power. Additionally, SQLite is highly customizable, allowing users to easily create and manage their own databases using a variety of programming languages, including C, C++, Java, and Python.
In this article, we will guide you through the process of SQLite Windows installation, highlighting the steps and best practices to ensure a successful installation. Whether you’re a developer, a power user, or just looking to try out SQLite, this article will provide you with the necessary information to get started with this powerful and versatile database management system.
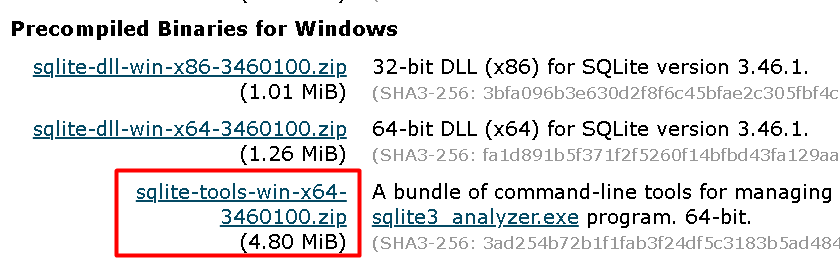
To install SQLite on Windows 10, you’ll need to download the precompiled binaries from the official SQLite website. Open a web browser navigate to the SQLite download page and then scroll down to the Precompiled Binaries for Windows section.
Here, you’ll find links to download the SQLite tools for 32-bit and 64-bit systems. Click on the sqlite-tools-win32-x86-<version>.zip** link for 32-bit systems or sqlite-tools-win64-x86-<version>.zip** for 64-bit systems.
The `<version>` will be the latest available version of SQLite. Save the zip file to a location on your computer, such as the Downloads folder.
Once the download is complete, you’ll need to extract the contents of the zip file. Navigate to the location where you saved the zip file and right-click on it. Select Extract All or Extract Here and choose a location to extract the files. This will begin the extraction process, and the files will be extracted to the specified location.
After extracting the files, you should see three executable files in the directory.
sqlite3_analyzer.exe file is a tool for analyzing and optimizing SQLite databases. sqldiff.exe file is a tool for comparing two SQLite databases. sqlite3.exe file is the SQLite command-line shell, which allows you to interact with SQLite database Windows 10 using SQL commands.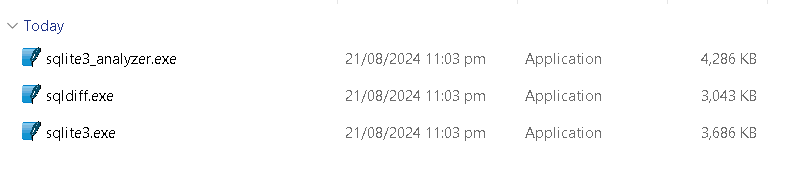
These executables are the core components of the SQLite installation on Windows 10.
Install SQLite on Our Windows 10 VPS!
With Ultahost, Hosting Windows VPS has never been easier or faster. Enjoy ultra-fast SSD NVME speeds with no dropouts and slowdowns.
Now that you have extracted the SQLite files, it’s time to run the SQLite command-line shell and start interacting with SQLite databases. To do this, you’ll need to navigate to the working directory where you extracted the SQLite files using the `cd` command.
cd Desktop\SQLite
Replace “Desktop\SQLite” with the actual path to the directory where you extracted the SQLite files.
Once you are in the correct directory, type the following command and press Enter:
sqlite3
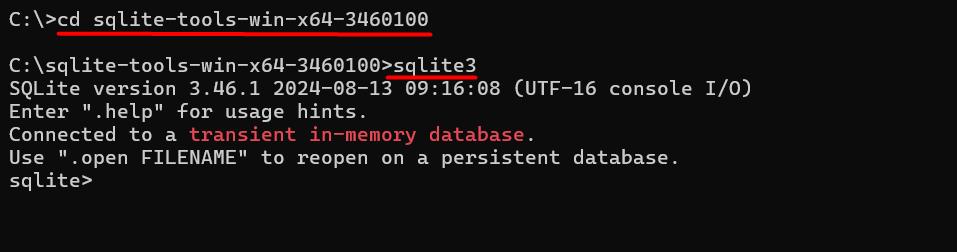
This will launch the SQLite command-line shell, and the output shows the version of SQLite that you are running, followed by a prompt that tells you that you are connected to a transient in-memory database. This means that any changes you make to the database will be lost when you exit the SQLite shell.
From the `sqlite>` prompt, you can execute SQL commands to create and manage databases, tables, and data. You can also use various SQLite commands to perform tasks such as:
To see a list of all available commands in SQLite, you can type the following command and press Enter:
.help
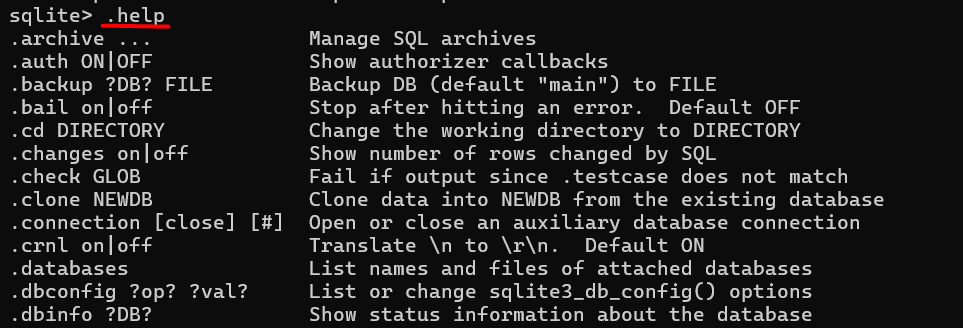
This will display a list of all available commands, including those for creating and managing databases, tables, and data.
When you are finished using the SQLite shell, you can quit by typing the following command and pressing Enter:
.quit
This will exit the SQLite shell and return you to the Command Prompt.
With the SQLite shell up and running, you can now start exploring the features and capabilities of SQLite. In the next section, we will cover some common use cases for SQLite and provide examples of how to use SQLite in real-world applications.
Learn about How to install SQLite on Ubuntu 20.24.
SQLite is a robust and versatile database management system that offers a wide range of features that make it an ideal choice for various applications. Some of the key features of SQLite include:
In this article, we have walked you through the process of installing SQLite for Windows 10. From downloading the precompiled binaries to running the SQLite command-line shell, we have covered every step in detail. With its serverless architecture, zero-configuration setup, and support for SQL features, SQLite is an ideal choice for a wide range of applications.
By following the steps outlined in this article, you can easily download SQLite Windows on your system and start using it to create and manage databases. Whether you’re a developer, a power user, or just looking to try out SQLite, this article has provided you with the necessary information to get started with this powerful and versatile database management system.
Ultahost’s VPS hosting plan empowers you to elevate your development experience and offers superior processing power memory and storage on your system. Focus on running demanding applications or managing complex environments seamlessly, let Ultahost provide the power and resources you need to virtualize confidently.
SQLite is a lightweight, disk-based database engine that doesn’t require a separate server process. It is widely used for local storage in applications and is known for its simplicity and efficiency.
Open Command Prompt and type sqlite3. If SQLite is installed correctly and added to your system path, you should see the SQLite command-line interface start, showing a prompt like sqlite>.
This usually means that the path to sqlite3.exe is not correctly added to the system PATH environment variable. Double-check the steps to ensure the directory containing sqlite3.exe is correctly added to the PATH.
No additional software is required for basic SQLite usage. However, for enhanced functionality or graphical interfaces, you might consider using SQLite management tools like SQLiteStudio or DB Browser for SQLite
You can find comprehensive documentation and resources on the official SQLite website: SQLite Documentation.