
How to Check CentOS Version
Understanding which version of CentOS you're running is...


Securing your website with SSL stands for Secure Sockets Layer is important for protecting sensitive data and ensuring the integrity of your site. Certbot a free and open source tool simplifies the process of obtaining and installing SSL certificates from Let’s Encrypt.
In this article, we will cover the steps to install SSL on a Linux VPS using Certbot to enhance security.
To successfully install SSL Certbot ensure you have the following:
Login into your server with SSH access or client after that, follow the steps to install SSL on Linux using Certbot:
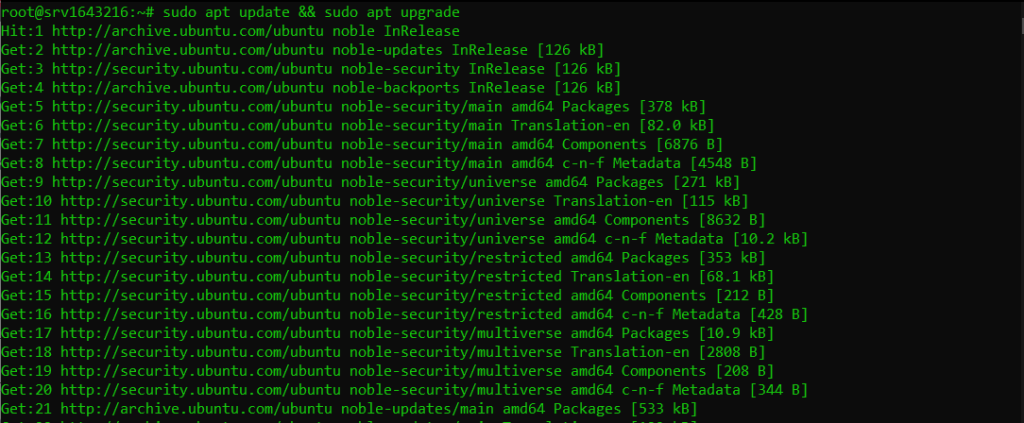
First, update your package list and upgrade your existing packages to ensure you have the latest software versions.
sudo apt update && sudo apt upgrade
Certbot can be installed using various methods. The recommended way is to use Snap a package management system that simplifies the installation process.
Install Snapd
If Snapd is not already installed on your system, you can install it using the following commands:
sudo apt install snapd && sudo snap install core

Install Certbot
Once Snapd is installed you can install Certbot:
sudo snap install --classic certbot

Create a symbolic link to ensure Certbot can be run from any path:
sudo ln -s /snap/bin/certbot /usr/bin/certbot
With Certbot installed you can now obtain an SSL certificate. The process differs slightly depending on whether you are using Apache or Nginx.
For Apache
If you are using SSL Certbot Apache run the following command:
sudo certbot --apache
Certbot will prompt you to enter your email address and agree to the terms of service. It will then automatically configure your Apache server to use the new SSL certificate.
For Nginx
If you are trying Nginx SSL Certbot run the following command:
sudo certbot --nginx
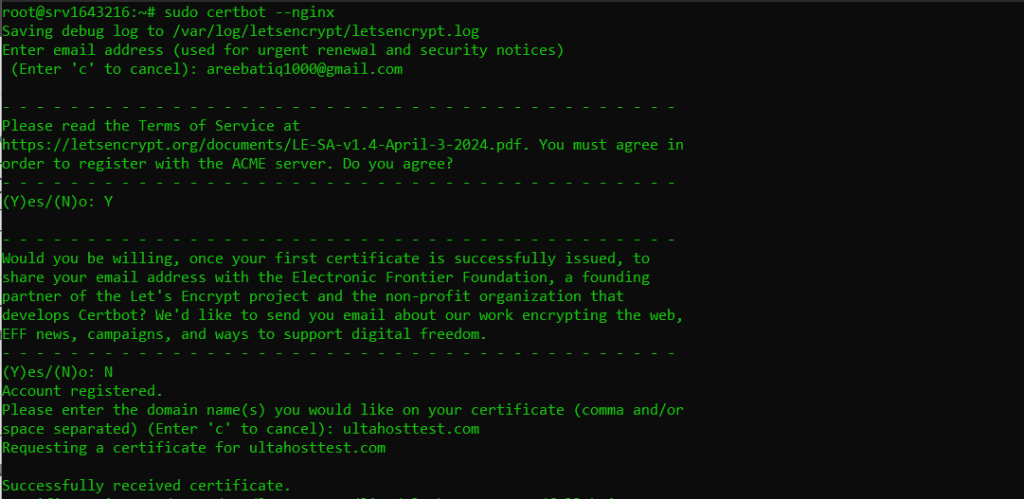
Similar to the Apache process Certbot will prompt you for your email address and terms of service agreement and then configure Nginx to use the SSL certificate.
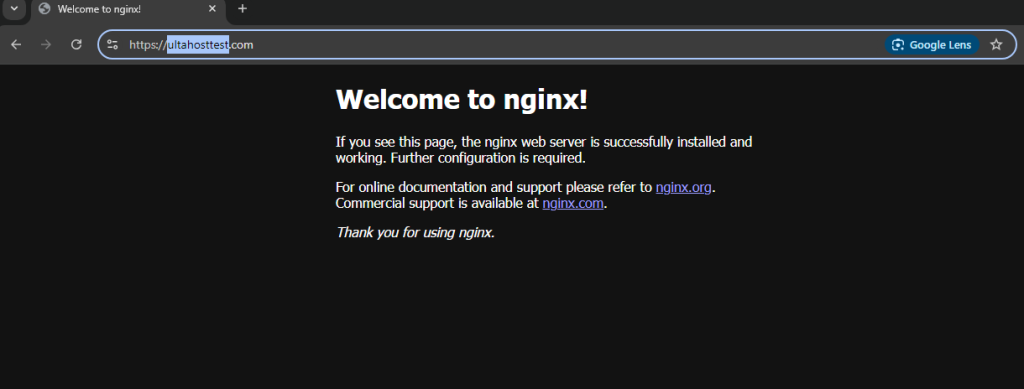
After obtaining the SSL certificate it’s important to verify that your web server is correctly configured to use it. You can do this by visiting your website using https:// in the URL. Your browser should indicate that the connection is secure.
Let’s Encrypt certificates are valid for 90 days so it’s essential to set up automatic renewal to avoid any downtime. Certbot can handle this for you.
Create a Cron Job
Create a cron job to run the renewal command periodically. Open the crontab editor:
sudo crontab -e
Add the following line to run the renewal twice a day:
0 0,12 * * * /usr/bin/certbot renew --quiet
This command will check for certificate renewal twice a day and renew the certificate if it’s due to expire.
Secure your Website with an SSL Certificate!
Ultahost SSL allows you to encrypt all the data between a visitor and the server with high-quality encryption makes sure that every packet is unbreachable.
To enhance the security of your SSL configuration consider implementing the following additional measures:
HTTP to HTTPS Redirection
Ensure that all HTTP traffic is redirected to HTTPS to enforce secure connections. This can be done by modifying your web server configuration.
For Apache
Edit your Apache configuration file usually located in /etc/apache2/sites-available/your_domain.conf and add the following lines:
<VirtualHost *:80>
    ServerName your_domain
    Redirect permanent / https://your_domain/
</VirtualHost>
For Nginx
Edit your Nginx configuration file usually located in /etc/nginx/sites-available/your_domain and add the following lines:
server {
    listen 80;
    server_name your_domain;
    return 301 https://$host$request_uri;
}
Enable HTTP Strict Transport Security (HSTS)
HSTS instructs browsers to only connect to your site using HTTPS. Add the following header to your web server configuration:
For Apache
Header always set Strict-Transport-Security "max-age=31536000; includeSubDomains"
For Nginx
add_header Strict-Transport-Security "max-age=31536000; includeSubDomains" always;
Disable Weak Ciphers and Protocols
Ensure that your web server is configured to use strong ciphers and protocols.
For Apache
Edit your SSL configuration file usually located in /etc/apache2/mods-available/ssl.conf and add the following lines:
SSLProtocol all -SSLv2 -SSLv3 -TLSv1 -TLSv1.1
SSLCipherSuite HIGH:!aNULL:!MD5
SSLHonorCipherOrder on
For Nginx
Edit your SSL configuration file usually located in /etc/nginx/nginx.conf and add the following lines:
ssl_protocols TLSv1.2 TLSv1.3;
ssl_ciphers HIGH:!aNULL:!MD5;
ssl_prefer_server_ciphers on;
Also, Read How to Fix ERR_SSL_VERSION_OR_CIPHER_MISMATCH.
If you encounter any issues during the installation process here are some common problems and their solutions:
If you receive a “command not found” error when running Certbot make sure that the symbolic link was created correctly:
sudo ln -s /snap/bin/certbot /usr/bin/certbot
If Certbot fails to configure your web server automatically you may need to manually edit your configuration files. Ensure that the paths to your SSL certificate and key are correct.
If your domain is not fully propagated Certbot may fail to verify your domain ownership. Ensure that your DNS records are correctly configured and fully propagated before running Certbot.
Installing SSL on your Linux VPS using Certbot is a simple process that significantly enhances the security of your website. By following the steps outlined in this guide you can obtain and install a free SSL certificate from Let’s Encrypt configure your web server to use it and set up automatic renewal to ensure continuous protection.
Remember to periodically check your SSL configuration and update your web server software to maintain security. With SSL in place, you can provide your users with a secure and trustworthy browsing experience.
Installing SSL using Certbot on a Linux VPS is an important step for securing your website. However, it can be a technical process for those unfamiliar with server configurations. Upgrading to an Ultahost Linux VPS plan streamlines this process that offers user friendly control panels like cPanel or WHM which often come with built in SSL management tools.
Certbot is a free tool that helps you get and install SSL certificates for your website.
SSL secures your site, encrypts data, and boosts trust with visitors by showing “HTTPS.”
Yes, Certbot uses free SSL certificates from Let’s Encrypt.
Certbot works on most Linux VPS distributions, like Ubuntu, Debian, and CentOS.
You can install Certbot using package managers like apt for Ubuntu or yum for CentOS.
Certbot can automatically renew your SSL certificates by setting a cron job.
No, you can install SSL with Certbot without interrupting your website’s availability.
Understanding which version of CentOS you're running is...

Unlike other text editors, Vim is a keyboard-focused te...
Burp Suite is a powerful tool security professionals us...

Secure file transfer between Linux systems is a routine...
Kali Linux is widely known as an operating system used ...
The date command in Linux is a powerful tool for displa...