
How to Install Dev-C++ on Windows 10
Dev-C++ is a lightweight and user-friendly integrated d...


Swift is a modern, high-performance programming language developed by Apple, designed to give developers the ability to create powerful, modern apps with a clean and easy-to-read syntax. Initially introduced for developing iOS, macOS, watchOS, and tvOS apps, Swift has since evolved to become a versatile language for a wide range of applications, including web development, cloud services, and beyond. As a Windows user, you can benefit from Swift’s capabilities, such as its high-performance compilation, modern design, and vast community support, to build robust and scalable applications.
By installing Swift on your Windows machine, you can tap into its numerous benefits, including cross-platform development, which enables you to create applications that run seamlessly across multiple operating systems. Additionally, Swift’s compatibility with popular frameworks and libraries, such as Vapor and Kitura, allows you to build fast, scalable, and secure web applications. With Swift on Windows, you can unlock new possibilities for web development, machine learning, and more.
In this article, we will provide a step-by-step guide on how to install Swift on Windows, covering the necessary tools and software required to set up a development environment that mimics the macOS ecosystem.
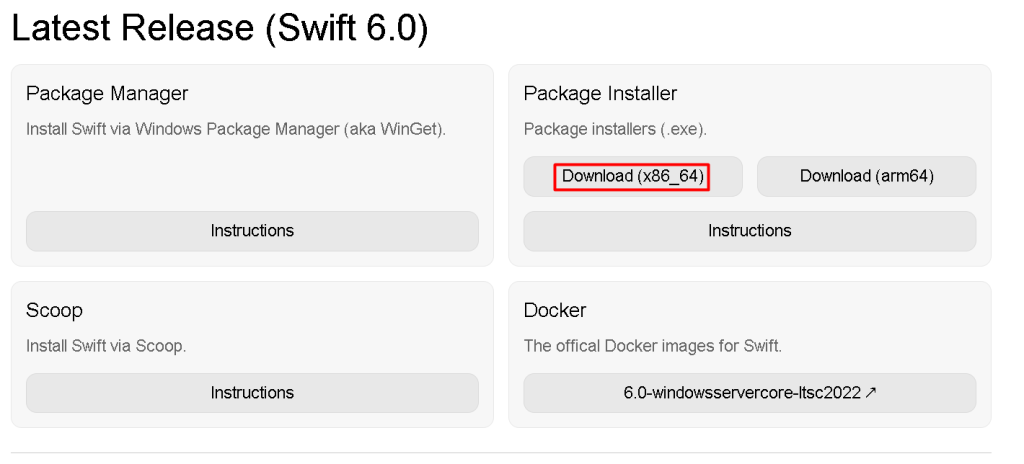
To download Swift for Windows machine, navigate to the official Swift website. This page provides several methods for downloading Swift, each catering to different user needs and preferences. Let’s break down each method to help you decide which one suits you best.
The first method involves installing Swift via the Windows Package Manager (WinGet). WinGet is a command-line package manager that allows you to easily install and manage software on Windows. This method is ideal if you’re already familiar with command-line interfaces and want to manage your software packages efficiently. Refer to our guide on how to install WinGet on Windows system.
The second method involves downloading a package installer (.exe) from the official Swift website. This method provides two architecture options:
This method is suitable for users who prefer a more traditional installation process, where they can download and run an executable file to install the software. This approach is straightforward and easy to follow, making it a good choice for beginners.
The third method involves installing Swift via Scoop, a popular package manager for Windows. Scoop allows you to easily install and manage software on your system, and it’s particularly useful for installing software that’s not available through the official Windows Store. To use Scoop, you’ll need to have it installed on your system first.
The fourth method involves using Docker installed on Windows images for Swift. This method is geared towards developers who are already familiar with Docker and want to use it to manage their development environments. Docker provides a containerized environment for Swift, allowing you to easily switch between different versions of the language.
For the purpose of this article, we’ll focus on the Package Installer (.exe) method, as it’s one of the simplest and most straightforward approaches. This method doesn’t require any prior knowledge of command-line interfaces or package managers, making it an excellent choice for beginners:
We’ll guide you through the process of downloading and installing the Swift package installer (.exe) in the next steps.
Install Swift on Our Windows VPS!
Hosting a Windows VPS with Ultahost is now easier and faster than ever. Experience lightning-fast SSD NVMe speeds with no interruptions.
Once you’ve downloaded the Swift package installer (.exe), run the file to begin the installation process. The welcome screen will appear, displaying the version number of Swift, which in this case is 6.0.0. Below the version number, you’ll see a summary of the terms and conditions of using Swift:
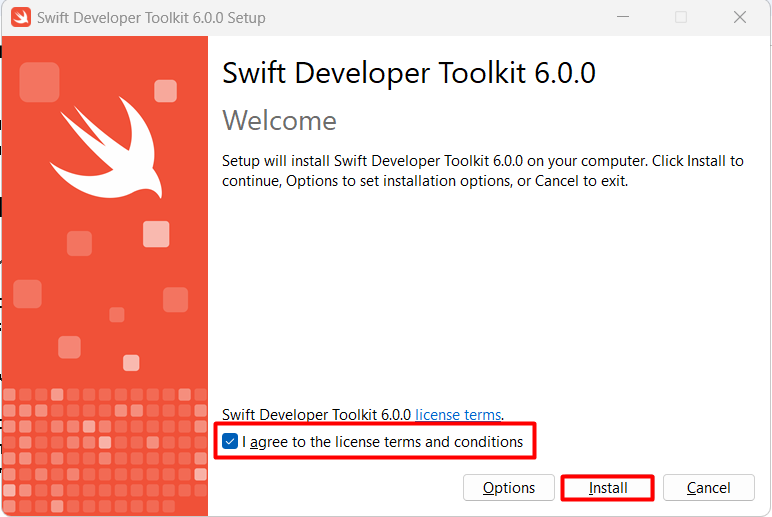
Before proceeding, it’s essential to read and understand the terms and conditions of using Swift. The terms and conditions outline the rights and responsibilities of both you (the user) and Apple (the developer of Swift).
To proceed with the installation, you must accept the terms and conditions by checking the box next to “I accept the terms in the License Agreement.” This indicates that you’ve read, understood, and agreed to the terms and conditions.
In addition to the checkbox, you’ll notice two other buttons:
For now, we’ll proceed with the default installation settings. Make sure to check the box next to “I accept the terms in the License Agreement” and click the Install button to continue with the installation process.
Once you’ve accepted the terms and conditions, the installation process will begin automatically. However, you might notice that the installer doesn’t prompt you to specify the installation location. Instead, it will use the default installation path.
So, if you want to install Swift in a custom location, you can use the Options button to specify the installation path. After specifying the installation location, click on the Install button to continue with the installation process.
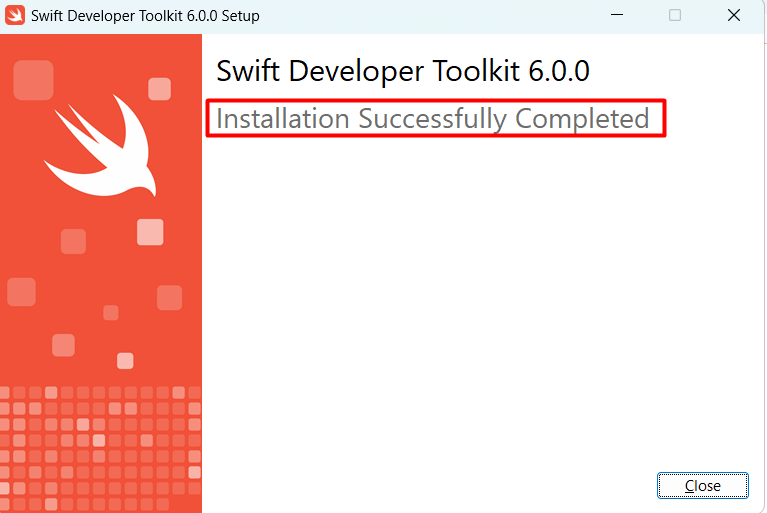
The installer will proceed with the installation, and you’ll see the progress bar indicating the status of the installation. This may take a few minutes to complete, depending on your system’s specifications and the speed of your hard drive.
When the installation process is completed, you’ll see a confirmation message indicating that the installation has been successful:
You can further verify the swift version via the command prompt as well. For this, you can write the below command by opening a command prompt:
swift -v

Moreover, you will also get some basic commands to get started with the swift on Windows.
Learn also How to Install Swift on Ubuntu.
Swift is a modern, powerful, and versatile programming language that offers a range of features that make it an ideal choice for developers. Some of the key features of Swift include:
Swift offers a range of benefits to developers, including:
In this article, we walked through installing Swift on a Windows machine. We discussed the different methods available for installation, including the package manager, package installer, Scoop, and Docker. We chose the package installer method as the most straightforward approach. We then navigated through the installation process, accepting the terms and conditions, specifying the installation location, and waiting for the installation to complete.
Overall, the installation process was relatively smooth and easy to follow. With the default installation settings, Swift was installed successfully on our Windows machine. We also discussed the features and benefits of Swift, highlighting its high-performance compilation, modern design, and cross-platform development capabilities. With Windows Swift setup, Now you’re ready to start exploring its capabilities and building your applications.
Streamline your Swift setup on Windows with Ultahost’s VPS hosting, offering powerful processing, increased memory, and ample storage. Focus on managing your projects effortlessly, while Ultahost delivers the performance and resources you need to run swift smoothly.
Yes, Swift is officially supported on Windows as of version 5.3 and later.
You’ll need a Windows 10 or later operating system, a 64-bit architecture, and the Windows Subsystem for Linux (WSL) or Visual Studio installed.
You can install Swift by downloading the pre-built binaries from the official Swift website.
Yes, installing Visual Studio is recommended for building and running Swift applications. You also need to have the C++ build tools installed.
Install WSL by enabling it through Windows features, then install a Linux distribution (like Ubuntu) from the Microsoft Store. After that, you can install Swift within the WSL environment.
Open a command prompt or terminal and run swift –version. This should display the installed version of Swift.
Yes, you can use Visual Studio Code with extensions for Swift or try JetBrains CLion with Swift support.
Dev-C++ is a lightweight and user-friendly integrated d...
Jupyter Notebook is one of the most widely-used tools a...
Burp Suite is a powerful tool security professionals us...
MTR (My Traceroute) is a powerful network diagnostic to...
Selenium WebDriver is a powerful tool for automating we...