
How To Fix The “NPM command not found” Er...
Node Package Manager (npm) is an excellent tool for Jav...


Securing your website with an SSL certificate is important for protecting sensitive data and ensuring trust with your users. One of the most effective ways to achieve this is by implementing encryption. SSL certificates provide a secure connection between your website and visitors safeguarding their personal information and building trust.
In this guide, we will cover the process of installing an SSL certificate on an NGINX server which provides you with the necessary knowledge and instructions to enhance your website’s security.
An SSL (Secure Sockets Layer) certificate is a digital certificate that provides encryption and authentication for secure communication over the Internet. It ensures that data transmitted between a web server and a web browser remains confidential and cannot be intercepted or tampered with by unauthorized parties.
SSL certificates are essential for securing online transactions protecting sensitive data such as login credentials credit card information and personal details. They are commonly used by e-commerce websites online banking platforms email services and any other website that handles sensitive user information.
Before you install SSL certificate NGINX ensure you have the following:
A Certificate Signing Request (CSR) is required to obtain an SSL certificate from a Certificate Authority (CA). Follow these steps to generate a CSR:
1. Create a directory for your SSL files:
sudo mkdir /etc/nginx/ssl

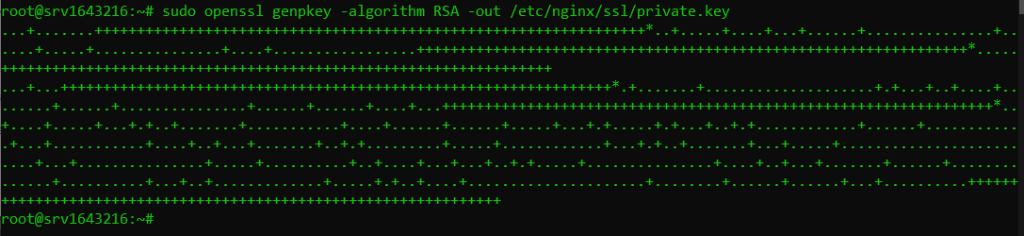
2. Generate a private key:
sudo openssl genpkey -algorithm RSA -out /etc/nginx/ssl/private.key
3. Generate the CSR:
sudo openssl req -new -key /etc/nginx/ssl/private.key -out /etc/nginx/ssl/csr.pem
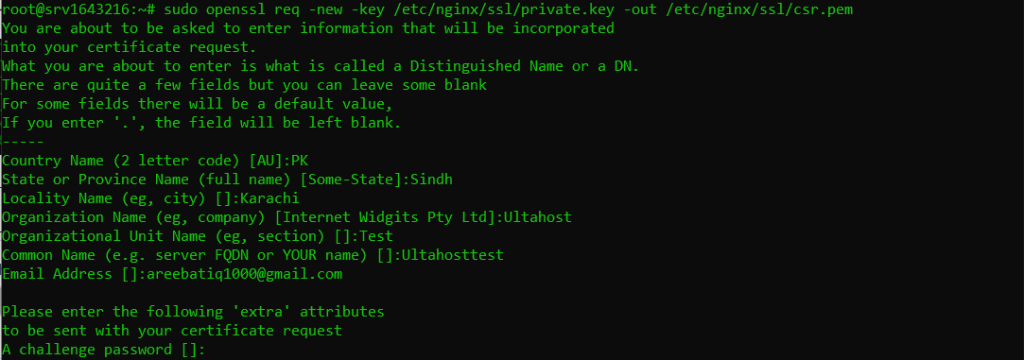
You will be prompted to enter information about your organization and domain. Fill in the details as required.
Once you have generated the CSR you need to submit it to a Certificate Authority (CA) to obtain your SSL certificate. The CA will verify your information and issue the certificate. You will receive the following files from the CA:
After obtaining the SSL certificate let’s understand how to add SSL to NGINX server:
1. Copy the SSL certificate files to the SSL directory:
To configure SSL certificate NGINX copy the certificate files in the directory with following commands:
sudo cp /path/to/your/certificate.crt /etc/nginx/ssl/
sudo cp /path/to/your/intermediate.crt /etc/nginx/ssl/
sudo cp /path/to/your/root.crt /etc/nginx/ssl/
2. Combine the certificates into a single file:
sudo cat /etc/nginx/ssl/certificate.crt /etc/nginx/ssl/intermediate.crt /etc/nginx/ssl/root.crt > /etc/nginx/ssl/ssl-bundle.crt
Secure your Website with an SSL Certificate!
Ultahost SSL allows you to encrypt all the data between a visitor and the server with high-quality encryption makes sure that every packet is unbreachable.
Next, you need to configure the NGINX SSL certificate. Follow these steps:
Open the NGINX configuration file by typing the following command:
sudo nano /etc/nginx/sites-available/default
Now modify the server block to include SSL settings:
server {
    listen 443 ssl;
    server_name your_domain.com;

    ssl_certificate /etc/nginx/ssl/ssl-bundle.crt;
    ssl_certificate_key /etc/nginx/ssl/private.key;

    ssl_protocols TLSv1.2 TLSv1.3;
    ssl_ciphers HIGH:!aNULL:!MD5;

    location / {
        root /var/www/html;
        index index.html index.htm;
    }
}

Save and close the configuration file. Now test the configuration file with the following command:
sudo nginx -t
Reload NGINX with the following command to apply the changes:
sudo systemctl reload nginx
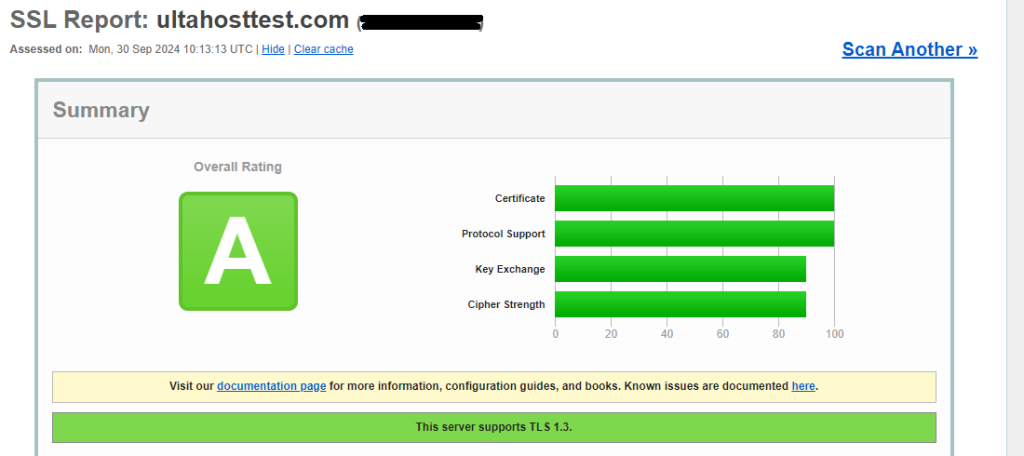
After NGINX enable SSL it is important to test the SSL configuration to ensure everything is working correctly. You can use online tools like SSL Labs to test your SSL configuration and identify any potential issues.
Also, Read How to Install SSL on Linux VPS Using Certbot.
Here are some common issues you might encounter and how to resolve them:
Installing an SSL certificate on your NGINX server is an important step to protect your website and your visitor’s data. By following these steps, you can successfully install an SSL certificate on your NGINX server ensuring secure communication and building trust with your users.
When you successfully install an SSL certificate ensure a secure and encrypted connection for your domain. This means your visitors can now browse your website in a protected environment. Now that your website is secured, consider taking it to the next level with Ultahost’s affordable web hosting. Get your website up and running in minutes with our user-friendly interface.
An SSL certificate secures data between a server and a browser by enabling HTTPS.
SSL certificates protect your website and data making your site more secure and trusted.
You can buy an SSL certificate from a provider or use a free option like Let’s Encrypt.
You need the SSL certificate file and the private key file to install SSL on NGINX.
Add the certificate and key file paths to your NGINX configuration and restart NGINX.
Yes, you can use Let’s Encrypt to install a free SSL certificate on NGINX.
Visit your website and ensure it loads with “https://” and shows a padlock icon in the address bar.