
How to Install Unity on Ubuntu
Unity is a popular, widely-used game engine that enable...


Deployment of Redis in Docker simplifies managing dependencies, improves efficiency, enhances the output of systems, and decreases conflicts. Redis is essential to streamline DevOps and microservices’ agility. With Docker, the risk of dependency conflicts and the need for rapid resource-intensive tasks are reduced. The multi-tenancy feature of Redis on Docker increases its capability to fight, with higher scalability as well as better isolation.
In this article, we’ll provide step-by-step directions for deploying as well as running Redis Docker container.
Let’s look at the key features of Redis and find out how Docker can improve the user experience:
Deploy Redis in Seconds with our Ubuntu VPS!
Launch Redis effortlessly using Docker on Ultahost’s powerful Ubuntu VPS. Enjoy fast deployment, stable performance, and dedicated support!
In this tutorial, we install Redis and test its operations and persistence capabilities, including systems and operations. Let’s begin by installing Redis on Docker:
Make sure that Docker is installed on your Linux system. To confirm the installation, use the following command:
docker --version

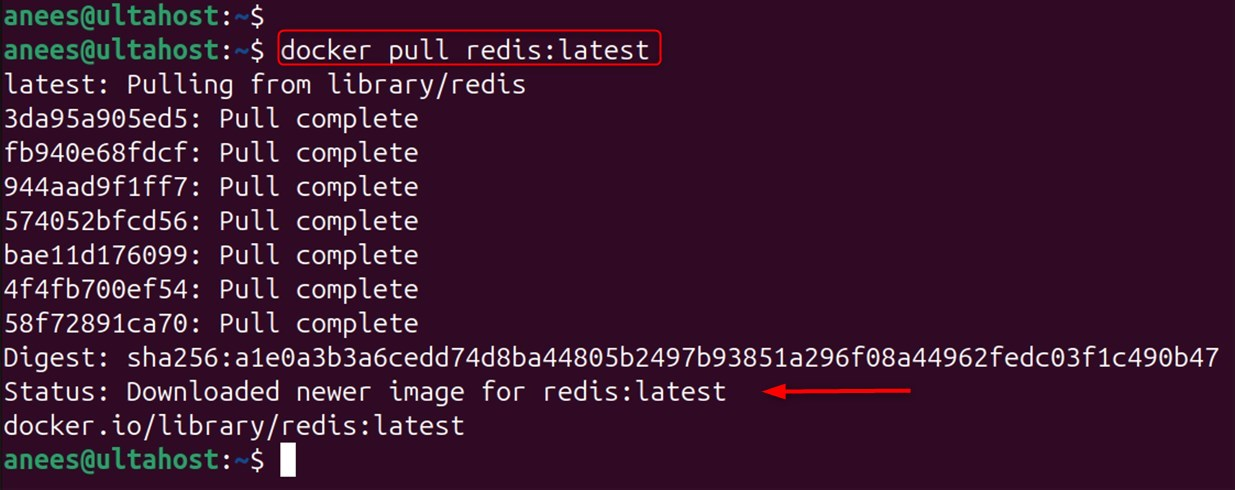
For the first time to get started, we’ll pull our Redis Docker image from Docker Hub. Redis offers an official version of its image available on Docker Hub. This means you can download the most recent, safe copies of images on Docker Hub:
docker pull redis:latest
The above command always retrieves the most current image:
After you have downloaded an image of the file, you are given the option of launching Redis within the Docker container that has the minimum of configurations:
docker run --name [Redis_image] -d redis:latest

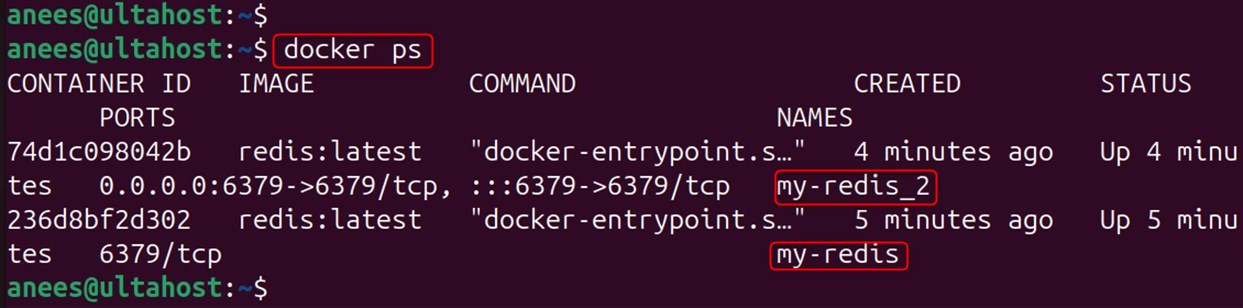
It creates a new container known as “my-redis” with the Redis image. The -d flag allows the container to be run as detached. This means that it will run in the background. The Redis server is running in the container using port 6379.
Before you can establish an external connection to your network, ensure you have the Redis port turned on:
docker run --name [Redis_image] -p 6379:6379 -d redis:latest

The -p 6379:6379 option connects port 6379 of your host computer to port 6379 within the container. This means that applications running on the host system, in other containers, or even other apps will have the ability to connect to Redis through localhost:6379.
You can confirm it by using this command:
docker ps
Read also How to Get All Keys in Redis?
To verify that Redis is necessary to join the Redis server using the Redis CLI. Start by opening the terminal:
docker exec -it [Redis_image] redis-cli

This command allows you to connect to the container using the Redis CLI.
To determine if Redis is running, try the following commands and verify that Redis is functioning:
SET mykey "Hello World"
GET mykey

The examples above illustrate the fundamental but essential functions provided by Redis. It allows data to be stored and then retrieved by keys.
In our case, with Redis, memory data, or in-memory database data, is crucial. For instance, if the container is stopped, this data is lost. For example:
docker run --name [Redis_image] -p 6379:6379 -v [redis_volume]:/data -d redis:latest redis-server --appendonly yes

The above command creates a named volume redis-data that is mounted to /data in the container. The --appendonly yes flag allows Redis persistent mode using append-only files, where writing operations will be logged for data preservation.
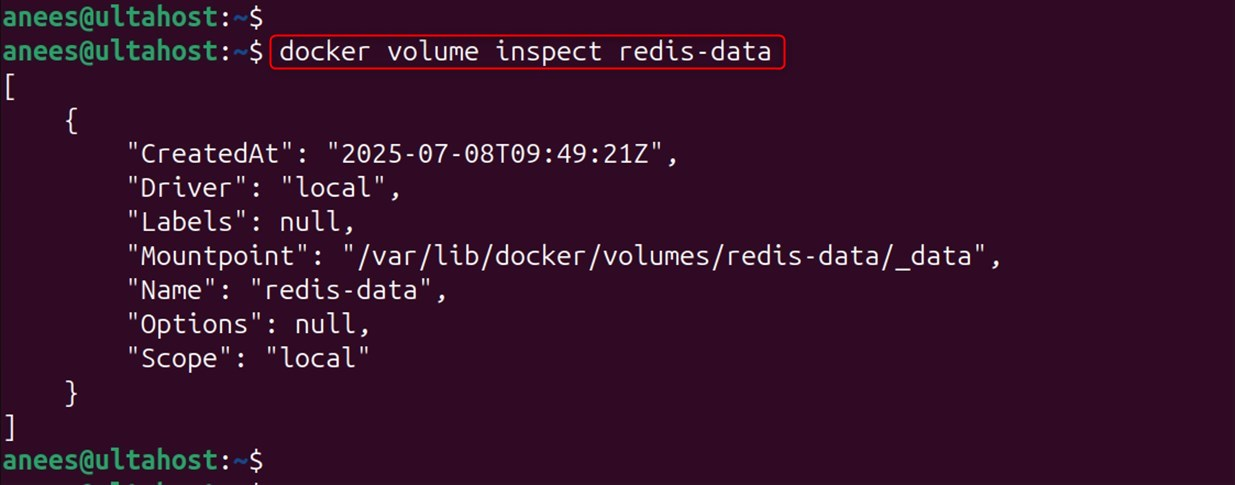
In Docker containers, information is often temporary. If the container is removed, there is a risk of permanent data loss because all stored information and settings will be deleted. In such situations, one must always attach a volume that will allow the user to save the configuration files with the written information:
docker volume inspect [redis_volume]
For production setups, you will likely require custom configurations for Redis. For that, create a Redis configuration file in your local directory:
# Create a custom redis.conf file
echo "maxmemory 256mb
maxmemory-policy allkeys-lru
save 60 1000" > redis.conf
Now, you can run the following command to mount this configuration file into the container:
docker run --name [Redis_image] -p 6379:6379 -v $(pwd)/redis.conf:/usr/local/etc/redis/redis.conf -v [redis_volume]:/data -d redis:latest redis-server /usr/local/etc/redis/redis.conf

With this configuration, you can adjust the memory limits, policy for eviction, and other intervals customized to your application’s needs.
Production Redis deployments are vulnerable to multiple security risks; therefore, security is essential. You can implement authentication by adding a password to your Redis configuration:
echo "requirepass mypassword" >> redis.conf
With this setup, clients must authenticate before command execution. This can be done by:
docker exec -it [Redis_image] redis-cli

Note: “auth mypassword” verifies authentication by adding a password.
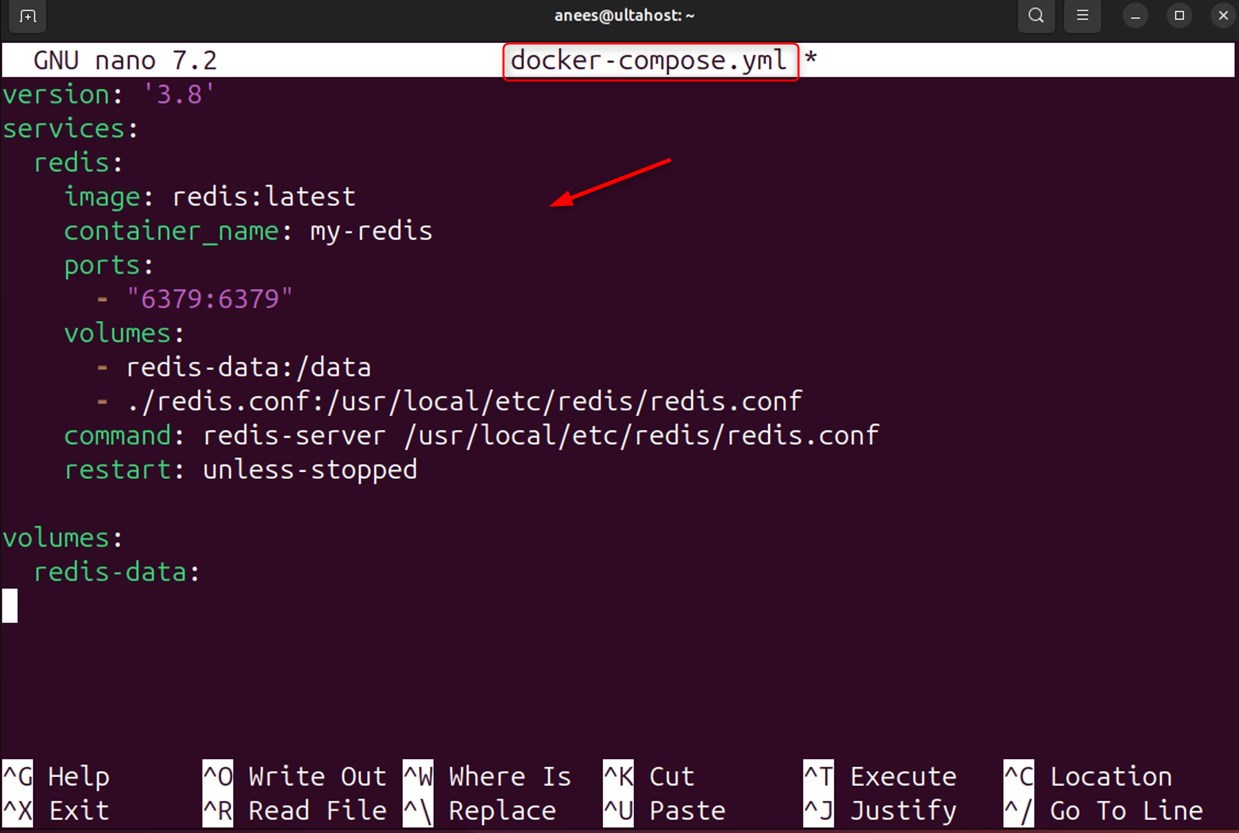
In case you have advanced scenarios that include several containers or services, Docker Compose is a more appropriate option. You just need to create a docker-compose.yml file:
version: '3.8'
services:
  redis:
    image: redis:latest
    container_name: my-redis
    ports:
      - "6379:6379"
    volumes:
      - redis-data:/data
      - ./redis.conf:/usr/local/etc/redis/redis.conf
    command: redis-server /usr/local/etc/redis/redis.conf
    restart: unless-stopped
volumes:
  redis-data:
Deploy using the following command:
sudo docker-compose up -d
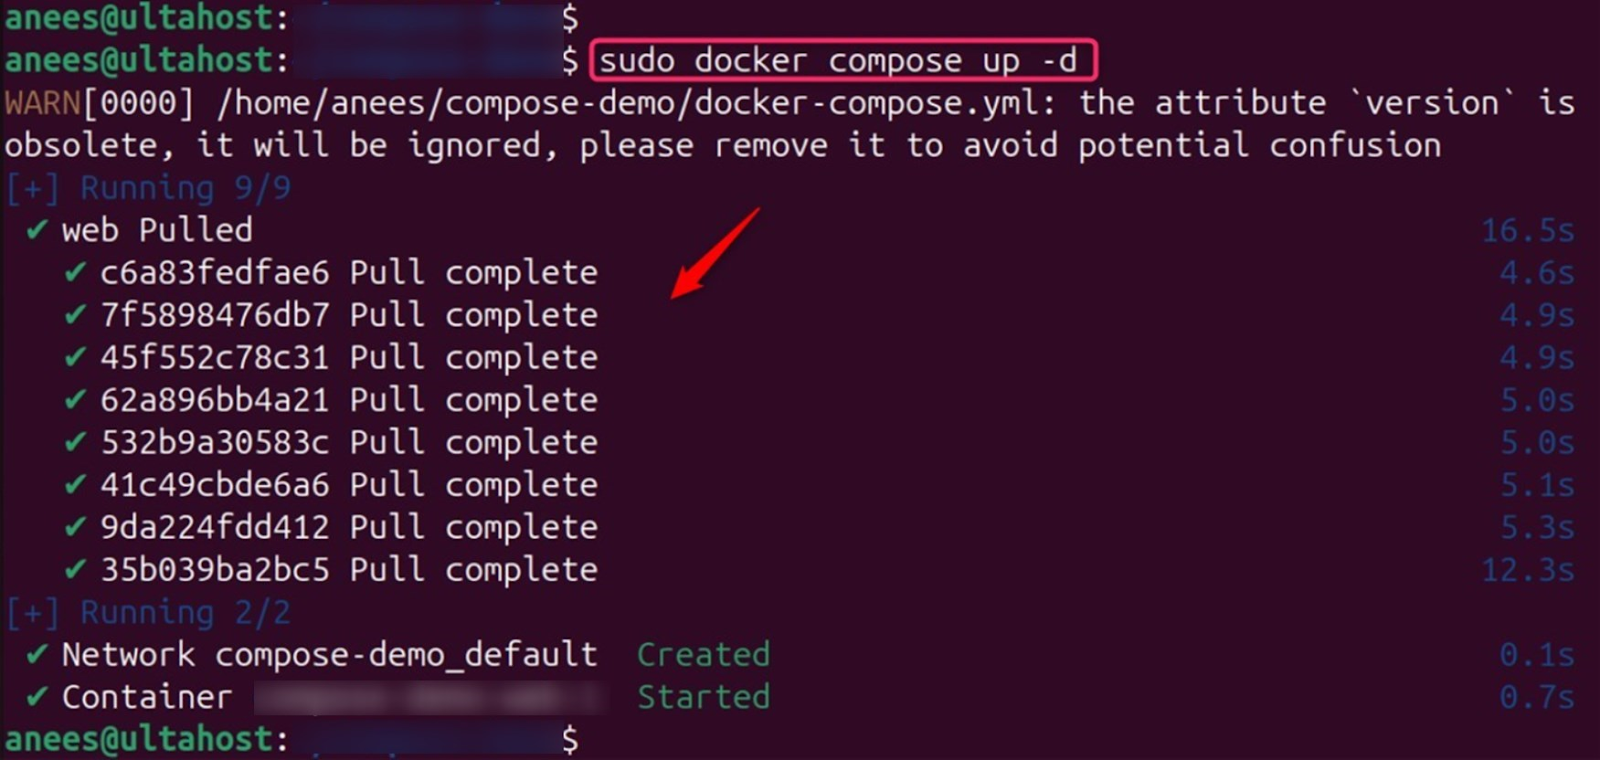
This way, you have better structure and control over multi-container applications.
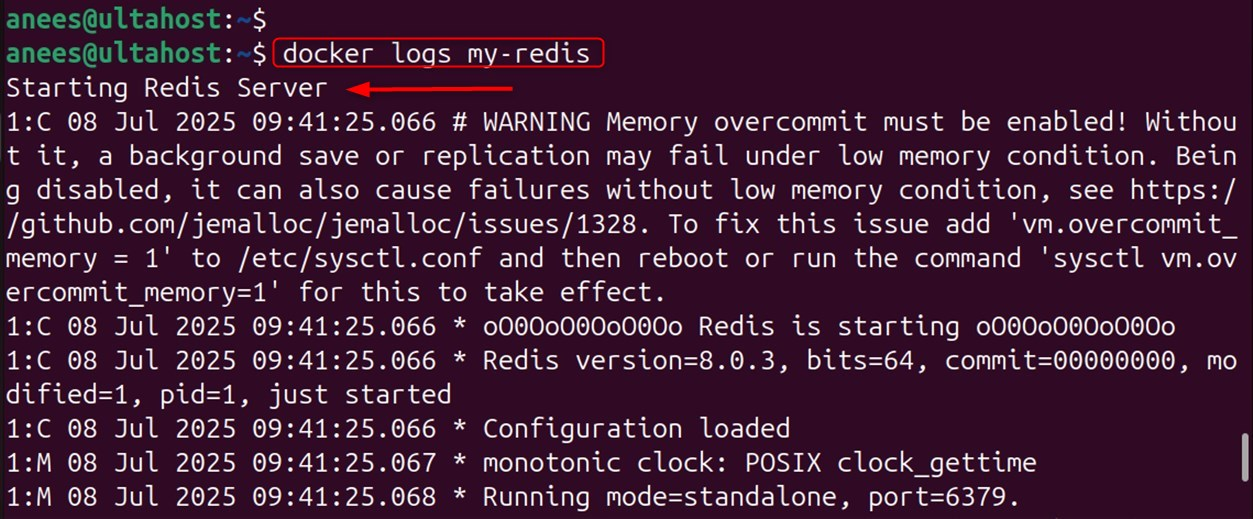
For production environments, monitoring Redis performance and Redis logs can be done through:
docker logs [Redis_image]
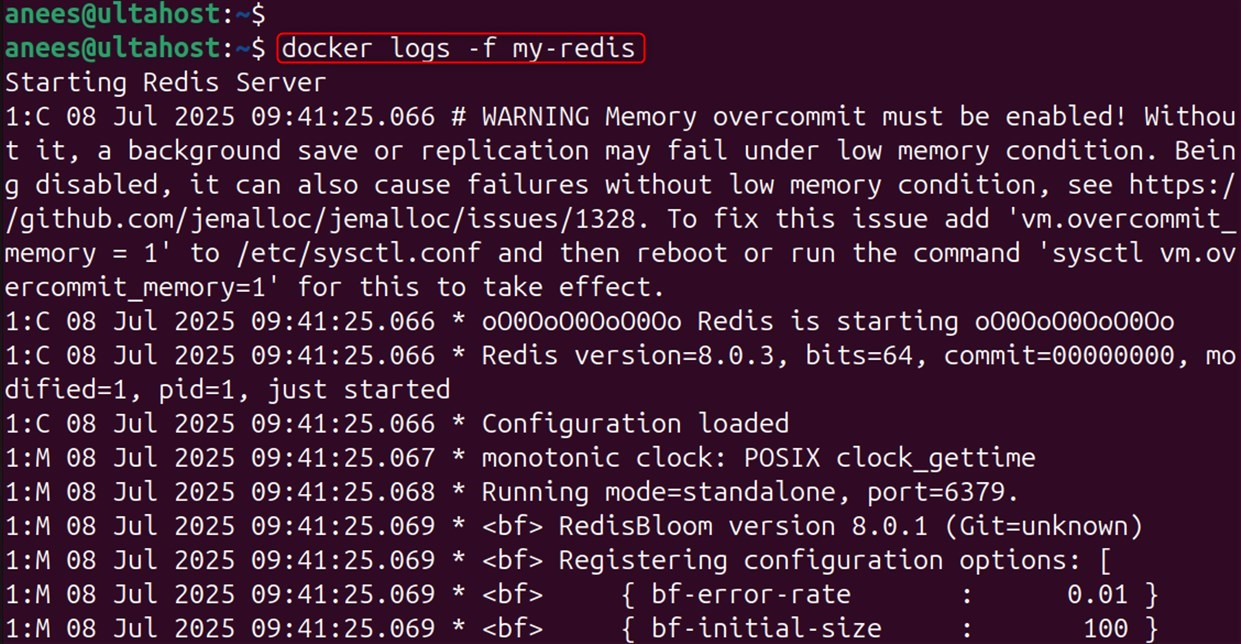
For more persistent monitoring, run the following commands:
docker logs -f [Redis_image]
Monitoring Redis performance can also be done through the CLI by executing the INFO commands, which provide adequate statistics.
While using Docker, you may gather unused containers and volumes. Let’s stop a container:
docker stop [Redis_image]

Now, remove a container:
docker rm [Redis_image]

Performance monitoring, data backups, and image updates are examples of regular maintenance. To update Redis:
docker pull redis:latest

Named volumes ensure that data persists through container recreations.
The deployment of Redis is simple in any context with Docker. These steps help in securely deploying Redis while making it easy to scale. Running Redis in Docker is an important skill for developers building systems locally and for DevOps engineers overseeing infrastructure. It improves workflow efficiency as well as the ability to scale services and ensures constant control of resources. When you run multiple containers, a simpler management process and a cleaner environment come. If Redis dockerfile is exposed to the internet, serious security risks can arise. Restrictions via firewalls are essential.
Deploy Docker on UltaHost’s DDoS-protected VPS Hosting for better performance, reliability, and to streamline your workflows. Enjoy ultra-fast SSD NVMe storage, DDoS protection up to 3500+ Gbps, and lightning-fast server deployment at a competitive price. Safeguard your business or online service with our top-tier firewalls!
Redis persists data in two ways. RDB (Redis Database) takes snapshots at defined intervals, whilst AOF (Append Only File) logs every modification made. RDB is more efficient for backups due to snapshots, while AOF log documents are slower. AOF is better as it provides greater durability and protection against failure. The safest option is to enable both modes simultaneously.
To backup redis data from docker containers, bash file interface tools could be used (save command, BGSAVE using redis-cli), as with the example command: docker exec my-redis redis-cli BGSAVE. You can also retrieve the saved files using mounted volumes. Alternatively, you may use docker cp to copy the container volume or copy the volume folder from the host’s mounted directory.
It is possible to run multiple Redis instances on the same host provided that there is a unique container name as well as port assigned. An example is provided below: docker run –name redis-instance-2 -p 6380:6379 -d redis:latest. Each instance must have a unique host port and container name, otherwise, the instances will conflict with each other.
Either approach works: setting maxmemory in redis.conf or using Docker’s –memory flag: docker run –name my-redis –memory=512m -p 6379:6379 -d redis:latest. In this example, the latter will hard limit the memory allocated to the system by the container.
In these scenarios, all Redis data will be erased without volume mounting. To ensure that data can be retrieved, volumes (-v flag) or bind mounts must be used. In production environments, named volumes are preferred as they are more performant than bind mounts since they are managed by Docker.
Custom networks can be established via docker network create my-network and subsequently start redis with –network my-network. All containers started within the same network can access Redis using the hostname.
Ensure that data persistence is properly secured, monitoring is set, appropriate authentication, isolation controls, and periodic backups are enforced. Always start with the official Redis images and make sure they’re regularly updated. For higher availability, utilize orchestration tools such as Docker Swarm or Kubernetes.
UltaAI – Smart AI Assistant for Ultahost Clients
UltaAI is your advisor for anything related to domain or hosting. Experience personalised suggestions.