
How to Configure SendGrid in WordPress to Sen...
WordPress can send basic emails like registration and p...


Kubernetes, a powerful container orchestration platform, is increasingly becoming the preferred choice for deploying web applications. Deploying a WordPress instance on Kubernetes can significantly enhance the scalability reliability and manageability of your website.
In this article, we will discuss the process from setting up your Kubernetes cluster to configuring persistent storage and deploying WordPress.
Kubernetes an open source container orchestration platform allows you to automate the deployment scaling and management of containerized applications. WordPress a popular content management system can benefit greatly from Kubernetes capabilities especially in handling high traffic and ensuring high availability.
Before we start Kubernetes WordPress deployment make sure you have the following:
Following are some steps on how to deploy WordPress instances on Kubernetes:
If you do not already have a Kubernetes cluster you can setup by installing Minikube on Ubuntu machine. After that run the following command on your local development:
minikube start --driver=<driver-name>
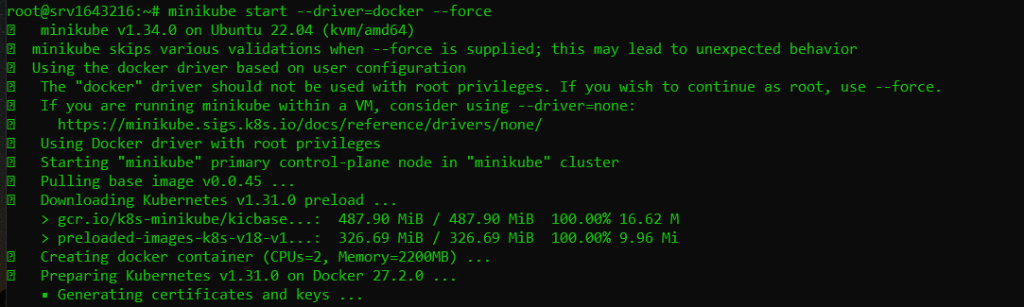
Replace <driver-name> with a pre-installed driver for example I am using Docker. For this, you need to install Docker on Ubuntu system. It is important to note that while you start Minikube with root privileges use --force argument.
Helm simplifies the deployment of applications on Kubernetes by using pre-configured charts. Install Helm using the following commands:
curl https://raw.githubusercontent.com/helm/helm/master/scripts/get-helm-3 | bash

WordPress requires a database to store its data. We will use MySQL for this purpose. Create a Kubernetes secret to store the MySQL root password:
kubectl create secret generic mysql-pass --from-literal=password=YOUR_PASSWORD

Next, create a PersistentVolume and PersistentVolumeClaim for MySQL. You can create these files in any directory on your local machine.
# mysql-pv.yaml
apiVersion: v1
kind: PersistentVolume
metadata:
  name: mysql-pv
spec:
  capacity:
    storage: 10Gi
  accessModes:
    - ReadWriteOnce
  hostPath:
    path: "/mnt/data"
---
apiVersion: v1
kind: PersistentVolumeClaim
metadata:
  name: mysql-pv-claim
spec:
  accessModes:
    - ReadWriteOnce
  resources:
    requests:
      storage: 10Gi
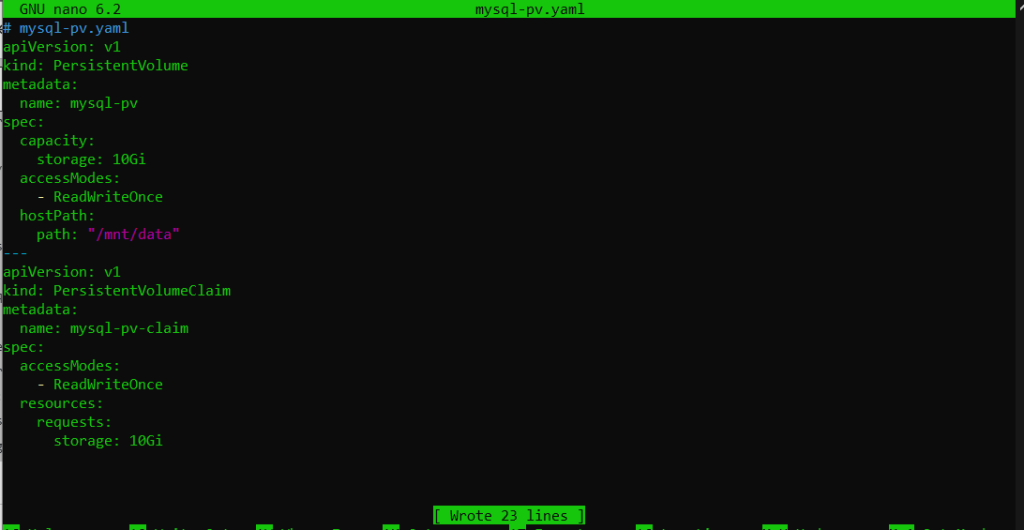
Apply the configuration:
kubectl apply -f mysql-pv.yaml

Now, create a MySQL deployment and service:
# mysql-deployment.yaml
apiVersion: apps/v1
kind: Deployment
metadata:
  name: mysql
spec:
  selector:
    matchLabels:
      app: mysql
  strategy:
    type: Recreate
  template:
    metadata:
      labels:
        app: mysql
    spec:
      containers:
      - image: mysql:5.6
        name: mysql
        env:
        - name: MYSQL_ROOT_PASSWORD
          valueFrom:
            secretKeyRef:
              name: mysql-pass
              key: password
        ports:
        - containerPort: 3306
          name: mysql
        volumeMounts:
        - name: mysql-persistent-storage
          mountPath: /var/lib/mysql
      volumes:
      - name: mysql-persistent-storage
        persistentVolumeClaim:
          claimName: mysql-pv-claim
---
apiVersion: v1
kind: Service
metadata:
  name: mysql
spec:
  ports:
  - port: 3306
  selector:
    app: mysql
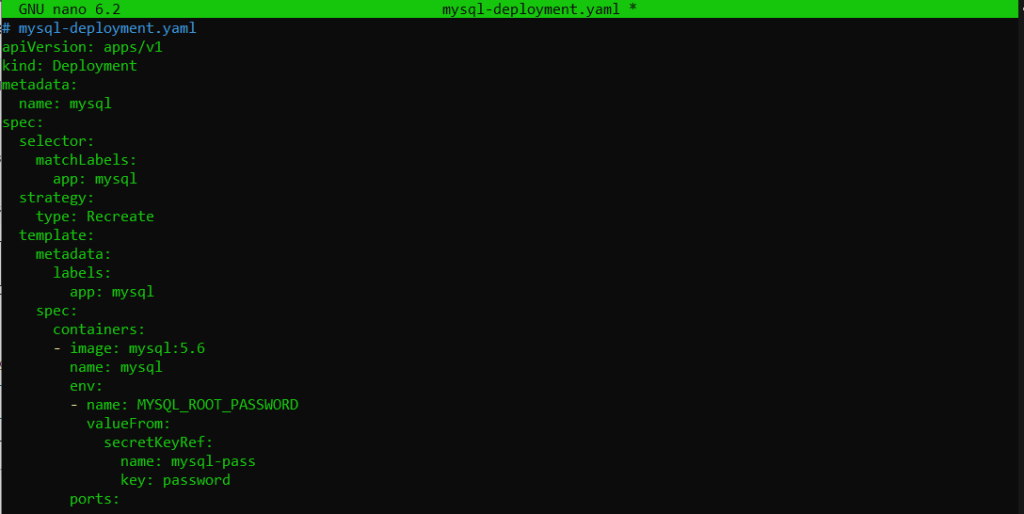
Apply the configuration:
kubectl apply -f mysql-deployment.yaml
Unleash the power of Scalable WordPress Hosting
Increase the speed of your WordPress website with Ultahost’s scalable WordPress hosting and provide your visitors with the best possible faster page-loading experience.
Create a PersistentVolume and PersistentVolumeClaim for WordPress:
# wordpress-pv.yaml
apiVersion: v1
kind: PersistentVolume
metadata:
  name: wordpress-pv
spec:
  capacity:
    storage: 10Gi
  accessModes:
    - ReadWriteOnce
  hostPath:
    path: "/mnt/data"
---
apiVersion: v1
kind: PersistentVolumeClaim
metadata:
  name: wordpress-pv-claim
spec:
  accessModes:
    - ReadWriteOnce
  resources:
    requests:
      storage: 10Gi
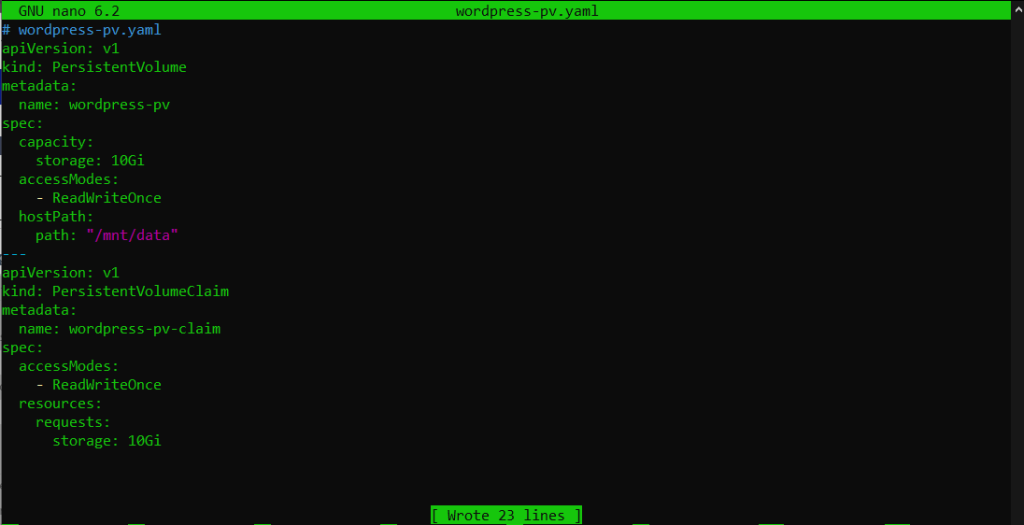
Apply the configuration:
kubectl apply -f wordpress-pv.yaml

Now, create a WordPress deployment and service:
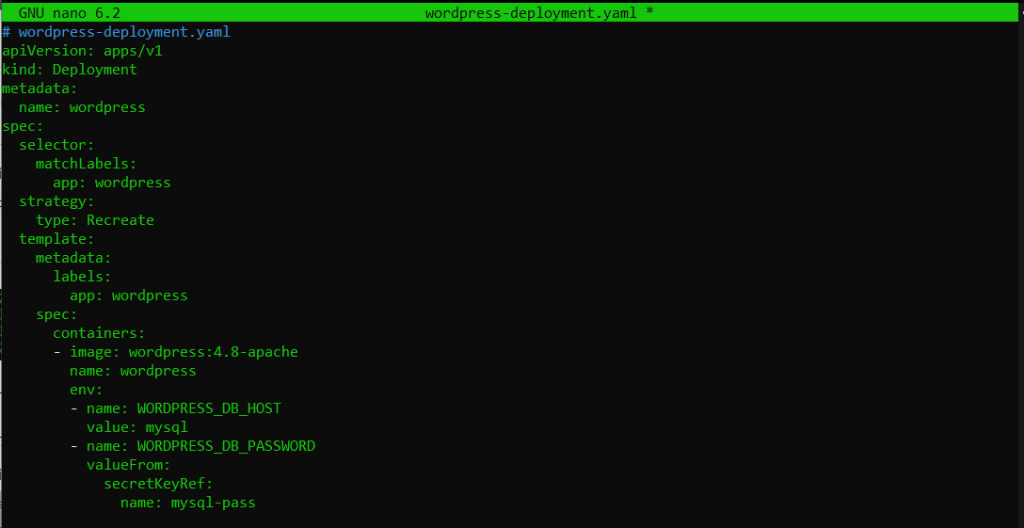
# wordpress-deployment.yaml
apiVersion: apps/v1
kind: Deployment
metadata:
  name: wordpress
spec:
  selector:
    matchLabels:
      app: wordpress
  strategy:
    type: Recreate
  template:
    metadata:
      labels:
        app: wordpress
    spec:
      containers:
      - image: wordpress:4.8-apache
        name: wordpress
        env:
        - name: WORDPRESS_DB_HOST
          value: mysql
        - name: WORDPRESS_DB_PASSWORD
          valueFrom:
            secretKeyRef:
              name: mysql-pass
              key: password
        ports:
        - containerPort: 80
          name: wordpress
        volumeMounts:
        - name: wordpress-persistent-storage
          mountPath: /var/www/html
      volumes:
      - name: wordpress-persistent-storage
        persistentVolumeClaim:
          claimName: wordpress-pv-claim
---
apiVersion: v1
kind: Service
metadata:
  name: wordpress
spec:
  ports:
  - port: 80
  selector:
    app: wordpress
  type: LoadBalancer
Apply the configuration:
kubectl apply -f wordpress-deployment.yaml

To access your WordPress site you need the external IP address of the WordPress service. Run the following command to get the IP address:
kubectl get svc wordpress

Open a web browser and navigate to the IP address. You should see the WordPress installation page.
One of the key benefits of using WordPress Kubernetes is the ability to scale applications easily. To scale your WordPress deployment, use the following command:
kubectl scale deployment wordpress --replicas=3
This command will create additional replicas of the WordPress pods distributing the load and ensuring high availability.
Learn about How to Install Kubernetes on Ubuntu 22.04.
Monitoring and logging are important for maintaining the health and performance of your WordPress instance. Kubernetes provides several tools for this purpose such as Prometheus for monitoring and Fluentd for logging.
Prometheus
Prometheus is an open source monitoring and alerting toolkit. To deploy Prometheus on Kubernetes you can use the Prometheus Operator:
kubectl apply -f https://raw.githubusercontent.com/coreos/prometheus-operator/master/bundle.yaml
Fluentd
Fluentd is an open source data collector for unified logging. To deploy Fluentd on Kubernetes you can use the Fluentd Helm chart:
helm repo add fluent https://fluent.github.io/helm-charts && helm install fluentd fluent/fluentd
Deploying a WordPress instance on Kubernetes involves several steps from setting up your Kubernetes cluster to configuring persistent storage and deploying WordPress. By following this guide you can set up Kubernetes powerful features to ensure your WordPress site is scalable reliable and easy to manage.
Discover a seamless KVM VPS server that helps to install Kubernetes where reliability converges with security. Ultahost ensures efficient server management and dedicates resources to guarantee optimal speed and stability. Elevate your online presence with us.
Kubernetes is a system for automating the deployment, scaling, and management of containerized applications.
Yes, WordPress can be deployed on Kubernetes for better scalability and management.
Kubernetes helps you scale WordPress easily and manage its resources more efficiently.
Some basic knowledge of Docker and Kubernetes commands is helpful, but you can follow guides.
Kubernetes itself is free but you may need cloud services like Google Cloud or AWS, which can have costs.
You can use persistent storage, like Persistent Volumes, to store WordPress data securely.
Set up a Kubernetes cluster, create a WordPress container, configure storage, and deploy the instance.

WordPress can send basic emails like registration and p...
WordPress is a free, open-source content management sys...
Did you know that choosing the wrong plan can increase ...
The most effective and easy-to-use functionality elemen...
Optimizing your WordPress site’s performance is impor...
Protecting your WordPress website is essential to secur...