
How to Install Snap on Ubuntu
Snap is a universal package manager that allows you to ...


Git is fundamental with Ubuntu when it comes to software development and system maintenance. With Git, changes can be monitored, collaboration is possible, work can be done independent of being online, and it integrates with different platforms. Git is also widely accepted and is the best option to learn how to manage packages. The version control system is essential while multiple developers work simultaneously on a project. Install Git Ubuntu helps set the foundations needed to progress in technology.
This article focuses on how we can configure Git on Ubuntu Linux. The world we live in today, knowing how to use Git on Ubuntu is essential for collaborative development and Managing Projects.
Git is a free, open-source, and multi-platform distributed version control system for tracking changes within any file or set of files, most commonly used in source code management. You can track the changes accomplished to a project over time, go back to earlier version(s), or work with other developers easily. The following items are features of Git.
Learn about setting up an FTP server on Ubuntu.
Git can be a bit complex to learn at first, but it’s an important tool that can save you a lot of time in the long run. If you’re a developer, learning Git is essential. And even if you’re not a developer, Git can still be useful for tracking changes in any set of files, such as documents or photos. To Git install Ubuntu there are two ways to:
This method is the easiest and recommended for most users, as it uses the built-in apt package manager to install Git for Ubuntu directly from the official Ubuntu repositories. This ensures compatibility and simplifies the installation process. Before installing any software, it is important to check your package lists are up-to-date. This involves downloading the latest versions and compatibility information. To achieve this, run the following command in your terminal:
sudo apt update
This command fetches the latest information about available packages from the Ubuntu repositories. Below the image describe how the command works:

Installing Git:
Once your package lists are updated, installing Git is a simple process. To setup Git on Ubuntu, simply run the following command:
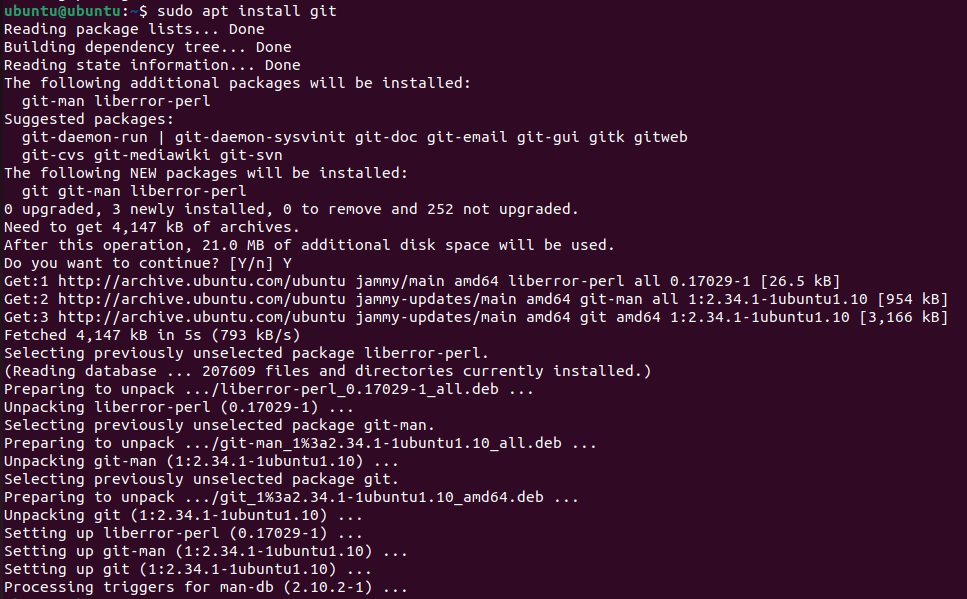
sudo apt install git
The sudo prefix grants temporary administrative privileges to execute the command, while apt install instructs the package manager to install the specified software. Here screenshot below installation of Git looks like this:
Verifying the Installation:
To confirm Git’s successful installation, run the following command:
git --version
This should display the installed Git version number, indicating a successful installation.

If users want the latest version of Git or have specific customization requirements. However, it requires manual compilation from the source code and is generally more complex than using apt.
Installing Dependencies:
Before compiling Git, ensure you have the necessary development libraries installed. Run the following command to install these dependencies:
sudo apt install build-essential libssl-dev libcurl4-gnutls-dev libexpat1-dev gettext libz-dev libssl-dev
These libraries provide essential functionalities for building and running Git.
Git source code:
Navigate to the official Git download page and choose the desired version. Download the source code tarball for example filename looks like “git-2.35.3.tar.gz”.
Extracting the Tarball:
Open a terminal in the directory where you downloaded the tarball and extract it using the following command:
tar -xzvf git-2.35.3.tar.gz
This creates a directory containing the Git source code files.
Configuring and Building Git:
Navigate to the extracted directory and run the following commands sequentially:
make configure
./configure --prefix=/usr
make
These commands configure the build process, specifying the installation location /usr and compiling the Git binary.
Installing Git:
To finalize the installation, run the following command:
sudo make install
This installs the compiled Git binary into the system directory, making it accessible globally.
Experience the power of Ubuntu VPS
Get the reliability of the world’s most popular Linux distro and the flexibility of a virtual server. Enjoy blazing-fast speeds and low latency.
After installation, it’s recommended to configure your Git username and email address globally using the following commands:
git config --global user.name "Your Name"
git config --global user.email "[email protected]"
These details will be associated with your Git commits in various projects. For upgrading Git by using the apt method, updating to the latest version. Run the following command:
sudo apt upgrade git
This command automatically retrieves and installs any available Git updates.
Here are the key reasons why Git is essential on Ubuntu Linux systems, especially for software development and system administration:
Choosing the Git installation method depends on your specific needs and preferences. For most users, the apt method is sufficient and convenient. However, advanced users or those requiring the latest Git version might prefer the manual compilation approach.
Installing Git on Ubuntu is a pretty simple process but when it comes to bigger projects you need to start collaborating on code, managing projects, and deploying changes with ease, you need a powerful and reliable platform to host your Git repositories and other Ubuntu projects, look no further than Ultahost’s Linux VPS hosting. We offer quick loading times and smoothness in your Git operations.
Git is a version control system that helps you track changes in your files, making collaboration on projects easier.
Installing Git on Ubuntu allows you to manage and track changes in your code, enabling efficient collaboration and version control.
Open your terminal and type “git –version.” If Git is installed, it will display the version; otherwise, you’ll need to install it.
You can install Git on Ubuntu using two methods the apt manager and manual installation.
A strong web development environment is key to making d...

Time To Live (TTL) is a numeric descriptor for how long...
Managing and transferring files efficiently is a key pa...