
How to Install Mozilla Firefox on Windows
Mozilla Firefox is a popular web browser known for its ...


Go, also known as Golang, is a powerful and efficient programming language developed by Google. It’s known for its fast compilation times, efficient memory management, and built-in concurrency features making it ideal for building scalable and reliable applications. Windows users can leverage Go’s capabilities to build high-performance applications, networked and cloud systems, and distribute tasks efficiently.
Installing Go on your Windows machine opens up a world of possibilities for developing high-performance applications. In this guide, we’ll provide a clear and concise walkthrough of the installation process, ensuring you have a smooth and successful setup.
Before installing Go on Windows, it’s essential to ensure your system meets the minimum requirements. This section outlines the minimum and recommended system requirements for a successful installation.
Minimum System Requirements:
Recommended System Requirements for Optimal Performance:
Meeting these requirements ensures a smooth installation process and allows you to develop and run Go applications efficiently. Insufficient resources can lead to errors, slow compilation times, and overall performance issues. To mitigate these problems.
Unlock Seamless Performance with Windows 10 VPS
Transform your digital experience with our Windows 10 VPS, delivering unrivaled efficiency and power. Unlock the peak of performance today!
Now that you’ve confirmed your system meets the requirements, let’s dive into the step-by-step process of installing Go on your Windows machine.
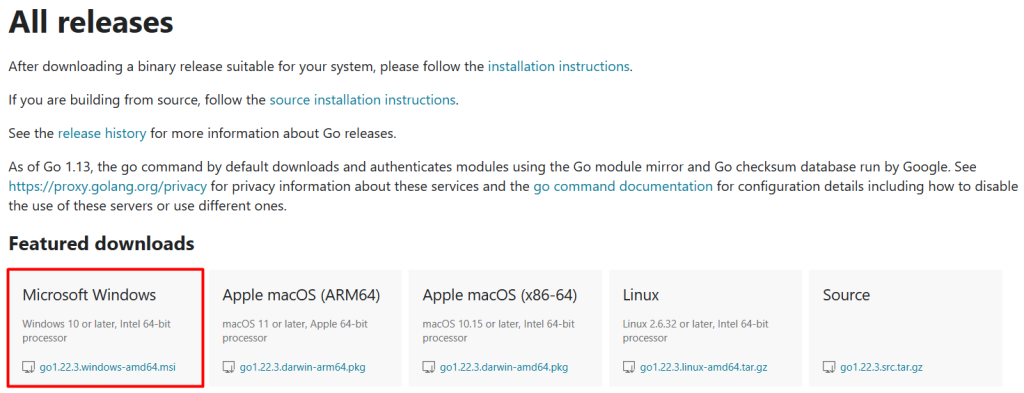
Step 1: Downloading Go
To get started with installing Go on Windows, you need to download the Go install from the official Go website.
Step 2: Run the Installer
Once the download is complete, locate the downloaded MSI file in your browser’s download directory or the specified download location. Double-click the MSI file to launch the Go installation wizard. And also download Golang.
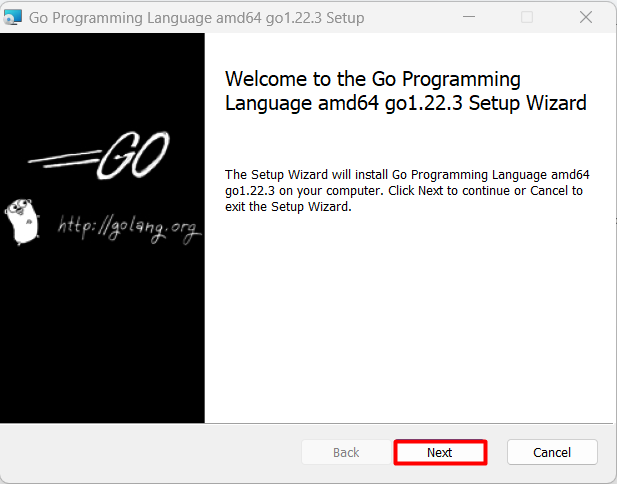
Step 3: Welcome Screen
The first screen welcomes you to the Go installation wizard and you need to click on “Next” to proceed.
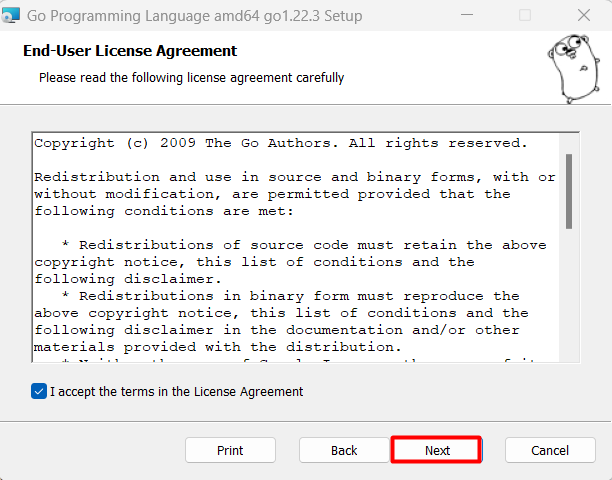
Step 4: Accepting the License Agreement
On the next screen, you’ll be presented with the Go license agreement. Take your time to read through the agreement carefully. If you agree to the terms and conditions outlined in the license agreement, check the box next to “I accept the terms in the License Agreement.” Once you’ve accepted the terms, click the “Next” button to continue:
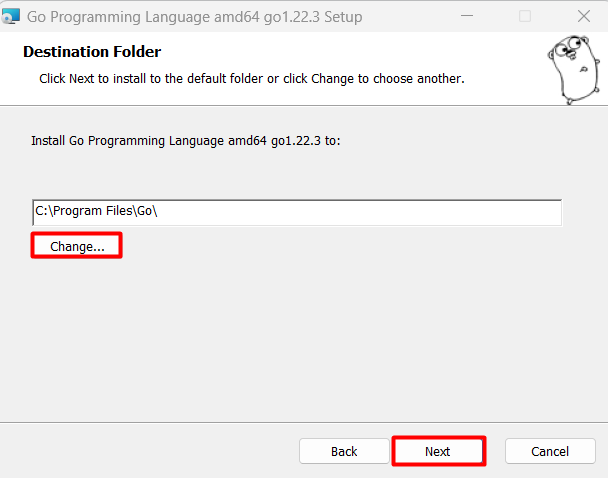
Step 5: Choosing the Installation Directory
The next screen allows you to choose the directory where Go will be installed on your system. By default, Go is installed in the “C:\Go” directory. If you prefer to install Golang in a different location, click the “Browse” button and navigate to your desired directory. It’s recommended to stick with the default installation directory unless you have a specific reason to change it. Once you’ve selected the installation directory, click “Next” to proceed:
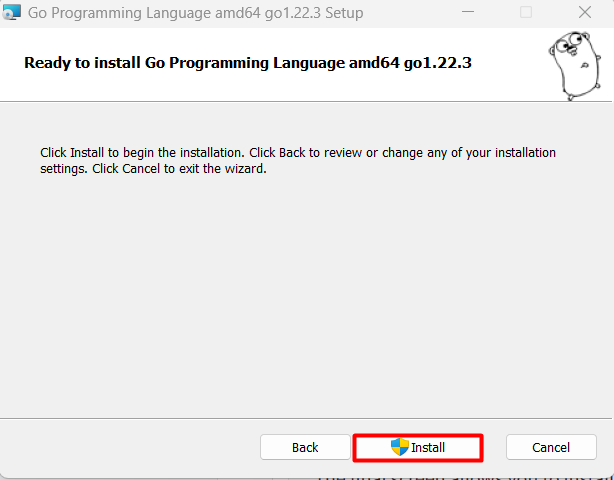
Step 6: Ready to Install
At this point, you’ve completed all the necessary configuration steps, and the installer is ready to install Go Windows machine. Review the installation settings displayed on the screen to ensure everything is correct. If you need to make any changes, click the “Back” button to go back to the previous steps. If you’re satisfied with the settings, click the “Install” button to begin the installation process.
The installer will now copy the necessary files and set up Go on your system. This process may take a few minutes, depending on your system’s speed. Be patient and allow the installer to complete the installation without interruption.
Once the installation is complete, you’ll see a final screen confirming the successful installation of Go on your Windows machine. Click the “Finish” button to exit the installer and close the installation wizard:

Step 7: Verifying Go
After completing the installation process, it’s crucial to verify that Go has been installed correctly and is functioning as expected. This can be done using a command prompt and to open that you need to press the Windows key + R to open the Run dialog box. Type “cmd” and press Enter to open the Command Prompt.
In the Command Prompt, type the following command and press Enter:
go version

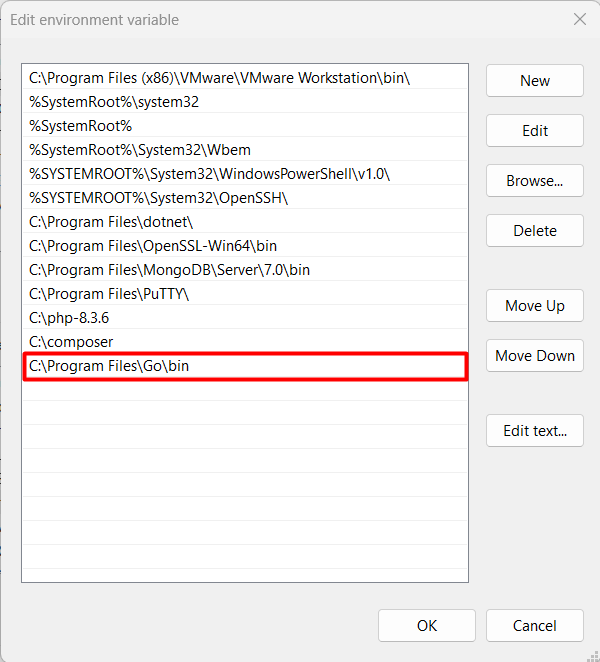
If Go is installed correctly, you should see the version number of Go displayed in the Command Prompt. Seeing the Go version information confirms that Go has been installed successfully on your Windows machine. The following image verifies the Go Installation in the environment variable section.
Now that you’ve installed Go on your Windows machine, it’s time to set up your development environment. Here are a few essential tools you’ll need to get started:
Text Editor or IDE
You’ll need a text editor or an Integrated Development Environment (IDE) to write and edit Go code. Some popular choices include Visual Studio Code, IntelliJ IDEA, and Sublime Text.
GoLand
GoLand is a popular IDE specifically designed for Go development. It provides features like code completion, debugging, and project management.
Git
Git is a version control system that helps you manage your code changes. You’ll need Git to collaborate with other developers and track changes to your code.
Installing Go on Windows is a straightforward process that can be done by following the detailed guidelines discussed in this article. By following the step-by-step guide provided in this article, you can ensure a smooth installation and get started with Go development on your Windows machine. From downloading the installer to verifying the successful installation, each step is clearly explained, ensuring that you don’t find any problems while installing it.
With Go installed, you can leverage its powerful features to build scalable and reliable applications. Whether you’re a seasoned developer or just starting out, Go’s simplicity and efficiency make it an ideal choice for building high-performance systems.
Installing the Go language on Windows successfully lays a strong foundation for your development projects. Pairing this setup with reliable performance with Ultahost’s affordable Windows VPS hosting service can further enhance your workflow by providing a cost-effective solution for deploying your Go applications, ensuring you have all the essential resources without straining your budget.
To install Go on Windows, you need:
You can download the Go installer from the official Go website: golang.org/dl.
GOPATH is an environment variable that specifies the location of your Go workspace. It is where Go code, binaries, and packages are stored. Setting up GOPATH ensures that Go knows where to find your projects and dependencies.
Mozilla Firefox is a popular web browser known for its ...

RubyMine is an integrated development environment (IDE)...
Ansible is a powerful automation tool that simplifies i...
PyCharm is a powerful Integrated Development Environmen...
Windows Firewall is a built-in security feature designe...