Understanding TTL values and How to Choose th...
Time To Live (TTL) is a numeric descriptor for how long...
Ubuntu provides a pre-installed firewall configuration tool called Uncomplicated Firewall (UFW). This is an easy-to-use tool that helps us manage server firewall settings. However, the pre-installed UFW tool is CLI-based. Moreover, Ubuntu provides the Graphical Uncomplicated Firewall (GUFW) for users who prefer graphical user interfaces (GUIs). This tool isn’t pre-installed but can be easily installed on Ubuntu from the terminal or Software Center.
In this tutorial, we will discuss how to install and configure the graphical uncomplicated firewall on Ubuntu.
GUFW (Graphical Uncomplicated Firewall) is a user-friendly graphical tool for managing UFW Firewall on Ubuntu systems. It provides a simple interface that helps users control the built-in firewall easily. With GUFW, you can create firewall rules and manage settings with minimal effort. Moreover, it enables you to control incoming and outgoing network traffic based on specified criteria. This makes it accessible to users with different levels of technical knowledge.
We can install a Graphical Uncomplicated Firewall on Ubuntu using the terminal as well as the Software/Ubuntu Center. Let’s go through each method one by one.
First, open the terminal and then run the following command to add the Universe repository to the list of system repositories:
sudo add-apt-repository universe
Now update and upgrade system repositories by executing the following command:
sudo apt update && sudo apt upgrade -y
Finally, run the below-given command to install GUFW on Ubuntu:
sudo apt install gufw -y
On successful installation, the graphical interface for UFW will be ready to use.
Read also How to install UFW on Ubuntu 22.04
You can also install GUFW using a GUI method, i.e., from Ubuntu Center. For this purpose, first, open the Ubuntu Software Center, type GUFW in the search bar, and click on the Firewall Configuration package:
After this, you’ll be navigated to a new page; click on the install button to install GUFW on Ubuntu:
It will take some time to complete the installation. Once completed, click on the open button to start using it.
Install GUFW on Our Ubuntu VPS!
Experience the reliability of the world’s leading Linux distribution combined with the flexibility of a virtual server. Enjoy lightning-fast performance and low latency.
Let’s go through the following steps to learn how to turn on GUFW, configure firewall rules, and use it on Ubuntu.
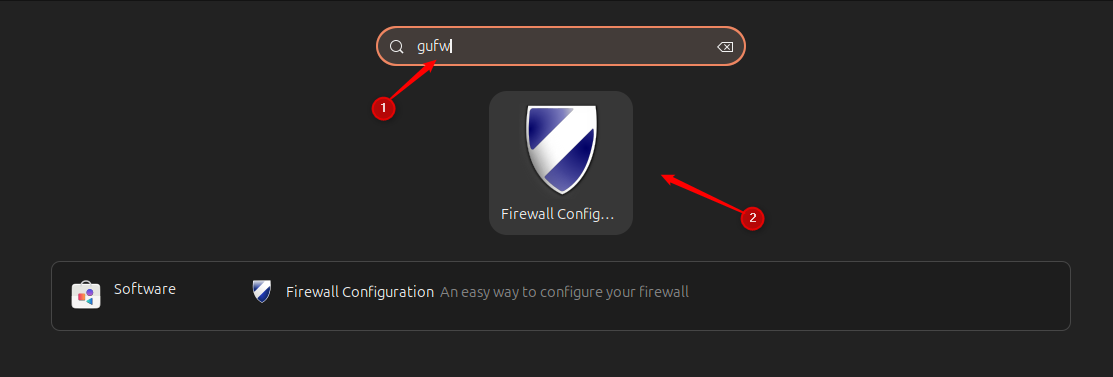
Let’s search gufw in the search bar and click on the firewall configuration app to open it:

Alternatively, you can run the gufw command with sudo privileges from the terminal to open the GUFW on Ubuntu:
sudo gufw
The GUFW home screen shows multiple parameters like profile, status, and incoming & outgoing traffic rules. You can enable or disable the firewall using the toggle switch for the status:
GUFW profiles are preset firewall settings for different security needs. You can customize these rules and switch profiles based on your network connection.
The preconfigured GUFW profiles are listed below:
Moreover, we can create customized profiles or remove existing profiles. For instance to create a custom profile, navigate to the Edit tab and select Preferences:
In the firewall preferences, click on the “+” icon to add a new profile and double-click on the newly added profile to rename it:
Similarly, you can remove a profile by selecting it and then clicking on the “–” sign.
Each GUFW profile supports custom rules, which require understanding your network environment and security needs. These network rule policies include “Allow” to accept all traffic on a port, “Deny” to block all traffic on a port, “Reject” to block traffic on a port and inform the requester, and “Limit” to block traffic after six attempts within the last thirty seconds.
To add a GUFW rule, select a profile for which you want to add a rule, then click on the “+” button:
Upon clicking the + button, a new window pops up that shows “Preconfigured”, “Simple”, and “Advance” tabs for adding rules:
Set up the rules as per your needs, and click on the Add button to add the rule, then the Close button to exit the “Add a Firewall Rule” window.
Ubuntu’s Graphical Uncomplicated Firewall (GUFW) is a user-friendly tool that simplifies the management of firewall settings. It supports both terminal and Software Center installation methods, which makes it accessible to all users. With GUFW, you can easily enable or disable the firewall, customize profiles, and create specific firewall rules to control network traffic. In this article, we provided a comprehensive guide on installing and configuring GUFW to ensure users can effectively manage their firewalls with minimal effort.
Installing the Graphical Uncomplicated Firewall (GUFW) on Ubuntu provides a user-friendly way to manage basic firewall protection. You can upgrade to an Ultahost Linux VPS hosting plan for complex server environments, giving you enhanced control and security while using advanced firewalls alongside GUFW for a stronger, multi-layered defense.
GUFW is a user-friendly GUI for managing the UFW firewall on Ubuntu systems. It simplifies the control of incoming and outgoing network traffic.
No, GUFW is not pre-installed on Ubuntu. However, you can easily install it using the terminal or the Ubuntu Software Center.
To install GUFW on Ubuntu using the terminal, first, add the Universe repository, update your system, and then run the sudo apt install gufw -y command.
Yes, you can install GUFW on Ubuntu through the Ubuntu Software Center. To do this, simply search for GUFW in the Ubuntu Center, click on the Firewall Configuration package, and then click the Install button.
You can open GUFW by searching for it in the application menu or by running the command sudo gufw in the terminal.
Yes, you can create custom firewall rules in GUFW by selecting a profile and clicking the “+” button to add new rules based on your specific network needs.
GUFW allows you to set rules to Allow, Deny, Reject, or Limit traffic on specific ports, providing control over how your UFW GUI handles network requests.