
How to Enable or Disable IPV6 on Ubuntu Linux
IPv6, also known as Internet Protocol version 6, offers...


Java is a flexible programming language that can be used for anything from developing mobile and web applications to enterprise software. If you want to harness the power of Java on your Ubuntu 22.04, this guide will walk you through the installation process step by step.
It doesn’t matter if you are a Java expert or a beginner; a properly set up Java environment is critical to any development efforts. This article is meant for both novice and seasoned users, so it will provide logic and detailed explanations for every installation method presented.
Let us jump in and see what it takes to install Java on Ubuntu 22.04!
Also, explore the installation process of MongoDB on Ubuntu
Before installing Java on Ubuntu 22.04, it’s essential to update the system repositories to ensure smooth installation without conflicts.
Running the following refreshes the repository information and upgrades installed packages to their latest versions, resolving any potential dependencies or compatibility issues:
$sudo apt update && sudo apt upgrade -y
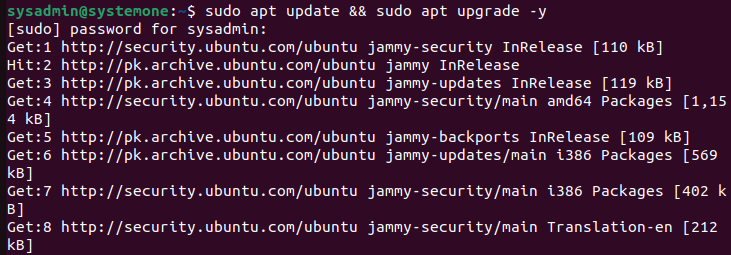
This preemptive step helps maintain system stability and ensures that the Java installation process proceeds seamlessly, minimizing the risk of encountering errors or conflicts.
Before we install Java, it is important that we understand that Java consists of two primary components: the Java Runtime Environment (JRE) and the Java Development Kit (JDK).
The JRE encompasses the necessary libraries, runtime environment, and components required to run Java applications on a computer or device. It includes the Java Virtual Machine (JVM), which executes Java bytecode and ensures platform independence.
On the other hand, the JDK is a comprehensive development package tailored for Java developers, containing tools such as compilers, debuggers, and other utilities essential for creating, compiling, and debugging Java applications.
While the JRE is sufficient for running Java programs, the JDK is essential for developers to create, test, and deploy Java applications efficiently. Together, these components form the backbone of Java’s versatility and ubiquity across various platforms and devices.
When installing Java, users typically have two options: OpenJDK and Oracle JDK. OpenJDK, an open-source implementation bundled with Ubuntu, receives contributions from the community, while Oracle JDK, the original version maintained entirely by Oracle, offers robust support.
Both versions, officially endorsed by Oracle, were initially distinct, but starting with Java 11, Oracle has aligned their functionalities, rendering them functionally identical. The decision between them often hinges on selecting the appropriate licensing for specific circumstances. Additionally, OpenJDK provides the flexibility to install the JRE separately, whereas OracleJDK comes bundled with its own JRE.
For this guide, we will demonstrate the process using the default JRE/JDK a.k.a. Open JDK.
Before starting the installation, just make sure that it’s not already installed on your computer. Fire up your terminal and run the following to check:
$java -version
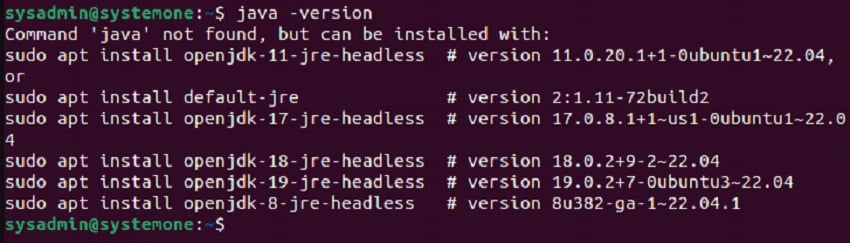
If you get a similar output, you will know that Java is not installed and you can start with the installation process.
After the update process successfully completes, you can now kickstart the installation. Run this in your terminal:
$sudo apt install default-jre -y
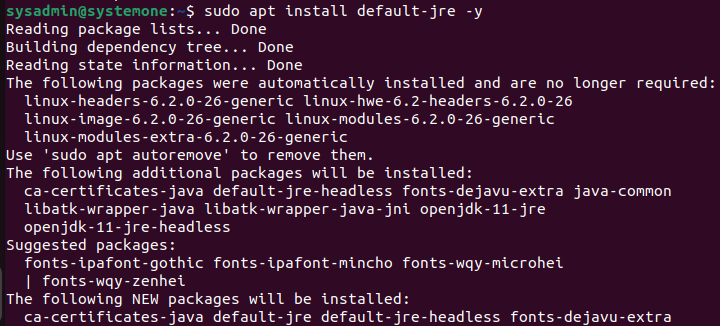
After this is completed, you will be ready to run almost all software developed in Java. You can verify the success of the installation by running:
$java -version

If you want to compile and run custom Java code, you will need to install the JDK. Along with the JRE, you can install the JDK by executing the following command in your terminal:
$sudo apt install default-jdk -y

Similar to the last step, you can run the following to verify the success:
$javac -version

Unleash the power of Ubuntu VPS
Get the reliability of the world’s most popular Linux distro and the flexibility of a virtual server. Enjoy blazing-fast speeds and low latency.
Setting up the Java environment variable in Ubuntu 22.04 involves configuring the system to recognize the Java installation path. Why would you want to set up your Java environment variable? After installing Java, typically either OpenJDK or Oracle JDK, users need to set the JAVA_HOME environment variable to point to the Java installation directory. To identify the installation path of Java, users can run the command “sudo update-alternatives –config java“, which lists all installed Java versions and their installation paths.
sudo update-alternatives --config java

Once identified, users can proceed with the following steps to update the ~/.bashrc file:
Open a terminal window on your Ubuntu system. Run the command “nano ~/.bashrc” to open the ~/.bashrc file in the Nano text editor. Alternatively, you can use any text editor of your choice, such as vim or gedit. Scroll to the bottom of the file and add a new line to set the JAVA_HOME variable. For example:
$export JAVA_HOME=/path/to/your/java/installation
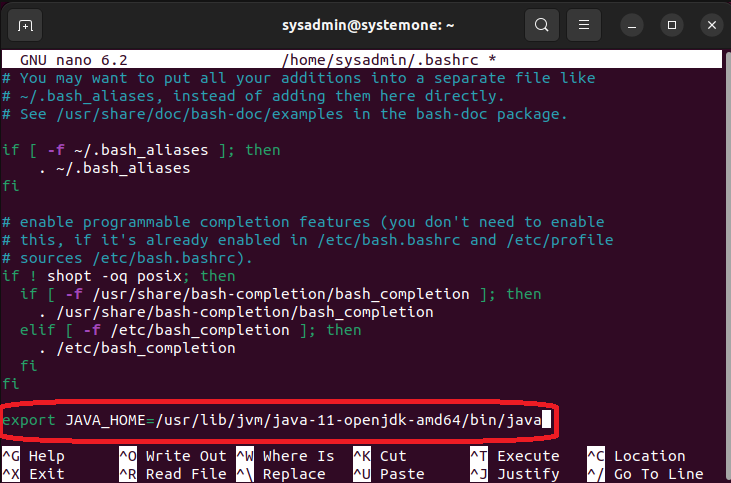
Replace “/path/to/your/java/installation” with the actual path to your Java installation directory, which you identified using the “sudo update-alternatives –config java” command.
Press Ctrl + X to exit Nano, then press Y to confirm saving changes, and press Enter to return to the terminal. After updating the ~/.bashrc file, you need to apply the changes. Run the command “source ~/.bashrc” to reload the ~/.bashrc file and update the current terminal session with the new environment variable. Optionally, you can verify that the JAVA_HOME variable is set correctly by running the command “echo $JAVA_HOME”. It should display the path to your Java installation directory.
Finally, to ensure global access to Java executable files, append the Java bin directory to the system PATH variable. You can do this by adding the following line to your ~/.bashrc file:
$export PATH=$PATH:$JAVA_HOME/bin
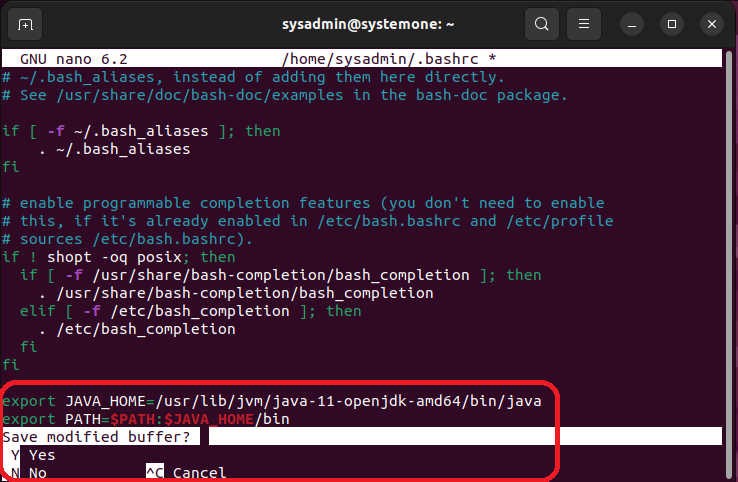
Again, save the changes and apply them by running “source ~/.bashrc” in the terminal.

After completing these steps, the Java environment variable will be properly configured on your Ubuntu 22.04 system, allowing seamless execution and development of Java applications.
In some use cases, you might end up with multiple versions of Java installed on your Ubuntu system. There is a readily available command to configure which version is default for the terminal. In your terminal, you can run:
$sudo update-alternatives --config java
You can input the number associated with your desired version to use it as default. You can use the same command with javac to achieve the same results with the JDK.
$sudo update-alternatives --config javac
Congratulations! You’ve successfully installed Java on your Ubuntu 22.04 system and configured your environment. Whether you chose OpenJDK or Oracle JDK, you’re now equipped to leverage Java’s potential for your development projects.
Remember, by default, the latest installed version becomes active. If you plan to work with multiple Java versions, consider using the update-alternatives command or dedicated tools like sdkman for seamless management.
Beyond installation, explore the official Java documentation and tutorials to delve deeper into the language’s nuances and its vast ecosystem of libraries and frameworks. With a solid foundation and continuous learning, you’re well on your way to mastering Java development on Ubuntu 22.04. Happy coding!
Whether you’re an experienced developer or just embarking on your coding journey to create your next remarkable app, it’s crucial to verify that your existing hosting configuration is capable of accommodating the requirements of Java. This is where a robust and dependable platform like Ultahost becomes invaluable. Offering cost-effective Linux VPS hosting, Ultahost ensures efficient server management and dedicates resources to guarantee optimal speed and stability.
Many applications and software, including some web applications, are built using Java. Installing Java on Ubuntu allows you to run these applications on your system.
It’s recommended to install the OpenJDK (Open Java Development Kit), which is the open-source implementation of the Java Platform. The default OpenJDK version in Ubuntu 22.04 might vary, but it’s usually a recent and stable version.
Open a terminal and execute the java -version command. If Java is installed, it will display the version information. If not, you’ll get a command not found error.
IPv6, also known as Internet Protocol version 6, offers...
TYPO3 is a free and open-source content management syst...

NGINX, which is known for its great performance, scalab...
SCP (Secure Copy Protocol) is a command that securely t...