
How to Install Bitwarden on Windows
Bitwarden is a free, open-source password manager to sa...


Magento is a powerful open-source e-commerce platform that enables businesses to create and manage online stores. Its flexibility, scalability, and customization options make it a popular choice among online retailers. Magento’s purpose is to provide a robust platform for businesses to showcase their products, manage orders, and interact with customers. With its extensive range of features, Magento helps online stores increase sales, improve customer experience, and stay ahead of the competition.
To install Magento Windows, businesses can leverage the platform’s capabilities to create a seamless online shopping experience. Windows, being a widely used operating system, provides an ideal environment for Magento to run smoothly. With Magento on Windows, businesses can easily manage their online stores, update products, and track orders from a single platform. This integration enables online retailers to focus on their core business activities, while Magento takes care of the technical aspects.
In this article, we’ll be covering the detailed process of installing Magento on Windows, providing step-by-step instructions and expert tips to help you get started with your online store.
Before we dive into installing Magento on Windows, it’s essential to have a suitable environment to run it. Xampp is a popular, open-source, and free software package that provides a complete web development environment. It consists of Apache HTTP Server, MariaDB, PHP, and Perl, which are the necessary components to run Magento smoothly. Xampp is a crucial step in installing Magento on Windows as it provides the necessary infrastructure to host and run Magento:
In essence, Xampp acts as a local host, allowing you to test and run Magento on your local machine before deploying it to a live server. This reduces the risk of errors and ensures a smoother transition to a production environment. If you haven’t already, you can follow our comprehensive guide on install Xampp Windows on your machine. With Xampp in place, you’ll be ready to move on to the next step of installing Magento.
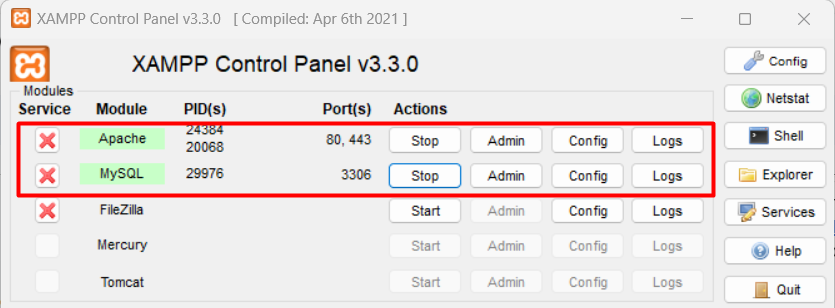
After successfully installing Xampp, it’s essential to configure it to work seamlessly with Magento. Launch Xampp and activate Apache and MySQL by clicking on the “Start” buttons next to each service. Activating Apache is necessary as it’s the web server that will host Magento, while MySQL is the database management system that will store Magento’s data. Without these services running, Magento won’t be able to function properly:
Next, click on the “Apache config” button and select “PHP (php.ini)” to launch the php.ini file. This file contains configuration settings for PHP, which is a crucial component of the Magento framework. In this file, you’ll need to enable the following extensions by removing the semicolon (;) at the beginning of each line:
These extensions are essential for Magento to function correctly. The intl extension provides internationalization support, xsl enables XML stylesheet transformations, and Soap facilitates web service communication. Make sure to save the changes to the php.ini file after enabling these extensions.
Moreover, search and update the following values as well:
These changes are essential for Magento to function correctly. The enabled extensions provide the necessary functionality, while the updated values ensure that PHP can handle the resource-intensive Magento framework.
The increased max_execution_time and max_input_time values prevent script timeouts, while the increased memory_limit value ensures that PHP has enough memory to handle Magento’s requirements. Make sure to save the changes to the php.ini file after making these updates.
Now that Xampp is configured, it’s time to download and extract Magento. To download the latest version of Magento, visit the official Magento 2 releases page on GitHub and download the zip file. Once the download is complete, extract the Magento zip file to the htdocs folder of your Xampp installation directory:
htdocs is a directory within the Xampp installation directory that serves as the document root for the Apache web server. It’s the default location where Apache looks for files to serve when you access localhost or 127.0.0.1 in your web browser. By extracting the Magento files to the htdocs folder, you’re making them accessible via your local web server, allowing you to access and configure your Magento installation through a web interface.
To extract the Magento zip file, right-click the Magento2 zip file, select “Extract files”, and then select the htdocs destination path e.g., C:\xampp\htdocs and press OK. This will extract the Magento files to the specified directory, making them accessible via your local web server.
Make sure to extract the files to the correct location, as this will determine the URL you’ll use to access your Magento installation later on. After extraction, you should see a new folder in the htdocs directory with the Magento files.
Install Magento on Our Windows VPS!
With Ultahost, Hosting Windows VPS has never been easier or faster. Enjoy ultra-fast SSD NVME speeds with no dropouts and slowdowns.
To create a new database for Magento, simply click on the “Create database” button: Before installing Magento Windows 10, it’s essential to create a database for it to use. To do this, you’ll need to access phpMyAdmin, a web-based tool that allows you to manage MySQL databases. Start by opening the XAMPP Control Panel and ensuring that the MySQL service is running. Once the service is started, open a web browser and navigate to http://localhost/phpmyadmin.
This will take you to the phpMyAdmin dashboard, where you can manage your databases. Click on the “Databases” tab to view a list of existing databases.
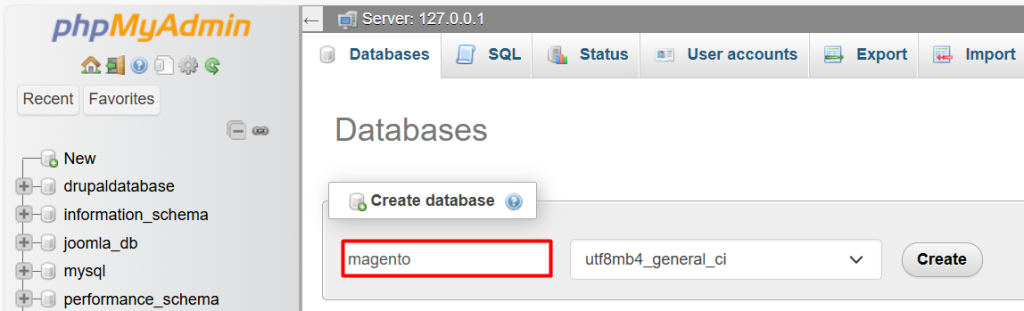
In the “Create database” dialog box, enter a name for your database, such as “magento2”. This will be the database that Magento uses to store its data. Click on the “Create” button to create the database. Once the database is created, you’ll see it listed in the phpMyAdmin dashboard. This confirms that your database is ready for use with Magento.
Now that you have created a database for Magento, it’s time to install the platform. To do this, open a web browser and navigate to http://localhost/magento (assuming you extracted the Magento files to the htdocs folder earlier). This will take you to the Magento Setup Wizard, which is a user-friendly interface that guides you through the installation process:
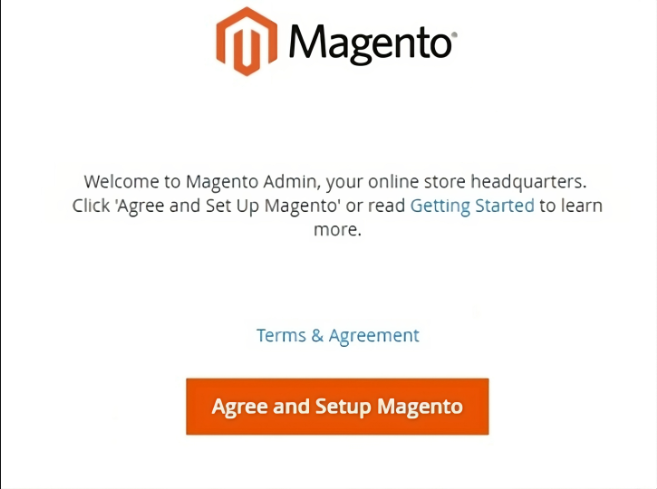
As you access the address http://localhost/magento, you will be greeted by the Magento Setup Wizard. This wizard is designed to make the installation process as smooth and straightforward as possible. The wizard’s interface is intuitive, with clear instructions and minimal technical jargon, making it easy for users of all skill levels to install Magento.
Click Start Readiness Check. If any errors are displayed, you must resolve them before you continue. Click more detail if available to see more information about each check.
Next, add a database by filling in the required information, including the database server, name, username, and password. Click “Next” to continue. In the Web Configuration section, enter your store’s address and Magento admin address. The store address is the URL customers will use to access your store, while the admin address is the URL you’ll use to access the Magento admin panel.
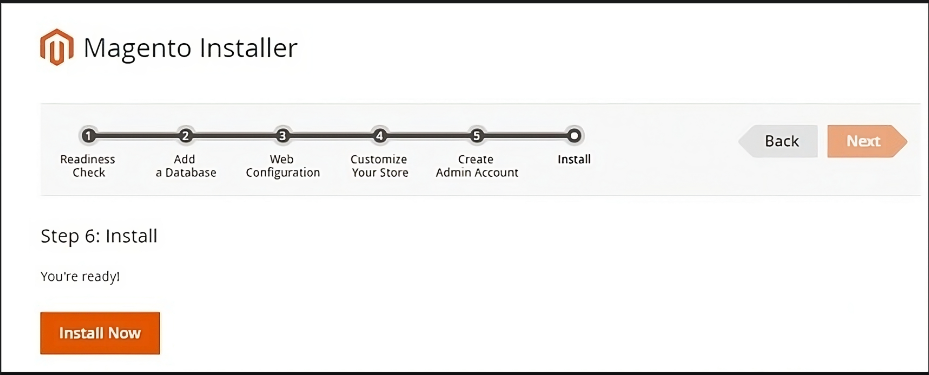
Finally, customize your store by selecting your default time zone, currency, and language. You can also enable or disable advanced modules if desired. Click “Next” to complete the installation process.
After providing all the necessary information in the Setup Wizard, click the “Install Now” button to begin the installation process. Magento will now install all the necessary components and configure the platform according to your settings:
Once the installation is complete, a success message will be displayed, indicating that Magento has been installed successfully. This is a significant milestone, as you’ve now completed the installation process and can start exploring your new Magento online store.
To verify that the installation was successful, let’s take a look at both the frontend and backend of your Magento store.
Learn about How to Install Joomla on Windows.
Frontend Verification
Open a new tab in your web browser and navigate to http://localhost/magento (or the URL you specified during the installation process). You should now see the default Magento storefront, complete with a demo store theme and sample products. This confirms that Magento is correctly installed and configured:

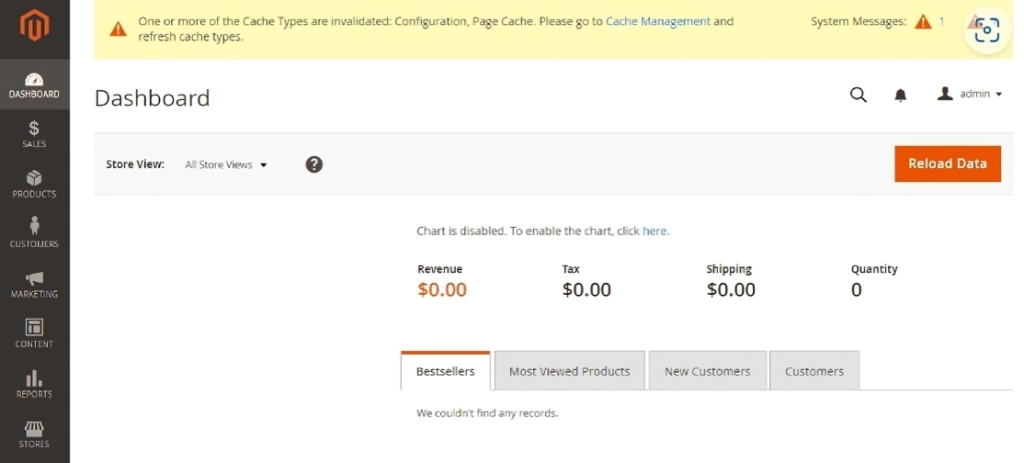
Backend Verification
Next, navigate to the Magento admin panel by accessing http://localhost/magento/admin (or the URL you specified during the installation process). Log in using the admin credentials you created during the installation process. Once logged in, you should see the Magento admin dashboard, where you can manage your online store, configure settings, and access various features and tools:
With the installation complete and verified, you’re now ready to start customizing and configuring your Magento online store to meet your business needs. In the next steps, we’ll explore some essential post-installation tasks to help you get started with your Magento journey.
Installing Magento on Windows is a straightforward process that can significantly enhance your e-commerce capabilities. By setting up Xampp as a local development environment, you ensure that Magento has the necessary components to run effectively. This setup not only simplifies the installation but also allows you to test and configure your store locally before making it live. The step-by-step guide provided covers essential actions such as configuring Xampp, extracting Magento files, and creating a database, which is crucial for a successful installation.
Once Magento is installed, you can verify its functionality by accessing both the frontend and backend of your store. This ensures that your online shop is ready for customization and management. With Magento correctly installed on your Windows system, you’re well-equipped to leverage its powerful features to create an exceptional online shopping experience.
Installing Magento on Windows can be a straightforward process but it might involve managing dependencies issues. Upgrading to an Ultahost VPS server empowers you with greater control and flexibility which grants you root access allowing you to streamline the installation process and configure Magento precisely for your needs.
Yes, Magento can run on Windows using software like XAMPP or WAMP that provides a local server environment.
You can use either XAMPP or WAMP. XAMPP includes Apache, MySQL, PHP, and Perl, while WAMP includes Apache, MySQL/MariaDB, and PHP.
Yes, you may need to adjust PHP settings such as memory_limit, max_execution_time, and other parameters as recommended by Magento.
Yes, you can upgrade Magento on Windows by following the upgrade instructions provided by Magento. This usually involves updating files, running database upgrades, and clearing caches.
Magento official documentation provides detailed instructions for installing Magento on various platforms, including Windows. Checking their website or community forums can also provide helpful tips and troubleshooting advice.
Bitwarden is a free, open-source password manager to sa...
The computing world keeps changing, and now, many Windo...
When we visit a website, our device talks to a Domain N...
Imagine you're playing your favorite online game, but y...