
How to Install Kotlin on Ubuntu
Kotlin is a modern, statically typed programming langua...


Django is one of the most recognized frameworks for web development and it is used on the Ubuntu operating system. Its main goal is to aid in the development of web applications by automating the processes using a defined set of workflows and tools. It employs model-view-controller (MVC) design pattern where developers are expected to identify the models – structures defining the data, views which take care of presentation logic, and controllers – which manage the flow of the application, organizing the logic in.
Dynamic and complex websites or applications can be built using Django which is why it’s so helpful for Ubuntu users. It also comes with many other features such as admin interfaces for content management, an object-relational mapping system to easily interface a database, and powerful URL routing capabilities. This framework encourages rapid development and reusability by DRY (Don’t Repeat Yourself) principles thus promoting efficient programming.
In this article, we will tell you the steps needed to install Django on Ubuntu 22.04.
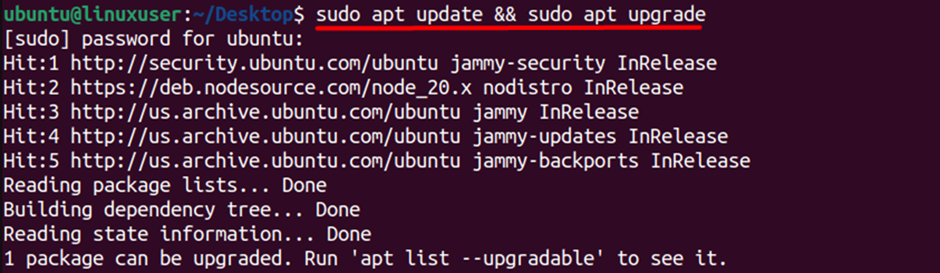
First, open the terminal using the “CTRL + ALT + T” shortcut keys and then update all current packages on the Ubuntu distribution to run everything smoothly:
$ sudo apt update && sudo apt upgrade
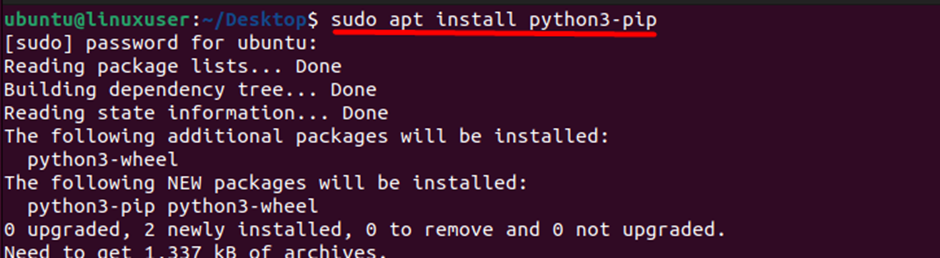
Next, you need to install the Python package installer if you already didn’t:
$ sudo apt install python3-pip
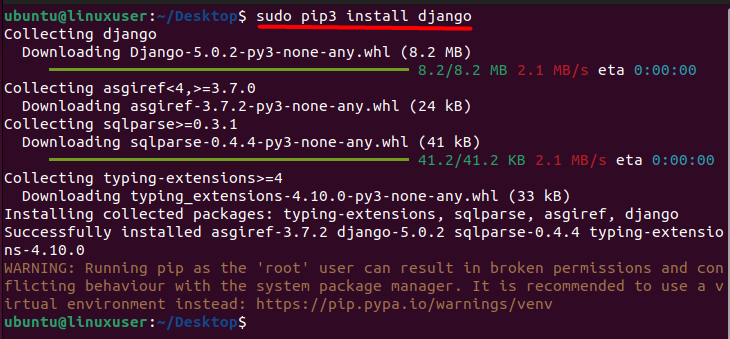
Once the pip is installed use the following command to install Django:
$ sudo pip3 install Django
Lastly, you need to verify if it was installed successfully using the following command:
$ Django-admin --version

The Python 3 virtual environment module, enables you to create isolated environments for your Python projects. This is a recommended practice for managing project-specific dependencies and ensuring a clean and consistent development environment.
To install it on Ubuntu, execute the following command:
$ sudo apt install python3-venv

Unleash the power of Ubuntu VPS
Get the reliability of the world’s most popular Linux distro and the flexibility of a virtual server. Enjoy blazing-fast speeds and low latency.
Now you need to create the Python environment using the below command:
$ python3 -m venv myenv

Here, myenv is the name of our virtual environment and you can replace it with any desired name of your choice.
Next, we need to activate the Python virtual environment:
$ source myenv/bin/activate

The source command is used to execute commands from a file in the current shell session. It’s often used with shell scripts or configuration files.
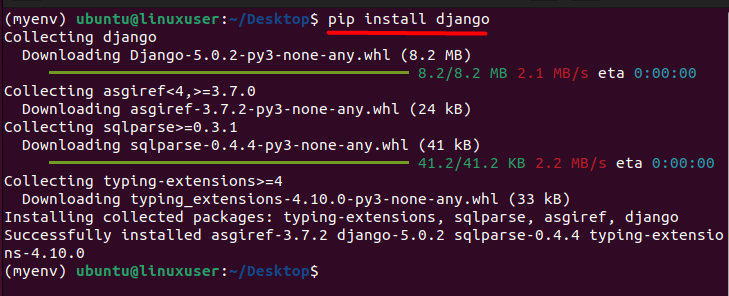
To install Django on the Python3 virtual environment you can use:
$ pip install Django
Lastly, we need to verify for the successful installation of Django:
$ python -m Django --version

One of the significant advantages of using Django on Ubuntu is the strong support for open-source technologies. Both Django and Ubuntu are open-source projects, fostering a collaborative and community-driven approach to development. This synergy allows developers to benefit from a vast ecosystem of tools, libraries, and documentation, making it easier to troubleshoot issues and find solutions.
Django’s built-in features contribute to increased productivity. It includes an ORM (Object-Relational Mapping) system that abstracts database interactions, making it easier to work with databases without writing raw SQL queries. Additionally, Django provides an admin interface, allowing developers to manage application data through a user-friendly interface automatically generated from the model definitions.
Security is another key aspect where Django excels. It incorporates various security measures by default, such as protection against common web vulnerabilities like SQL injection, cross-site scripting (XSS), and cross-site request forgery (CSRF). This built-in security helps developers create robust and secure web applications on the Ubuntu platform.
Moreover, Django follows the “Don’t Repeat Yourself” (DRY) principle and encourages reusable code through its app system. Developers can create modular components (apps) that can be easily plugged into different projects, fostering code organization and maintainability.
This guide explores two methods to install Django on Ubuntu 22.04, emphasizing simplicity and efficiency in web application development. Through an apt package manager or Python 3 virtual environment, users can seamlessly set up Django.
Utilizing Django on Ubuntu offers a powerful and efficient environment for web development. The seamless integration, strong community support, and inherent security features make this combination an excellent choice for developers looking to build scalable and maintainable web applications.
Elevate your Django applications with unparalleled flexibility, limitless bandwidth, and superior performance at an unmatched price point. Our Django hosting solutions cater specifically to the needs of Django developers, ensuring your projects run smoothly and efficiently.
Django is a high-level Python web framework that encourages rapid development and clean, pragmatic design. It follows the “Don’t Repeat Yourself” (DRY) principle and allows developers to build web applications quickly.
Ubuntu 22.04 is a Long Term Support (LTS) version, providing stability and security updates for an extended period. Installing Django on this platform ensures a reliable and well-supported environment for your web development projects.
Open a terminal and type python3 --version. If Python is installed, you’ll see a version number. If not, you can install it using sudo apt-get install python3.
In the terminal, run django-admin --version or python3 -m django --version. This will display the installed Django version.