Setup and Configuration of FreeRADIUS + MySQL on Ubuntu 16
Or copy link
Network authentication is an essential aspect of maintaining secure access to resources and safeguarding sensitive information. For this purpose, FreeRADIUS, a widely-used open-source RADIUS server, offers a reliable solution that effectively manages network authentication. By utilizing MySQL as the database backend, FreeRADIUS gains additional capabilities, including scalability, reliability, and flexibility. In this blog post, we aim to provide you with a comprehensive guide on setting up and configuring FreeRADIUS with MySQL on Ubuntu 16. Our step-by-step instructions and configuration guidelines will equip you with the knowledge required to establish a robust and secure network authentication system. Stay tuned as we delve into the process of deploying FreeRADIUS with MySQL, ensuring a seamless implementation of this powerful combination.
Benefits of Using MySQL for FreeRADIUS:
When utilizing MySQL as the database backend for FreeRADIUS, there are several notable benefits:
Scalability and Performance: MySQL is specifically designed to handle large-scale data storage and retrieval efficiently. This makes it well-suited for environments with a high volume of authentication requests. With MySQL, you can expect optimal performance and scalability, ensuring that your network authentication system can handle increasing workloads as your organization grows.
Reliability and Data Integrity: MySQL offers robust features like transaction support and ACID (Atomicity, Consistency, Isolation, Durability) compliance. These features ensure data integrity, guaranteeing that your authentication data remains consistent and accurate. By leveraging MySQL’s reliability, you can trust that your network authentication system is built on a stable and secure storage solution.
Flexibility and Compatibility: MySQL supports a wide range of data types, indices, and functions, providing flexibility in data modeling for your authentication system. This allows you to structure and organize your data in a way that best suits your specific requirements. Additionally, MySQL integrates smoothly with other applications and systems, making it easier to incorporate FreeRADIUS into your existing infrastructure. This compatibility reduces potential integration challenges and allows for seamless operation within your network environment.
By leveraging the scalability, reliability, data integrity, flexibility, and compatibility of MySQL as the database backend for FreeRADIUS, you can establish a robust and secure network authentication system that meets the demands of your organization.
Prerequisites
Before proceeding with the setup and configuration of FreeRADIUS with MySQL on Ubuntu 16, ensure that you have met the following prerequisites:
Hardware Requirements:
A dedicated server or virtual machine with sufficient resources to handle the expected authentication load.
Recommended minimum specifications: 2 GHz dual-core processor, 4 GB RAM, and 20 GB of available disk space.
Software Requirements:
Ubuntu 16 operating system installed on the server or virtual machine.
Superuser (root) access or administrative privileges.
Installing Ubuntu 16 on a Virtual Machine or Dedicated Server:
Download the Ubuntu 16.04 LTS ISO image from the official Ubuntu website (https://releases.ubuntu.com/16.04/).
Create a virtual machine using your preferred virtualization software (e.g., VirtualBox, VMware) or set up a dedicated server with Ubuntu 16.04.
Follow the installation wizard to install Ubuntu 16.04 on the virtual machine or dedicated server. Configure the necessary settings, such as hostname, timezone, and user accounts.
Complete the installation process and ensure that you have a functioning Ubuntu 16 environment.
Updating and Installing Necessary Packages:
Launch the terminal on your Ubuntu 16 machine.
Update the package lists and upgrade existing packages by running the following commands:
Code: sudo apt-get update
sudo apt-get upgrade
Install essential packages required for FreeRADIUS and MySQL by executing the following command:
During the MySQL installation, you will be prompted to set a root password. Follow the instructions to set a secure password for the MySQL root user.
Once the installation is complete, verify that FreeRADIUS and MySQL are successfully installed by running the following commands:
freeradius -v
mysql –version
Make a note of the FreeRADIUS and MySQL versions displayed in the terminal for future reference.
At this stage, you have successfully installed Ubuntu 16, updated the system, and installed the necessary packages for FreeRADIUS and MySQL.
Configuring MySQL for FreeRADIUS on Ubuntu 16
Installing MySQL Server on Ubuntu 16:
Open the terminal on your Ubuntu 16 machine.
Execute the following command to install the MySQL server package:
sudo apt-get install mysql-server
During the installation process, you will be prompted to set a password for the MySQL root user. Enter a strong password and remember it for future use.
Wait for the installation to complete. Once finished, MySQL server will be up and running on your Ubuntu 16 system.
Securing the MySQL Installation:
Run the following command to initiate the MySQL security script:
sudo mysql_secure_installation
You will be prompted to validate the MySQL root password. Enter the password you set during the installation.
Follow the on-screen prompts to configure additional security options, such as removing anonymous users, disallowing remote root login, removing the test database, and reloading the privilege tables.
Carefully review and respond to each prompt based on your security preferences.
Creating a Database and User for FreeRADIUS:
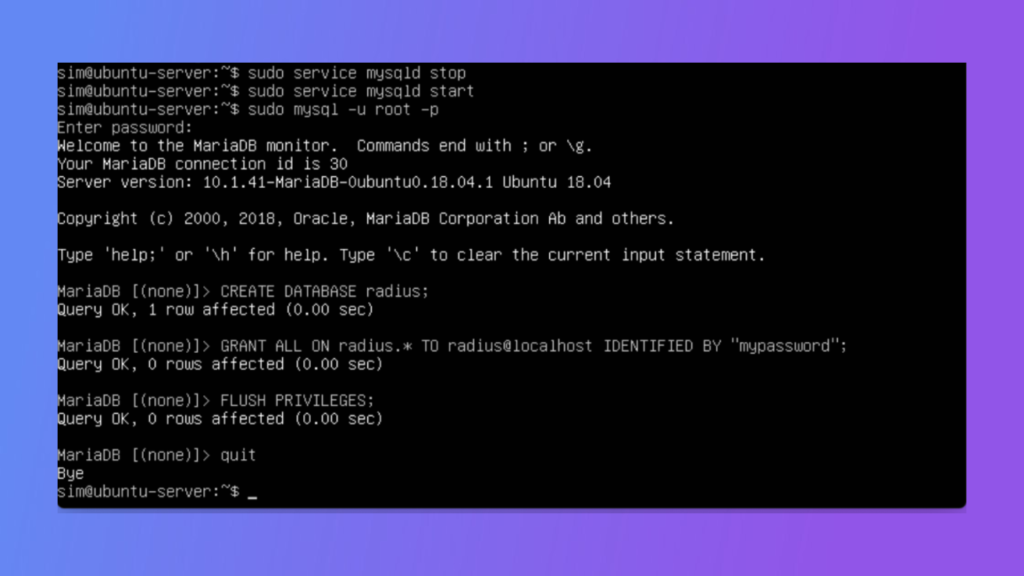
Log in to the MySQL server as the root user by executing the following command:
sudo mysql -u root -p
Enter the MySQL root password when prompted.
Once logged in, create a new database for FreeRADIUS by running the following command:
CREATE DATABASE radius;
Next, create a dedicated MySQL user for FreeRADIUS. Execute the following command, replacing ‘radius_user’ and ‘password’ with your desired username and password:
CREATE USER ‘radius_user’@’localhost’ IDENTIFIED BY ‘password’;
Granting Necessary Privileges to the FreeRADIUS User:
Assign the appropriate privileges to the FreeRADIUS user for the ‘radius’ database. Execute the following command:
GRANT ALL PRIVILEGES ON radius.* TO ‘radius_user’@’localhost’;
Apply the changes by executing the following command:
FLUSH PRIVILEGES;
Exit the MySQL server by typing:
exit;
Installing FreeRADIUS from the Ubuntu Repositories:
Open the terminal on your Ubuntu 16 machine.
Execute the following command to install FreeRADIUS from the official Ubuntu repositories:
sudo apt-get install freeradius
Wait for the installation to complete. FreeRADIUS will be installed and ready to use on your system.
Configuring FreeRADIUS to Use the MySQL Database:
Open the terminal and navigate to the FreeRADIUS configuration directory:
cd /etc/freeradius/
Make a backup of the original configuration file before making any changes:
sudo cp radiusd.conf radiusd.conf.bak
Open the ‘radiusd.conf’ file using a text editor of your choice:
sudo nano radiusd.conf
Locate the ‘database’ section in the configuration file. Uncomment the lines related to the MySQL database backend by removing the ‘#’ symbol at the beginning of each line.
Modify the database connection details according to your setup. Update the following lines with the appropriate information: