
How to Fix the “Specify a Cache Validator�...
In web development performance and user experience are ...


Expired headers play an important role in website performance, and WordPress websites are no exception. Expired headers can significantly reduce server load times and improve website responsiveness by instructing web browsers how long to cache static resources like images, CSS, and JavaScript. If the Expires header is absent the browser will determine the cache lifetime based on its policies.
In this post, we will discuss understanding WordPress add expires headers by exploring effective methods with the .htaccess file using Apache or Nginx and the solution is based on WordPress plugins.
When a user visits a WordPress site for the first time their browser downloads all the necessary resources like images, stylesheets, and scripts. These resources are then stored in the browser’s cache. On subsequent visits, the browser checks the WordPress cache expiration header associated with each resource. If the resource has not expired the browser retrieves it from the cache saving valuable time and bandwidth.
Most WordPress servers use Apache this method requires editing the .htaccess file which is located in your website’s root directory. It is important to back up your .htaccess file before making any changes as incorrect modifications can break your website.
Learn about How to Set Up a 301 Redirect in .htaccess.
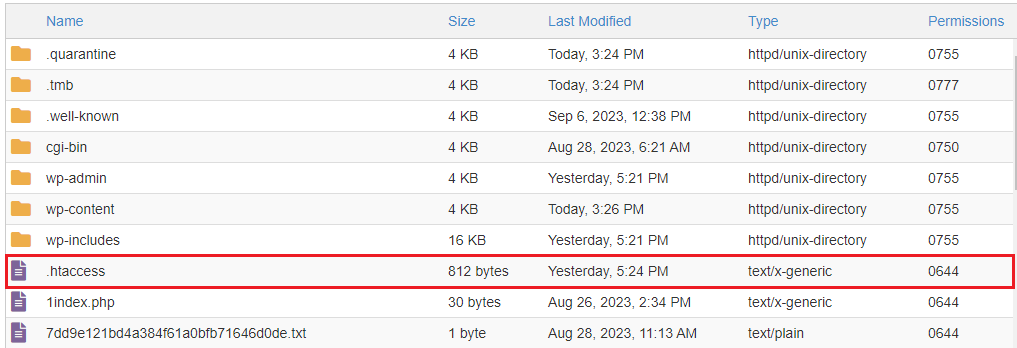
Access your .htaccess file: You can access the .htaccess file using an FTP client or file manager from cPanel. Remember .htaccess file is a hidden file so the “show hidden file” option should be enabled to view it. For this tutorial, I am using cPanel to access .htaccess file.
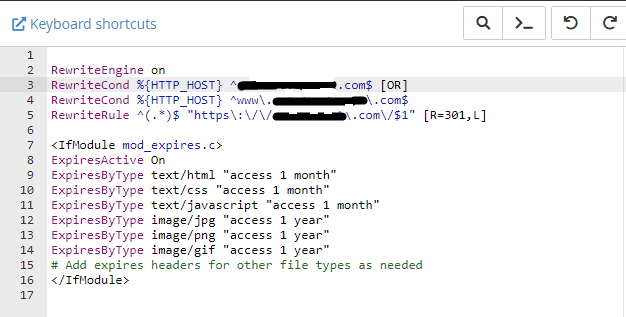
Edit the .htaccess file: Open the .htaccess file in a text editor and paste the following code:
<IfModule mod_expires.c>
ExpiresActive On
ExpiresByType text/html "access 1 month"
ExpiresByType text/css "access 1 month"
ExpiresByType text/javascript "access 1 month"
ExpiresByType image/jpg "access 1 year"
ExpiresByType image/png "access 1 year"
ExpiresByType image/gif "access 1 year"
# Add expires headers for other file types as needed
</IfModule>
This code configures the server to actively set expires headers WordPress. It also specifies expiration times for various file types. You can adjust the expiration times for example, “1 month” or “1 year” based on your preferences and the update frequency of your website’s content.
Save the changes: Save the .htaccess file and upload it back to your server if using an FTP client.
Unlock the power of Fast WordPress Hosting
Increase the speed of your WordPress website with Ultahost’s fast WordPress Hosting and provide your visitors with the best possible faster page-loading experience.
Adding expires headers in Nginx allows you to instruct web browsers on how long to cache static resources like images, CSS, and JavaScript files. This can significantly improve website performance by reducing server load and speeding up page load times. Here’s how to implement expires headers in your Nginx configuration:
Locate your Nginx configuration file: The location of your Nginx configuration file may vary depending on your setup. Mostly it is found in /etc/nginx/nginx.conf locations by default:
Edit the configuration file: Use a text editor like nano or vim to open the Nginx configuration file.
Add the expires headers block: Within the server block for your website, locate the section where you define location blocks for specific directories or files. Add the following code snippet inside a location block that matches the static resources you want to set expires headers for:
location ~* \.(?:ico|css|js|gif|jpe?g|png|svg|woff)$ {
  expires 30d;  # Set expiration time to 30 days (adjust as needed)
  add_header Pragma public;
  add_header Cache-Control "public";
}
This regular expression matches URLs that end with common static file extensions. Expires sets the expiration time for matched resources to 30 days. You can adjust this value based on your needs. The Pragma header to public, indicating the resource can be cached by any proxy server. The Cache-Control header to public, allowing browsers and other caches to store the resource for the specified expiration time.
Save and test your configuration: Save the changes to your Nginx configuration file. Validate your configuration for syntax errors by running the following command:
sudo nginx -t
For a more user-friendly approach, you can take advantage of several WordPress plugins that enable adding expires headers. Here’s a popular option:
Once you’ve implemented expires headers, it’s recommended to test their effectiveness. You can use online tools like GTmetrix to check if expires headers are being sent for your website’s resources.
Adding expires headers is a simple yet powerful technique to improve website performance WordPress. By implementing the methods outlined above, you can instruct browsers to website cache static resources effectively, leading to faster loading times and a more efficient user experience.
While adding expires headers can improve website performance it might not be the solution for all websites. If you are experiencing persistent performance issues, consider upgrading to Ultahost’s VPS hosting plan. Our offer includes dedicated resources and greater control allowing you to optimize your website for peak performance.
Expires Headers are codes that tell browsers when to refresh cached content enhancing website speed.
Adding Expires Headers reduces server requests speeding up your WordPress site and improving user experience.
No, it’s a straightforward process. Follow our guide for easy steps to add Expires Headers to your WordPress site.
By setting Expires Headers, you boost site performance, decrease load times, and enhance overall SEO for your WordPress website.
In web development performance and user experience are ...
WordPress is designed to be user-friendly, even for tho...
Artificial Intelligence, or AI, is rapidly becoming one...
Have you encountered the "Serve Static Content From a C...
WordPress uses CRON jobs to handle tasks like posting s...
In the current digital era, having a website is crucial...