
Causes of Slow Website Loading and Possible S...
In the current digital era, having a website is crucial...


WordPress is designed to be user-friendly, even for those with no coding experience. It is a highly flexible platform that can be used to create various websites, from simple blogs to complex e-commerce websites. Those who run WordPress websites occasionally find the problem of PHP memory limit. The PHP memory limit is the maximum amount of memory that PHP can use to execute a script. If a script requires more memory than the limit, it will fail.
In this post, we will discuss optimizing WordPress by increasing the PHP memory limit. We will also cover how to determine how much memory your website needs and what to keep in mind when increasing the limit.
WordPress requires a certain amount of memory to run properly, and if the PHP memory limit is too low, you may experience problems such as:
If you are experiencing any of these problems, it is possible that you need to increase the PHP memory limit.
The amount of memory you need will depend on the size and complexity of your website. If you have a small business website with a few plugins and themes, you may be able to get away with a PHP memory limit of 128M. However, if you have a large website with many plugins and themes, you may need to increase the limit to 256M or even 512M. There are a few different ways to do this:
Editing wp-config.php file
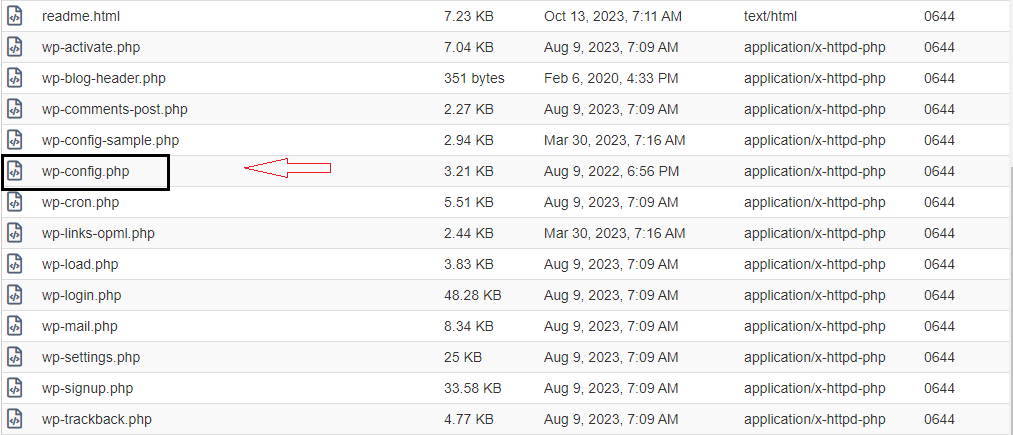
When you open your web hosting provider panel, where WordPress is installed in the panel, you can locate the wp-config.php file. The wp-config.php file is the main configuration file for WordPress. To edit the wp-config.php file, you must use an FTP client or file manager. As shown in the figure below, the panel shows the wp-config file:
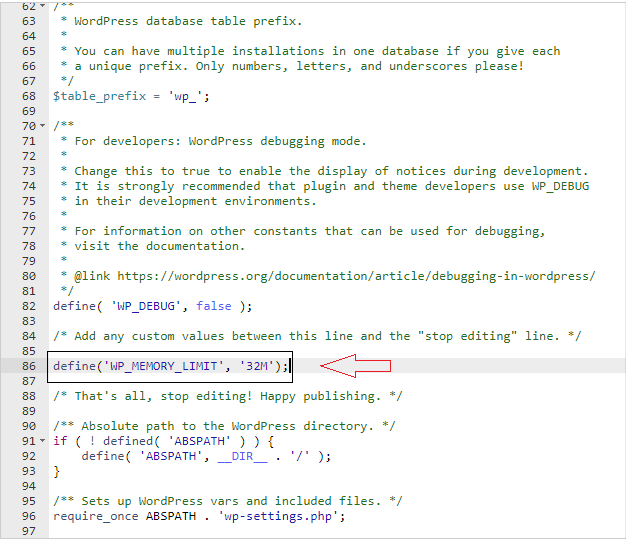
Once you have opened the wp-config.php file, look for the following line:
define('WP_MEMORY_LIMIT', '32M');
If this line does not exist, add it to the bottom of the file. Then, change the value of 32M to a higher value, such as 128M or 256M.
Save it and close the file. Now in the new tab try to browse your website.
Edit the .htaccess file
The .htaccess file is a configuration file that can override server settings. It is located in the root directory of your WordPress installation. To edit the .htaccess file, you will need to use an FTP client or file manager.
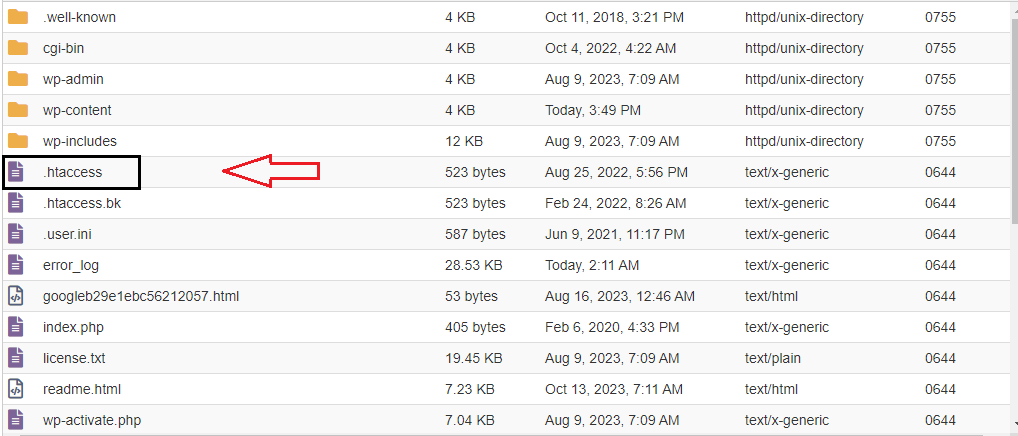
Once you have opened the .htaccess file, add the following line to the top of the file:
php_value memory_limit 256M
You can edit the file as shown in the figure below:

This will set the PHP memory limit to 256MB. Try to reload your website in a new tab.
Edit the php.ini file
The php.ini file is the main configuration file for PHP. It is located on your server. To edit the php.ini file, you will need to contact your hosting provider. Once you have opened the php.ini file, look for the following line:
memory_limit = 32M
Change the value of 32M to a higher value, such as 128M or 256M.
Increasing the PHP memory limit is one way to optimize WordPress performance and resolve memory-related errors. However, it is important to increase the limit as much as necessary, as too much memory can make your website more vulnerable to attack.
When it comes to the PHP memory limit, Ultahost is the partner you can trust. Our fully managed dedicated servers offer customers the tools, resources, and expertise they need to manage their memory limit effectively and protect their sites from errors and attacks.