
How to Install Zsh on Ubuntu
Zsh is a Unix shell that qualifies as an interactive lo...


Screenshots are a convenient way to explain complex ideas clearly. Therefore, capturing screenshots has become a common practice nowadays. Every modern operating system, such as Ubuntu, Windows, MacOS, etc., offers a built-in screenshot tool.
Ubuntu 24.04 LTS is the latest long-term support release that includes a default screenshot and screencast utility. It enables users to take basic to advanced screenshots. Ubuntu supports various keyboard shortcuts to save time when capturing screenshots. Moreover, users can install third-party screenshot tools from the official repository (if required) to get enhanced features and customization options.
In this tutorial, we’ll discuss several methods of capturing a screenshot or recording a screencast on Ubuntu 24.04.
Ubuntu includes a built-in screenshot tool that can be quickly accessed by pressing the “PrtSc” key or you can find it in the “system menu”. It offers basic screenshot features, such as capturing the entire screen, a selected area, the active window, or recording the screen activity as a video.
Let’s learn how to capture screenshots using Ubuntu’s default screenshot tool:
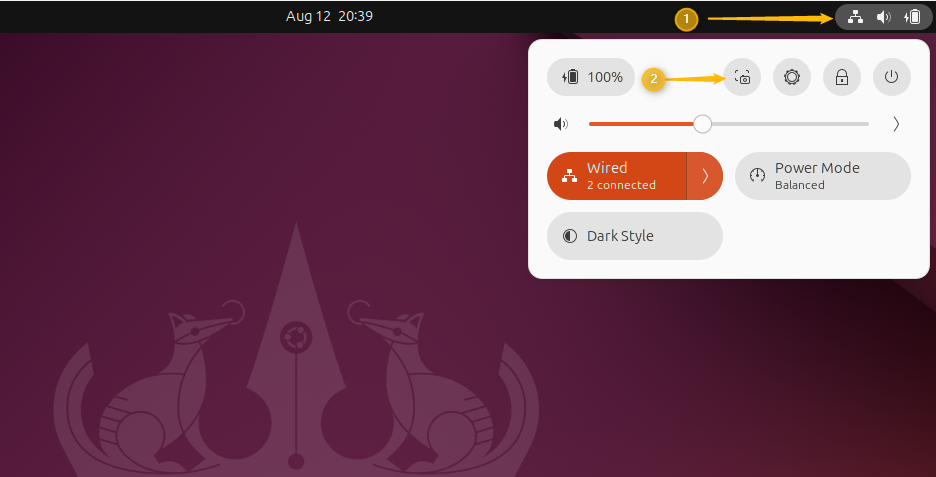
To launch Ubuntu’s default screenshot tool, either press the “prt sc” key on your keyboard or go to the system menu and select the highlighted option:
Once the default screenshot tool is open, you’ll see three options for capturing the screenshot: “Selection”, “Screen”, and “Window”, as illustrated below:
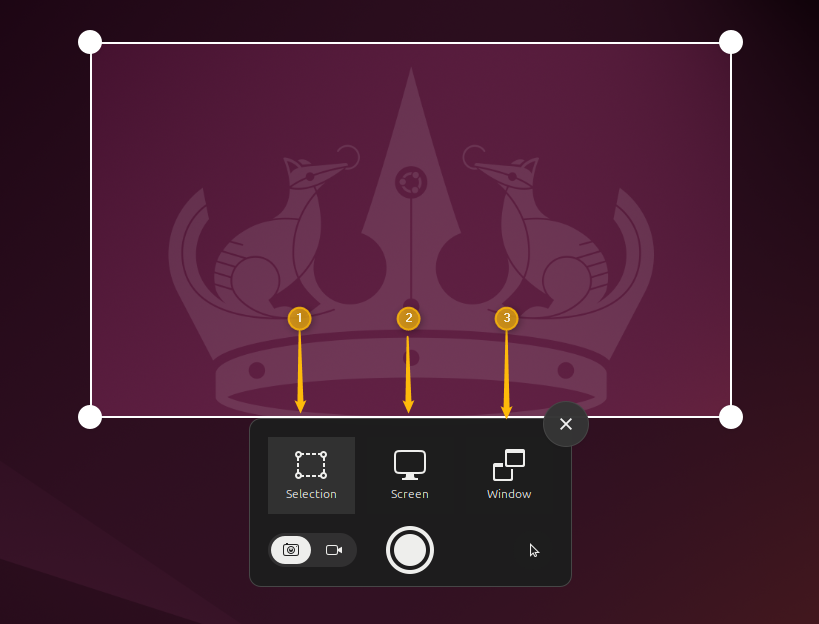
Let’s learn how to use these options to take a screenshot:
1. Selection | Capture Only the Selected Area
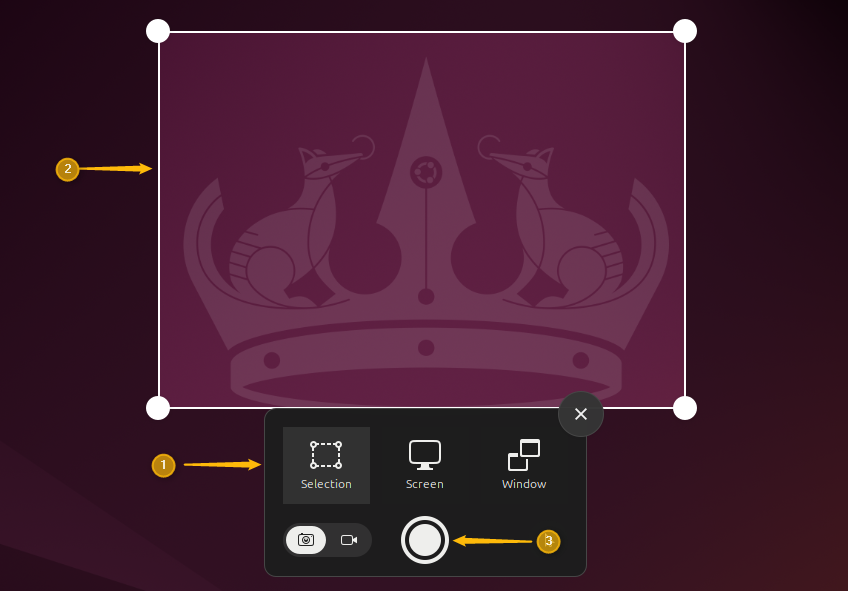
To capture a screenshot of a specific area, choose the “Selection” option, resize the area you want to capture, and then hit “Capture” to save the screenshot:
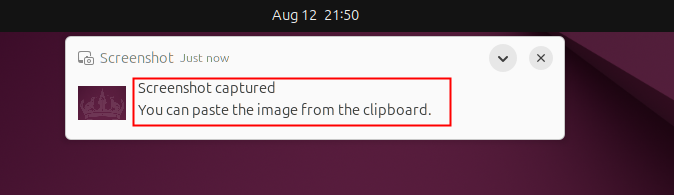
The following message pops up at the top of the window to confirm that the screenshot has been captured. The captured screenshot will be copied to the clipboard and by default, saved to the “Home/Pictures/Screenshots” directory:
Alternatively, you can use the “PRTSC” or “FN + PRT SC” key on your keyboard to capture a specific part of the screen.
2. Screen | Capture the Entire Screen
To capture a complete screen, choose the “Screen” option and then hit the “Capture” button:
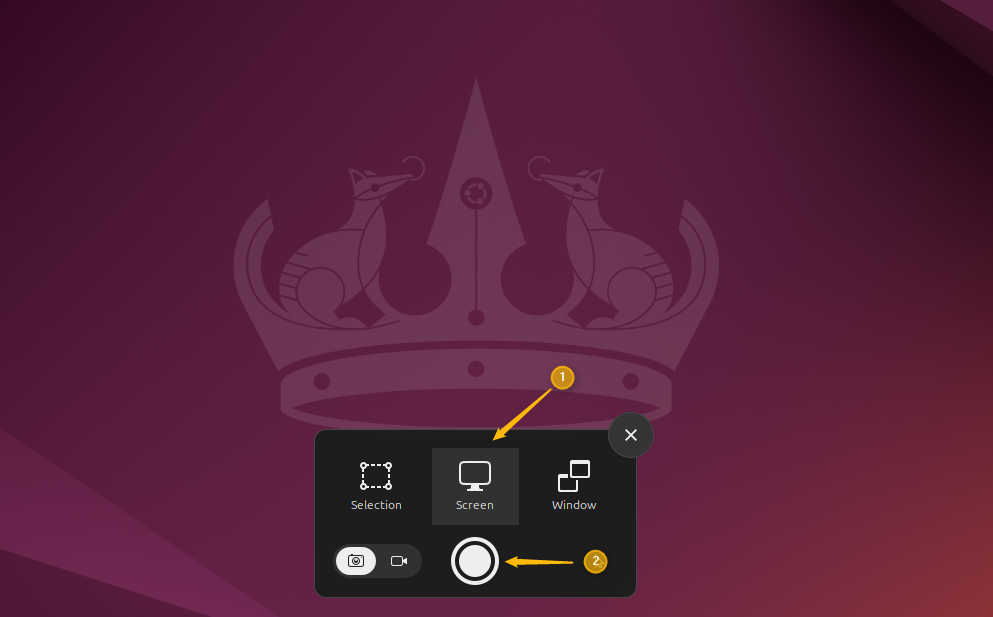
Alternatively, we can simply press “SHIFT + PRT SC” to capture the entire screen instantly.
3. Window | Capture Only a Specific Window
In case multiple windows are open, we can capture a specific window using the default screenshot tool. To do this, click on the “Window” option, select the desired window, and then press the “Capture” button, as demonstrated below:
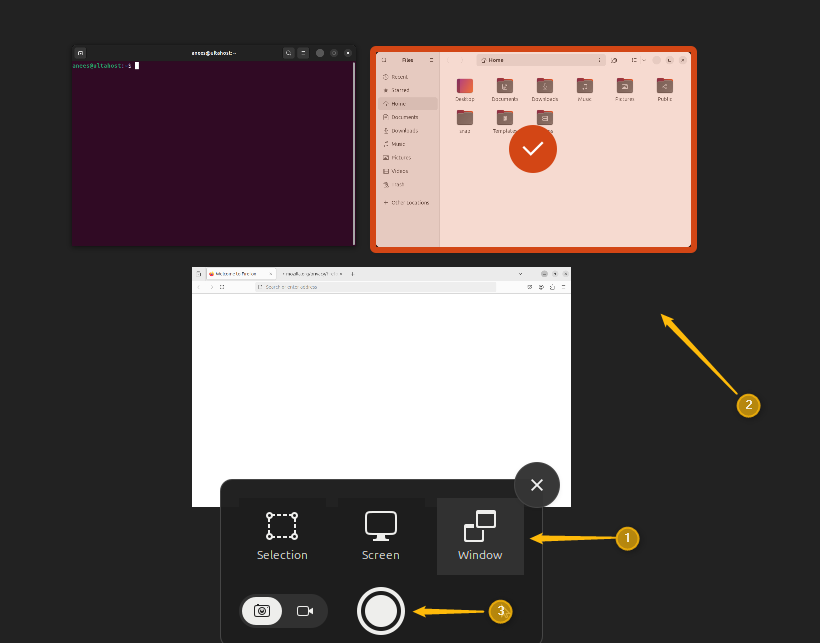
Alternatively, we can use the “ALT+PRTSCN” key to capture a certain window.
Start Capturing Your Screen on Ubuntu Today!
Whether you’re documenting a tutorial or saving your work, mastering screen capture commands on Ubuntu is essential. Explore our Ubuntu VPS with highest level of control and customization to enhance your Ubuntu experience and streamline your tasks.
In Ubuntu 22.04, the “GNOME Screenshot” tool was replaced with a built-in screenshot/screencast feature integrated directly into GNOME Shell. This screenshot tool provides improved features for a better user experience. However, some users still prefer “GNOME Screenshot”. If you are one of them, you can install and use “GNOME Screenshot” on your systems by following the below instructions:
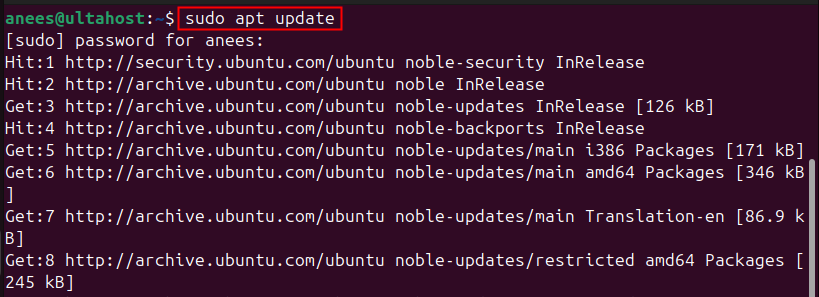
Let’s update the packages list to make sure we get the most recent version of GNOME Screenshot:
sudo apt update
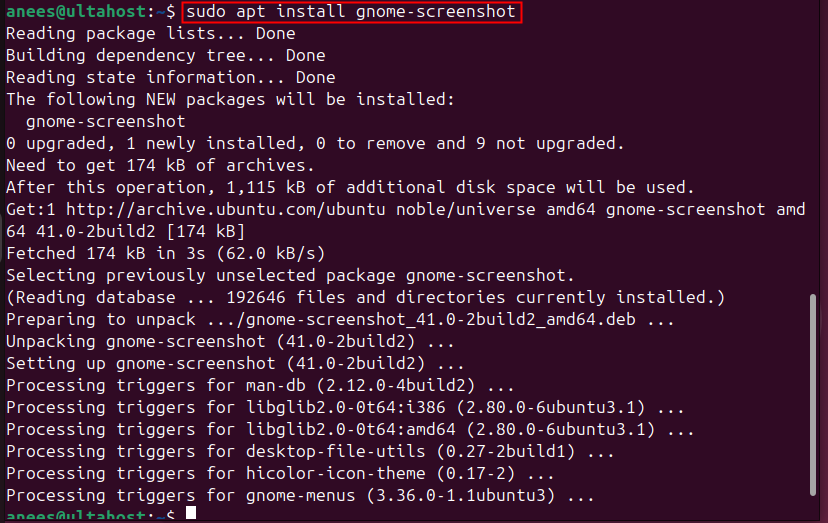
Now run the below-mentioned apt command to install the GNOME Screenshot tool on Ubuntu 24.04:
sudo apt install gnome-screenshot
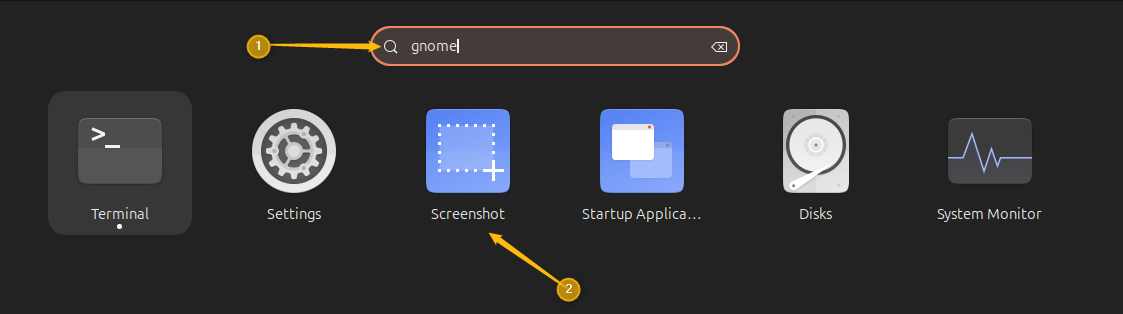
Open the GNOME screenshot utility from the applications menu, as follows:
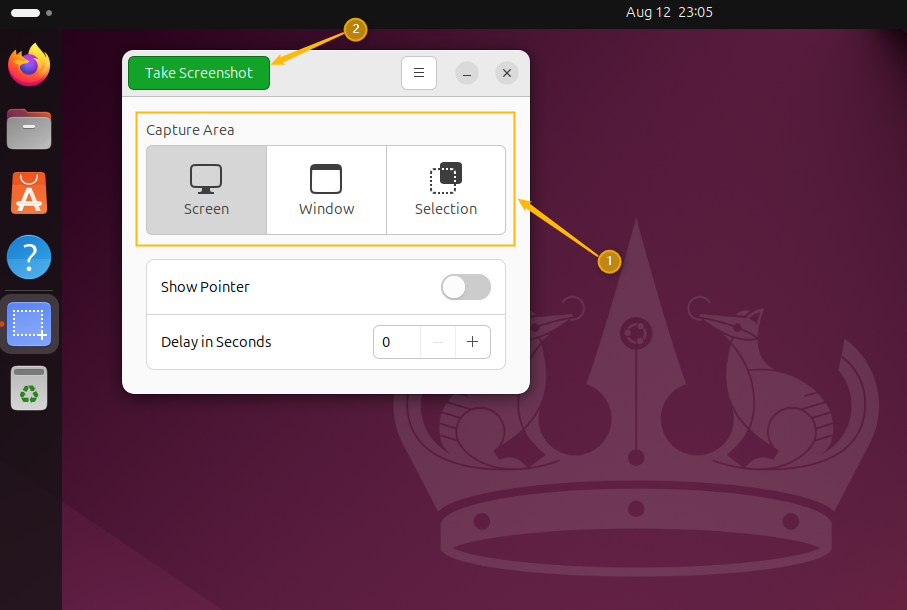
After launching the GNOME screenshot, select your preferred option: Screen, Window, or Selection, and click the “Take Screenshot” button to capture a screenshot:
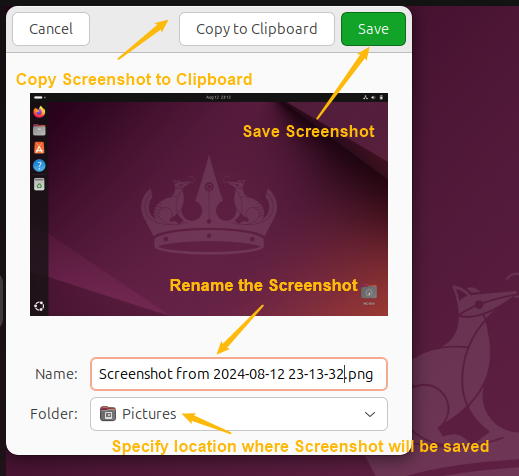
Once we click on the “Take Screenshot” button, it asks us to specify the name of the screenshot and choose the directory where we want to store it. Once done, hit the Save button to store the screenshot in the chosen directory:
The GNOME Screenshot tool allows users to capture screenshots directly from the terminal. To do this, you can run the gnome-screenshot command with various options, as shown below:
Run the gnome-screenshot command without any argument to capture the entire screen:
gnome-screenshot
On successful execution, the cursor will move to the next line and the screenshot will be saved in the “Home/Pictures/Screenshots” directory:

Similarly, you can capture a particular window or a specific part of the screen using the “gnome-screenshot” command with the “-w” and “-a” options, respectively.
Read also How to Install TeamViewer on Ubuntu
In addition to the default screenshot tool and gnome-screenshot, Ubuntu supports various alternative snipping tools that offer advanced customization options for capturing screenshots. Here are some of the best snipping tool alternatives:
Kazam is a commonly used screencast and screenshots tool that can be installed from Ubuntu’s official repository. You can use it to capture the entire screen, all screens, a particular window, or a selected screen area. By default, it takes a screenshot after a five-second delay, but this setting can be customized. Moreover, it allows us to add the mouse pointer and borders to the screenshot. You can use the following command to install this tool on Ubuntu 24.04:
sudo apt install kazam
Flameshot is a user-friendly screenshot tool that is available through Ubuntu’s official repository. It enables users to capture the complete screen, a desired area, or the current window. You can set a delay for taking screenshots and apply various effects, such as adding the pointer or window border. In addition to this, we can customize the screenshot options through its settings.
sudo apt install flameshot
Shutter offers a range of features. It can capture various elements including the current window, a specific window, a rectangular region, the entire screen, a child window, a menu, or a cascading menu from an application. Moreover, it provides editing capabilities, such as cropping screenshots and adding text or effects to screenshots, etc.
sudo apt install shutter
We can capture screenshots on Ubuntu 24.04 with both the built-in screenshot tool and alternative tools like GNOME Screenshot. The default tool allows us to capture the full screen, a specified area, or a particular window and supports keyboard shortcuts for efficiency. Users who want advanced customization and editing options can install and use alternative snipping tools like Kazam, Flameshot, or Shutter. In this guide, we covered various screenshot tools, from a default screenshot utility to some advanced utilities, to help you choose the right tool for your needs.
We hope this guide has helped you master screen capturing on Ubuntu 24.04. Consider upgrading to an Ultahost Linux VPS for enhanced control, security, and root access. You’ll enjoy greater flexibility and performance as we handle all the administrative tasks to keep your servers running fast and stable with guaranteed uptime.
We can’t use the default screenshot tool to capture screenshots on Ubuntu 24.04 via the terminal. However, we can use keyboard keys to take a screenshot. Alternatively, we can install the GNOME screenshot utility and run the “gnome-screenshot” command with different options to capture screenshots via the terminal.
We can take a screenshot of the selected area using the “PRTSC” key, “SHIFT + PRT SC” to capture the entire screen, and “ALT + PRT SC” to capture a specific window.
By default, Ubuntu saves the screenshots in the “Home/Pictures/Screenshots” directory.
You can run the sudo apt install gnome-screenshot command from to terminal to install the GNOME screenshot tool on Ubuntu 24.04.
To capture a specific area, select the “Selection” option, resize the area you want to capture, and then hit the “Capture” button to save the screenshot. Or press the PRTSC button on your keyboard.
Choose the “Screen” option from Ubuntu’s default screenshot tool, and then hit the “Capture” button or simply press “SHIFT + PRTSC” to capture a complete screen.
Yes, you can use tools like Kazam and Flameshot to set a delay before capturing the screenshot.

TeamViewer is a popular remote desktop software that en...
Listing installed packages on operating systems, such a...
ClickHouse is a high-performance, open-source database ...