
How to Install Wine on Ubuntu 22.04
Wine is a third-party tool that helps you to operate Wi...


Managing logs in Docker Compose is essential for developers to monitor the behavior of containerized applications. It offers visibility into runtime errors, events, and system interactions. This is crucial for debugging and troubleshooting, as logs offer detailed information that can help identify the root cause of issues. Additionally, logs are vital for performance analysis, helping to detect bottlenecks and ensure optimal operation of services.
Docker Compose logs are the aggregated output from all the services running in a Docker Compose file. These logs consist of the standard error and standard output streams from each container. In this tutorial, we’ll show you how to check and manage logs on Docker Compose.
Here’s a step-by-step guide to install and setup Docker Compose on Ubuntu 24.04:
Before checking and managing logs, make sure Docker Compose is installed on your system. If you haven’t already installed Docker Compose, you can do so by running the below command:
sudo apt install docker-compose
Similarly, if Docker or Docker Engine is not installed, you can install it along with its dependencies:
sudo apt install docker-ce docker-ce-cli containerd.io docker-buildx-plugin docker-compose-plugin
Now you can verify the successful installation of Docker Compose, by executing the below command:
docker compose version

Create the project directory named “compose-demo” in the home directory, then navigate to that directory. Next, the “app” subdirectory serves as the application’s root.
Read also How to Install Docker on Ubuntu 22.04
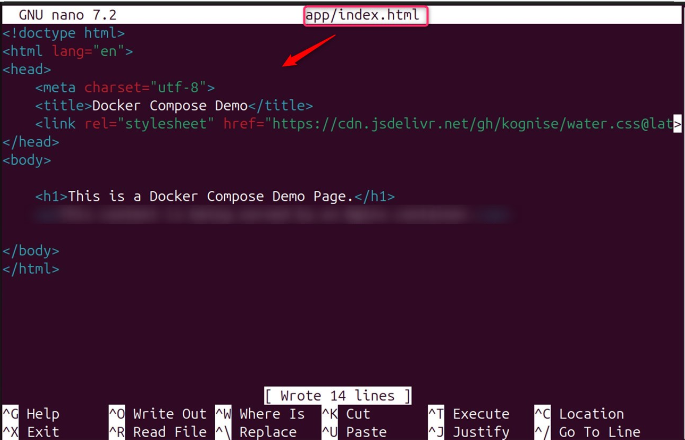
Finally, a new HTML file named “index.html” is created within the “app” directory using the nano text editor:
mkdir ~/compose-demo
cd ~/compose-demo
mkdir app
nano app/index.html

Let’s paste the content into the created file:
<!doctype html>
<html lang="en">
<head>
    <meta charset="utf-8">
    <title>Docker Compose Demo</title>
    <link rel="stylesheet" href="https://cdn.jsdelivr.net/gh/kognise/water.css@latest/dist/dark.min.css">
</head>
<body>
    <h1>This is a Docker Compose Demo Page.</h1>
</body>
</html>
In addition, create a “docker-compose.yml” file in the specified directory:
sudo nano docker-compose.yml
This file defines all the services that make up your application. Let’s copy the below script and paste it into the above-created file:
services:
  web:
    image: nginx:alpine
    ports:
      - "8000:80"
    volumes:
      - ./app:/usr/share/nginx/html
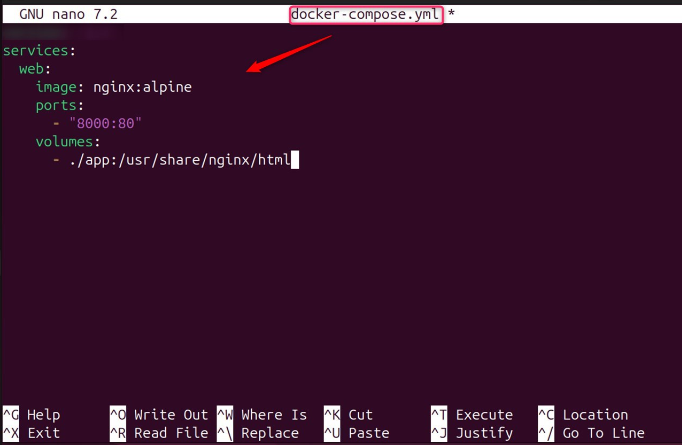
This example defines a simple setup with a web service using the Nginx image service.
Get a Cheap Ubuntu Server to Manage Docker Compose Logs!
Enjoy the reliability of Ubuntu with Ultahost’s virtual server, offering fast performance and low latency for managing Docker Compose logs.
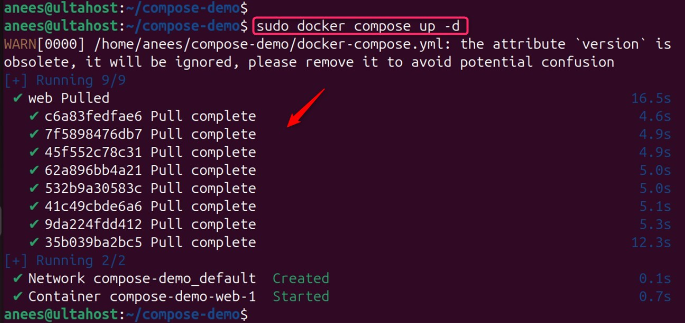
Now, you can initialize the application by running the “up” command. This command pulls the necessary Docker images, creates containers for your services, and starts them in detached mode.
Let’s start your Docker Compose application:
sudo docker compose up -d
To manage Docker Compose logs, users first need to access the logs in Docker Compose. For example, you can run the below command with the ps option for viewing the running services:
sudo docker compose ps

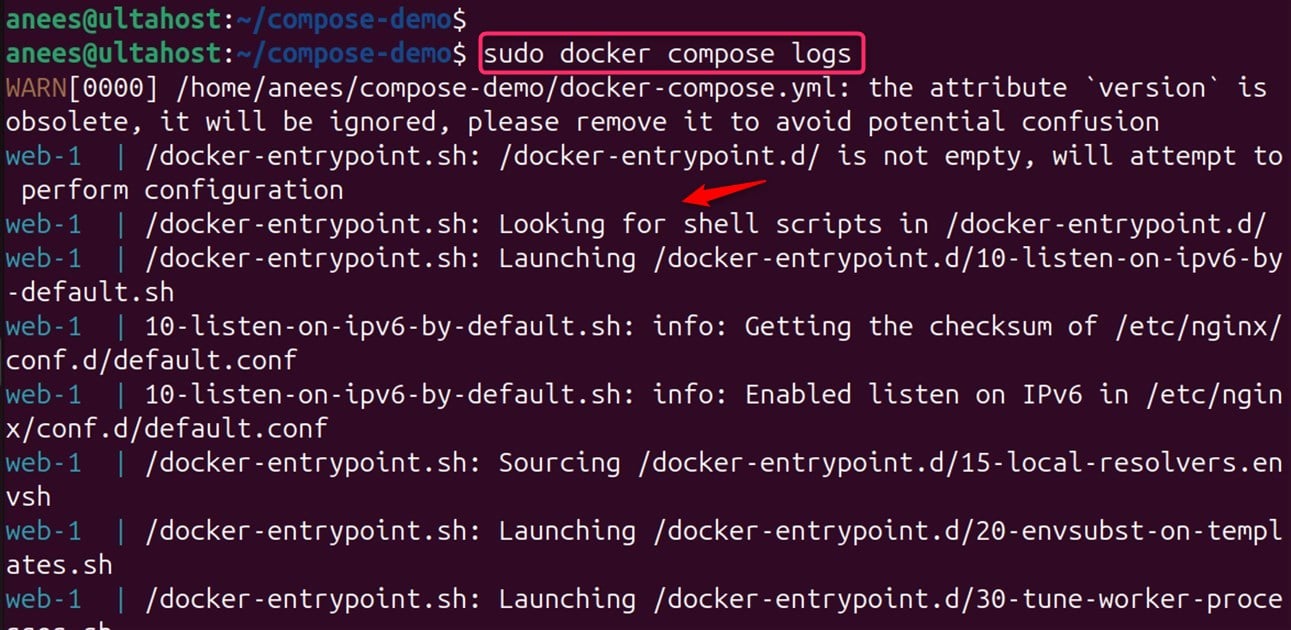
To view the logs of all containers in the project, run the docker compose logs command, as shown below:
sudo docker compose logs
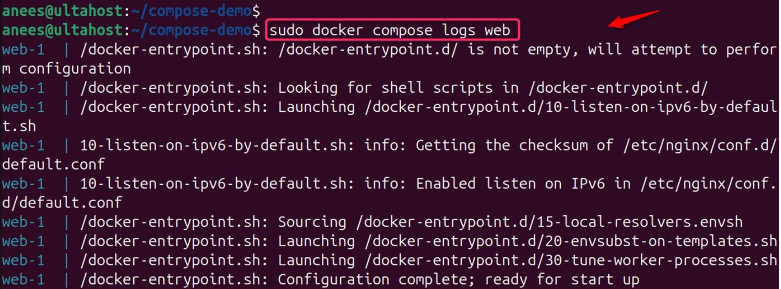
Run the docker compose command with the service name to view logs for a particular container. For example, the below command shows the logs for a web service:
sudo docker compose logs web
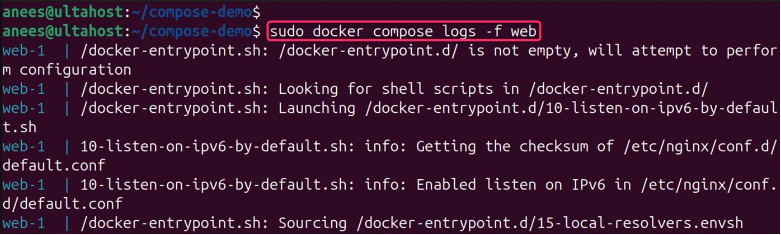
For real-time logs, you can execute the docker compose command with the -f option followed by the service name:
sudo docker compose logs -f web
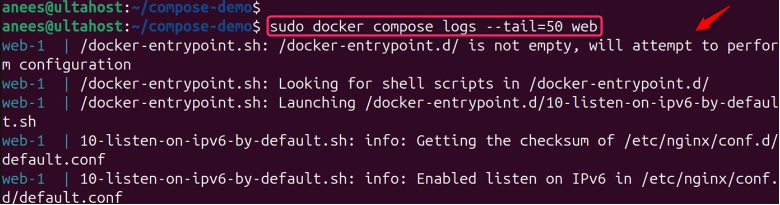
You can control the amount of log output using the “–tail” flag to limit the number of displayed lines:
sudo docker compose logs --tail=50 web
You can use the “grep” command along with the docker compose command to filter logs based on specific patterns:
sudo docker compose logs web | grep "process"

For redirecting logs to a file, you can specify the filename such as web.log:
sudo docker compose logs web > web.log

You can stop as well as remove the Docker Compose application by using the “down” option with the docker compose command. Let’s stop your Docker Compose application:
sudo docker compose down

For checking as well as managing logs in Docker Compose, utilize the “docker compose logs” command. It extracts/filters the logs of all services presented in the “docker-compose.yml” file. For real-time log streaming, which is particularly useful during development and troubleshooting, you can append the “-f” flag to continuously follow the log output.
Additionally, if you need to focus on a specific service, you can specify the service name after the logs command. It’s also possible to filter the logs by time or to modify the output to your needs using various flags and options provided by Docker Compose.
By following these steps, you can effectively manage your Docker Compose logs on Ubuntu 24.04. Integrate Docker Compose with Ultahost’s best Linux VPS server for seamless log management. Experience ultra-fast SSD NVMe speeds without dropouts or slowdowns, ensuring smooth performance while checking and managing Docker Compose logs
Docker Compose logs contain information about the applications running within your containers, including standard output (stdout) and standard error (stderr) messages.
Logs are crucial for monitoring your application’s behavior, debugging issues, and analyzing performance. They provide detailed information that helps identify problems and ensure the smooth operation of your containerized services.
For displaying the logs of all services in the project, utilize the docker compose logs command.
Yes, specify the service name after the logs command. For example, docker compose logs web show logs only for the “web” service.
Use the -f flag with docker compose logs. For instance, docker compose logs -f web enlists logs from the “web” service.
Yes, use the –tail flag with the desired number of lines. For example, docker compose logs –tail=20 web represents the last 20 lines from the “web” service logs.
Pipe the docker compose logs output to the grep command with your desired keywords. For instance, docker compose logs nginx | grep “processes” extracts logs having “processes” for the “web” service.
Wine is a third-party tool that helps you to operate Wi...
Nmap, the Network Mapper, is a free and open-source sec...


OpenLiteSpeed is a lightweight and powerful open-source...