How to Upload the UltaHost Reseller Module Fi...
This article will cover the basics of the Reseller Modu...
Modern web browsers utilize a temporary storage space known as a cache to enhance your online experience. This cache stores elements like images, scripts, and website data to expedite page loading upon subsequent visits. While caching significantly improves browsing speed and efficiency, it can occasionally lead to issues such as outdated content display or website malfunction. In such instances, clearing your browser cache becomes necessary.
Each major web browser offers unique methods for clearing cached data. Whether you’re navigating the web with Chrome, Firefox, Safari, or Edge, understanding the specific steps for cache clearance is crucial.
This guide will provide you with clear and concise instructions on how to effectively clear your cache across all major browsers, ensuring a smooth and optimized browsing experience.
Browser cache is a temporary storage area where your browser saves data from websites you visit. This data includes images, JavaScript files, and HTML documents. The primary purpose of a cache is to improve page load speed by reducing the need to download the same resources repeatedly. However, over time, the cache can become outdated, causing issues with website functionality, security, and performance.
Clearing your browser cache can:
Upgrade Your Hosting Experience Now!
Clear cache in all major browsers and boost your online experience! Explore our Cloudflare VPS hosting plans at Ultahost and take your online presence to the next level.
Clearing cache in Google Chrome is a straightforward process:
Access Chrome Settings: Click the three vertical dots in the top-right corner of the Chrome browser window and select “Settings” from the drop-down menu.
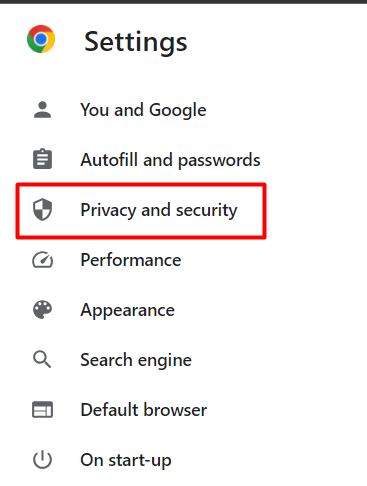
Find the “Privacy and Security” Section: Scroll down to the “Privacy and security” section and click on it:
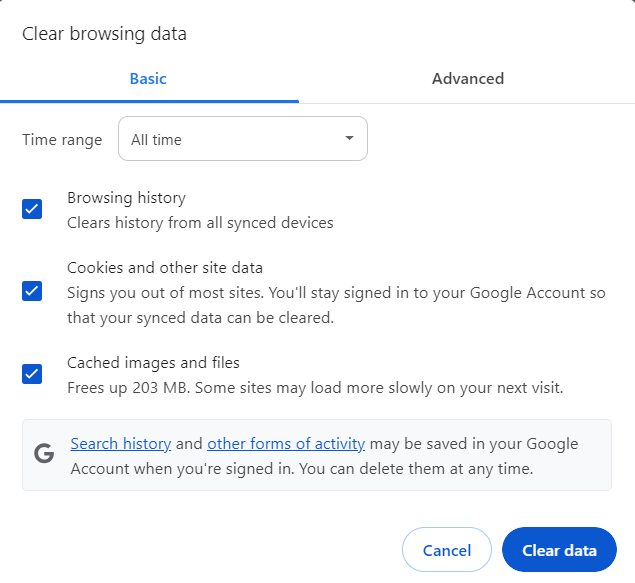
Select “Clear Browsing Data”: Click on “Clear browsing data” and select the options you want to clear, including:
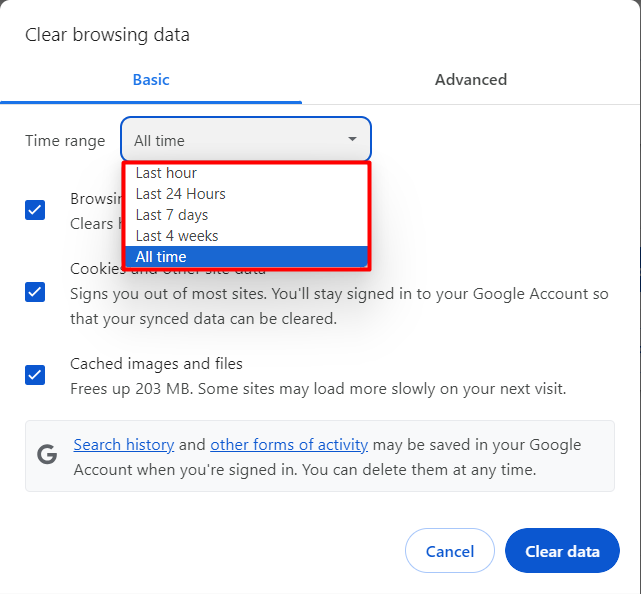
Choose a Time Range: You can completely remove any time or can give a custom range from which you want to clear data. You can choose from options like “Last hour,” “Yesterday,” “All time,” or a custom range and then click on “Clear data” to remove it.
Clearing cache in Mozilla Firefox is similar to Chrome:
Access Firefox Settings: Click the three horizontal lines in the top-right corner of the Firefox browser window and select “Settings” from the drop-down menu:
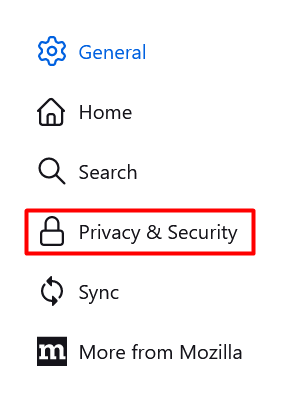
Find the “Privacy & Security” Section: Click on “Privacy & Security” from the left-hand menu and then select “Clear Your Recent History”. Next, click on “Clear your recent history” and select the types of data you want to clear, including:

Clearing cache in Microsoft Edge is a bit different:
Access Edge Settings: Click the three horizontal dots in the top-right corner of the Edge browser window and select “Settings” from the drop-down menu.
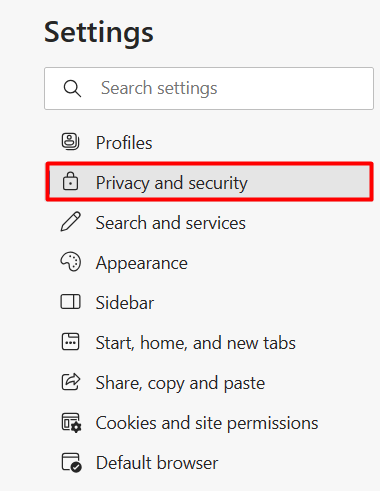
Find the “Privacy and Security” Section: Click on “Privacy and security” from the left-hand menu:
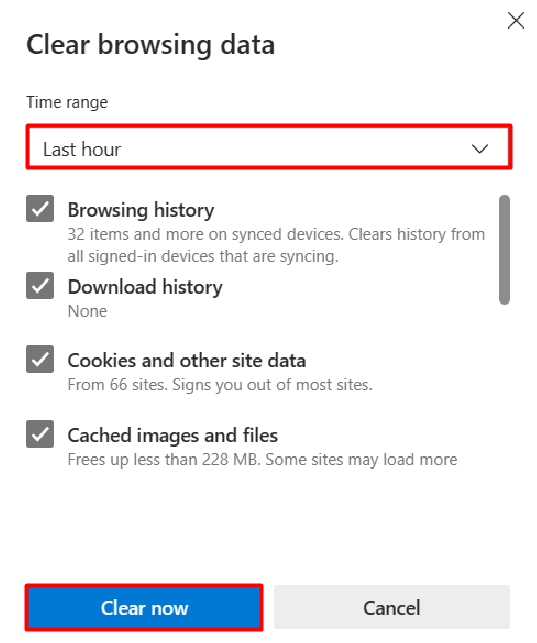
Select “Choose What to Clear”: Click on “Choose what to clear” and select the types of data you want to clear, including:

Clearing cache in Opera is similar to Chrome:
Access Opera Settings: Click the three horizontal lines in the top-right corner of the Opera browser window and select “Settings” from the drop-down menu.
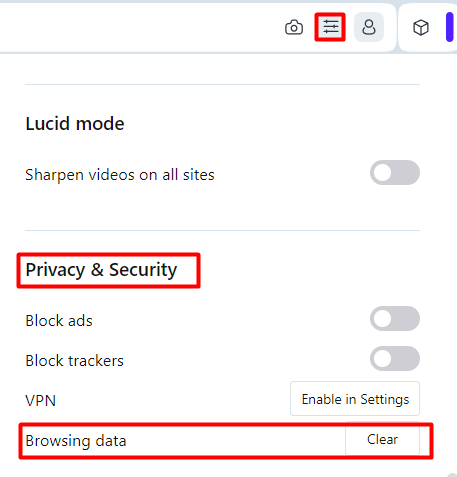
Find the “Privacy & Security” Section: Click on “Privacy & Security” from the left-hand menu.
Select “Clear Browsing Data”: Click on “Clear browsing data” and select the types of data you want to clear, including:
In addition to clearing your cache regularly, there are several other tips you can follow to optimize your browsing experience:
1 – Set up a cache-clearing schedule: Consider setting up a regular schedule to clear your cache, such as weekly or monthly, to ensure that your browser is running at its optimal level.
2 – Use third-party cache management tools: There are several third-party tools available that can help you manage your cache more effectively, such as cache cleaners, WordPress cache plugins, and browser extensions.
3 – Be mindful of browser extensions: While browser extensions can be useful, they can also impact your browser’s performance and cache management. Be sure to regularly review and update your extensions to ensure they are not causing issues.
Clearing your browser cache is a simple yet powerful tool for ensuring optimal online performance. By regularly removing outdated and potentially problematic data, you can enjoy faster loading times, improved website functionality, and enhanced security.
While this guide has provided essential instructions for clearing website cache across major browsers, additional browser-specific features and options may be available to further customize your cache management. With this knowledge, you can browse the internet with confidence, knowing that your browser is running at its optimal level.
With the knowledge of website cache and the cheapest WordPress hosting service from UltaHost, you can easily get your site up and running! This powerful hosting solution makes it simple and inexpensive to build your website.
A browser cache is a storage location on your computer where recently visited web pages are stored. This allows the browser to load pages more quickly upon subsequent visits.
Clearing the browser cache can resolve various issues such as outdated content display, slow loading times, and privacy concerns. It ensures that you’re seeing the most up-to-date version of a website.
To clear the cache in Google Chrome, click on the three-dot menu icon in the top-right corner, go to “More tools”, and then select “Clear browsing data”. From there, you can choose the time range and the types of data to clear, including cached images and files.
In Mozilla Firefox, you can clear the cache by clicking on the menu icon in the top-right corner, selecting “Options” or “Preferences”, then navigating to the “Privacy & Security” tab. Under “Cookies and Site Data”, click on “Clear Data” and select “Cached Web Content”.
To clear the cache in Microsoft Edge, click on the three-dot menu icon in the top-right corner, go to “Settings”, then click on “Privacy, search, and services” in the left sidebar. Under “Clear browsing data”, click on “Choose what to clear” and select “Cached images and files”.