

How to Install Microsoft SQL Server on Window...
SQL Server is a relational database management system (...


MySQL is one of the most popular open-source relational database management systems and a powerful tool when it comes to data storing, managing, and retrieval. MySQL’s focus rests primarily upon data organization and structuring it in a hierarchy that ensures smooth retrieval and manipulation when required. MySQL has diverse applicability covering small web projects to enterprise-level applications.
Adding a new user and assigning permissions to them in MySQL takes center stage in addressing the concerns regarding the secure perimeter to the database. The concept can also be regarded as creating an access key system which ensures precise controlling of the whole data house. Each user is assigned only the bare minimum permissions to ensure that they are able to fulfill their roles without crossing other boundaries that, if explored would, increase the risk of exploitation and misuse.
Step by step tutorial guidance will be given on how to create a new user and assign permissions unto him in MySQL on Ubuntu 22.04.
Also, read How to Install MySQL on Ubuntu 21.04 / 20.04
Before creating a new user, we need to ensure that MySQL is already installed and running in Ubuntu 22.04 which can be done by following the below steps:
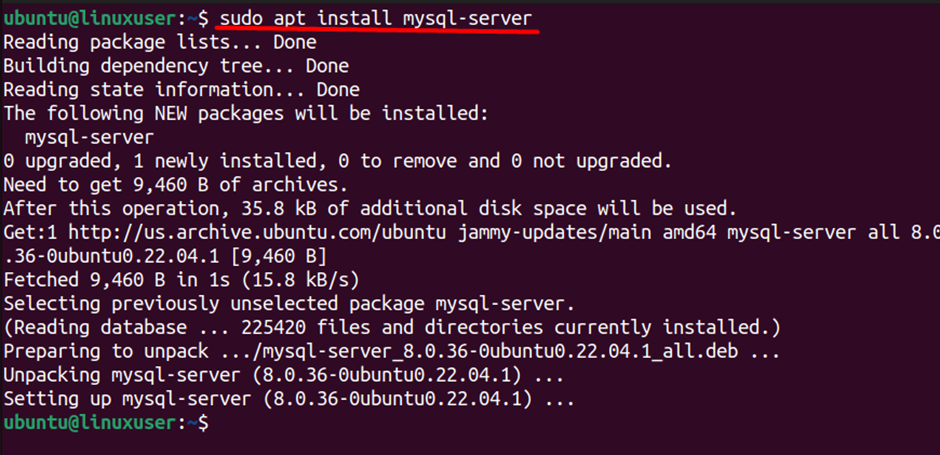
First, we need to install MySQL using the below command:
$ sudo apt install mysql-server
Next, we need to start the MySQL services on our Ubuntu 22.04 distribution:
$ sudo service mysql start
If we want to enable MySQL services every time we boot out Ubuntu distribution, we can execute the following command:
$ sudo systemctl enable mysql

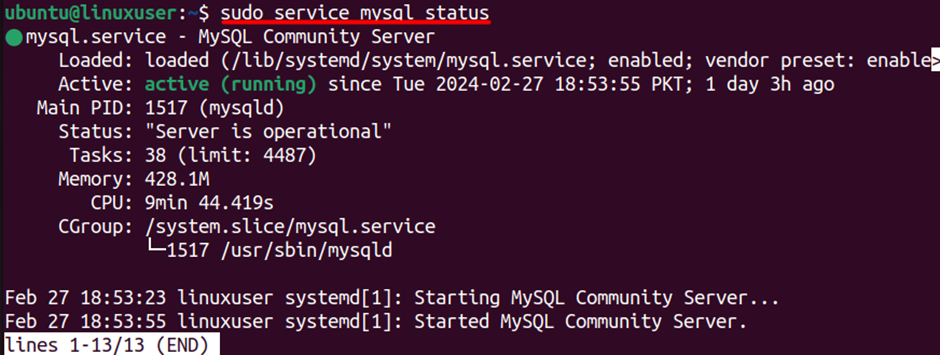
After following the above steps, MySQL services should be up and running without any issue which we can check using:
$ sudo service mysql status
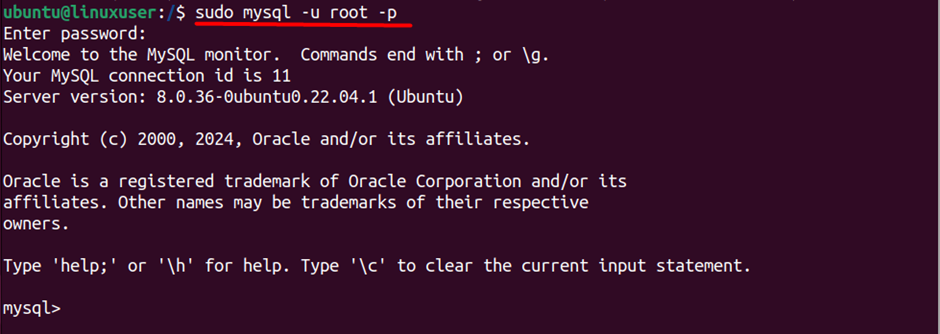
Now we will use the root user to interact with MySQL database using the following command:
$ sudo mysql -u root -p
In the next section, we will guide you on how you can create a new user.
Turbocharge website with MySQL hosting today!
Is your website bogged down by a slow, unreliable database? Experience Ultahost blazing-fast speeds, and reliability, for management of MySQL databases.
Once we log in to MySQL, we can use the following command to create a new user:
$ mysql> CREATE USER 'New-UserName'@'localhost or IP' IDENTIFIED BY 'User-Password';

In this command, we need to replace ‘new_user’ and ‘password’ with the actual name and password which we want to set.
If you want to allow connections from any host, you can use ‘%’ instead of ‘localhost’:
$ CREATE USER 'new_user'@'%' IDENTIFIED BY 'password';

After creating the user, you need to grant the necessary permissions. For example, to grant all privileges on a specific database, you can use:
$ GRANT ALL PRIVILEGES ON database_name.* TO 'new_user'@'localhost';

Replace database_name with the name of the database to which you want to grant access. If you want to grant all privileges on all databases, you can use the wildcard *:
$ GRANT ALL PRIVILEGES ON *.* TO 'new_user'@'localhost';

After granting privileges, you need to flush the privileges to apply the changes immediately:
FLUSH PRIVILEGES;

Once you have created the user and granted privileges, exit the MySQL prompt:
$ exit;

Now, you’ve successfully created a new user in MySQL with the specified permissions. Adjust the commands based on your specific requirements and security considerations.
One of the significant advantages of MySQL is its scalability, enabling it to handle an extensive range of data and user loads. It seamlessly accommodates the growth of data and users, making it suitable for projects of different sizes and complexities. This scalability ensures that MySQL can adapt to the evolving needs of applications over time.
Another key advantage is its reliability and performance. MySQL is designed to deliver high-performance data retrieval and management, ensuring quick and efficient access to information. Its reliability is crucial for applications that require consistent and stable data handling, such as e-commerce websites, content management systems, and financial applications.
Furthermore, MySQL supports multiple programming languages, making it versatile and compatible with various application development frameworks. This flexibility allows developers to choose the programming language that best suits their project requirements while still benefiting from the robust capabilities of MySQL.
MySQL serves as a reliable, scalable, and high-performance database management system that caters to diverse data storage needs. Its open-source nature and compatibility with multiple programming languages contribute to its widespread adoption and continued relevance in the ever-evolving landscape of data management. In this guide, we provide in-depth details on how to create a new user and grant permissions in MySQL on Ubuntu 22.04.
Fire up the terminal and explore different databases, experiment with creating users, and grant permissions in MySQL. Take your MySQL expertise to the next level with Ultahost’s dedicated hosting servers. Unlock the power of your databases without sacrificing security, control, or speed.
To create a new user in MySQL, you can use the CREATE USER statement.
To create a user that can connect from any host, use the ‘%’ wildcard.
To grant all privileges to a user, use the GRANT statement
You can grant specific privileges using the GRANT statement with the desired privileges and scope.
SQL Server is a relational database management system (...
SQLite is a lightweight, self-contained, and serverless...
Automating tasks in MySQL, like backups, data cleaning,...
The ability to easily integrate data from several sourc...
MySQL triggers are a powerful feature that allows autom...

MySQL is an open-source relational database system that...