
How To Install FTP Server On Windows
The File Transfer Protocol (FTP) is a set of rules netw...


Remote Desktop Protocol (RDP) serves as a proprietary protocol developed by Microsoft, allowing users to establish remote connections to Windows-based computers. The designated RDP port acts as the communication channel facilitating these connections, typically utilizing port 3389 as the default choice.
Although the default RDP port generally suffices for most users, it is considered a prudent security measure to modify the RDP port to a non-standard value. This practice enhances computer security by introducing an additional layer of complexity, rendering it more challenging for potential hackers to identify and exploit RDP vulnerabilities. In this blog post, we will present a step-by-step guide on how to change the RDP port in Windows, empowering you to fortify the security of your computer.
The process of changing the RDP port entails making modifications to the Windows Registry while also configuring the firewall settings to accommodate the newly assigned RDP port. Rest assured, we will provide comprehensive guidance for each step, ensuring that you can implement these changes both safely and securely.
The default RDP port is widely recognized among hackers, who often exploit it to gain unauthorized access to Windows-based systems. They employ brute-force attacks, systematically attempting various password combinations until they successfully breach the system. By altering the RDP port, you can significantly increase the difficulty for hackers to pinpoint the actual port being used by RDP, thereby enhancing the security of your computer.
Changing the RDP port offers several notable security improvements. Firstly, it effectively mitigates the risk of brute-force attacks since hackers would be unaware of the specific port to target. This reduces the likelihood of unauthorized access to your system. Secondly, modifying the RDP port makes it more challenging for attackers to exploit vulnerabilities associated with RDP. By obscuring the port, you add an additional layer of defense against potential exploits. Lastly, the port change acts as a preventive measure, effectively safeguarding your system from unauthorized entry and protecting sensitive data from falling into the wrong hands.
In certain situations, RDP connections may encounter issues arising from conflicts with other applications or network settings. Changing the RDP port can effectively address such conflicts and contribute to the improved performance of RDP connections.
One common scenario involves internet service providers (ISPs) blocking port 3389 as a security precaution. Consequently, RDP connections may be hindered or rendered non-functional. By modifying the RDP port to a different value, you can bypass this restriction and successfully establish an RDP connection, ensuring uninterrupted access to your remote desktop.
Moreover, if you have multiple computers within your network, changing the RDP port offers a practical solution to differentiate between them. This distinction helps prevent connection errors or confusion when attempting to establish RDP sessions, ultimately streamlining the process and enhancing overall connectivity.
By resolving port conflicts and optimizing RDP connections, changing the RDP port provides a practical approach to ensure smooth and efficient remote desktop access in various networking environments.
RDP Ports Instantly on High-Speed Windows VPS!
Run port checks with zero delay on Ultahost’s performance-optimized Windows VPS. Test connectivity, scan networks fast, and rely on 24/7 expert assistance!
Before you change the RDP port, you need to check the current port number to ensure that you don’t use an already-used port. To do this, open the Windows Registry Editor and navigate to “HKEY_LOCAL_MACHINE\System\CurrentControlSet\Control\Terminal Server\WinStations\RDP-Tcp\PortNumber”. The value in the “PortNumber” key represents the current RDP port.
Explanation of the registry keys that need to be modified:
To change the RDP port, you need to modify two registry keys: “PortNumber” and “TcpPortNumber” in the “HKEY_LOCAL_MACHINE\System\CurrentControlSet\Control\Terminal Server\WinStations\RDP-Tcp” registry path. The “PortNumber” key sets the RDP port for LAN connections, and the “TcpPortNumber” key sets the RDP port for WAN connections.
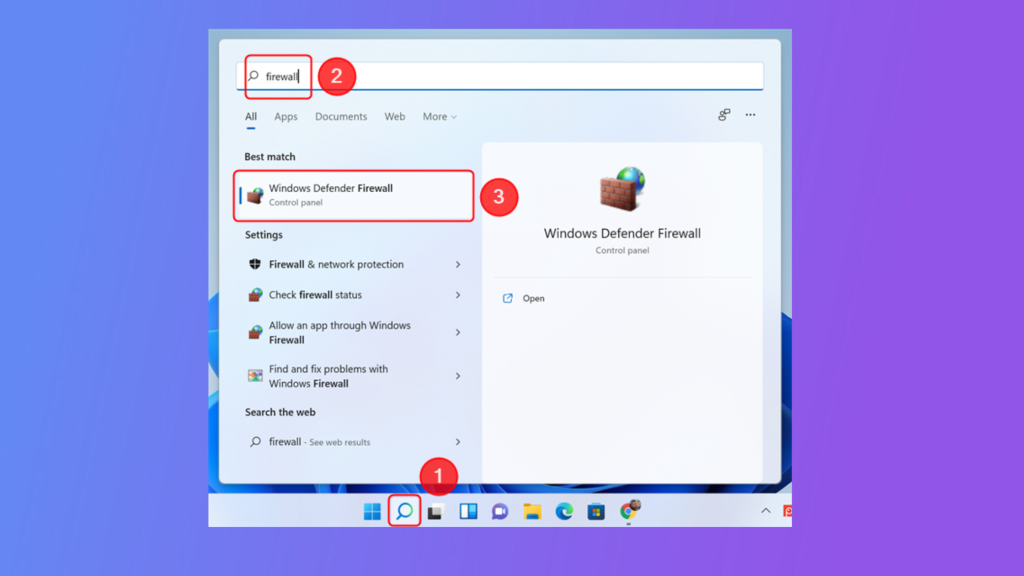
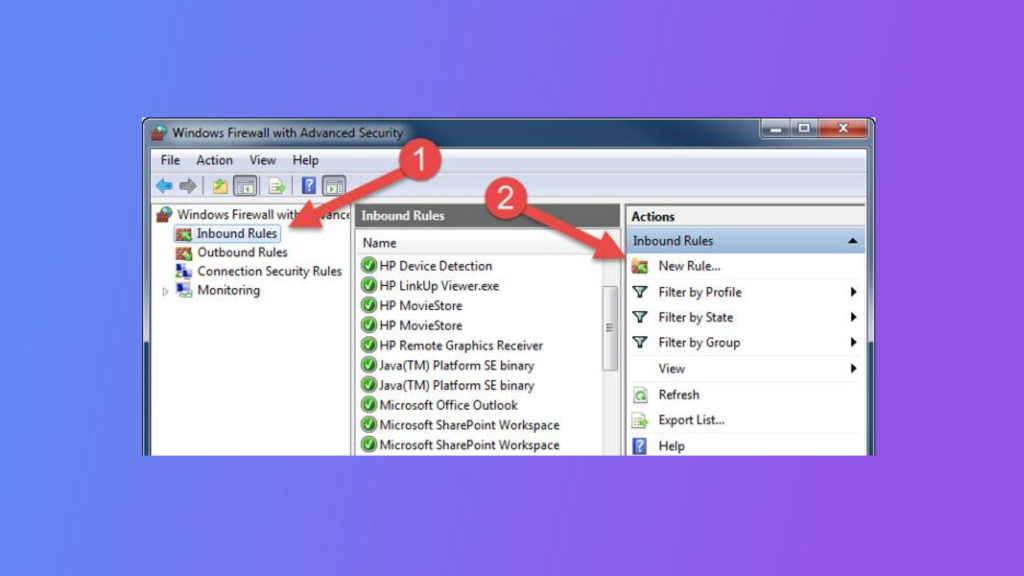
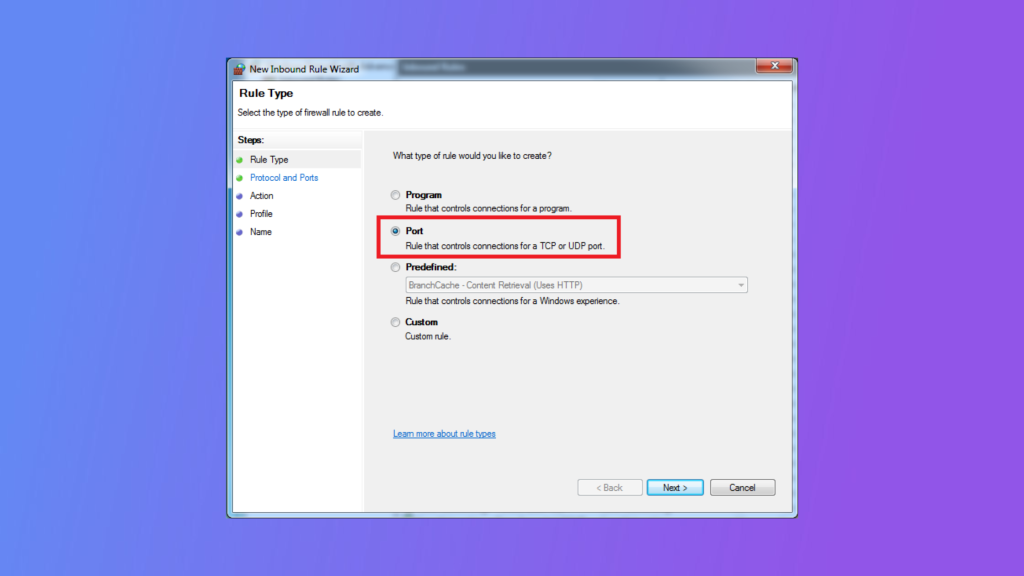
After modifying the registry keys, you need to configure the Windows Firewall to allow incoming connections to the new RDP port. To do this, open the Windows Firewall with Advanced Security app and create a new inbound rule that allows TCP connections on the new RDP port.
Congratulations! You have successfully changed the RDP port in Windows. You can now connect to your computer using the new RDP port number. Remember to update your RDP client with the new port number if necessary.
After changing the RDP port and configuring the firewall, you should test the new RDP port to ensure that it is working correctly. To do this, open the Remote Desktop Connection app, enter the IP address of the target computer followed by a colon and the new RDP port number, and then click “Connect”.
If you encounter issues connecting to the computer using the new RDP port, some common troubleshooting steps include:
Changing the default Remote Desktop Protocol (RDP) port in Windows is a crucial security precaution to safeguard your computer against unauthorized access. The default RDP port is widely recognized and frequently subjected to malicious attempts by hackers. By customizing the port, you can enhance the level of difficulty for potential attackers, making it more challenging for them to identify and exploit your system. Adjusting the RDP port in Windows involves a relatively straightforward procedure that contributes to bolstering the overall security of your computer.
Consider UltaHost’s high-performance VPS hosting plans. Get full admin access, fast port response times, and a stable environment ideal for network diagnostics and service monitoring. With NVMe storage, dedicated resources, and 24/7 Ultaai support, our VPS is perfect for IT professionals and developers who need precision, speed, and uptime for port testing and network troubleshooting.
Changing the default port (3389) can help reduce exposure to automated attacks and improve security.
The default Remote Desktop Protocol (RDP) port is TCP 3389.
You can change it by modifying the PortNumber value in the Windows Registry under HKEY_LOCAL_MACHINE\SYSTEM\CurrentControlSet\Control\Terminal Server\WinStations\RDP-Tcp.
Yes, a restart or restarting the Remote Desktop Services is required for the changes to take effect.
Yes, you must manually allow the new port through the firewall to ensure remote access works.
Yes, if the new port isn’t properly configured in firewalls or router settings, remote access may fail.
Use the new port in the connection string, e.g., yourdomain.com:customport.