
How to Install XAMPP on Windows
XAMPP is a free cross-platform solution stack package f...


Windows Firewall is a built-in security feature designed to safeguard your computer from unauthorized access. It acts as a protective barrier between your computer and external networks, allowing you to regulate which programs and services are permitted to communicate over the network. By default, Windows Firewall is enabled in Windows and provides basic protection against common network threats. However, you have the option to customize its settings according to your specific requirements in order to enhance your computer’s security. In this article, we will discuss the process of opening or blocking ports using Windows Firewall.
Before delving into the steps of opening or blocking ports with Windows Firewall, it’s important to comprehend what ports are. Ports act as entryways on your computer that enable the flow of network traffic. Each port is assigned a unique number, and different types of traffic utilize specific ports. For instance, web traffic typically utilizes port 80, while email traffic often employs port 25.
Setup Firewall on Our Windows 2012 VPS Hosting!
Acquire a Windows 2012 VPS hosting server with the capacity for a next-generation, high-performance, enterprise-class infrastructure.
Opening or blocking ports can significantly contribute to improving your computer’s security. By default, Windows Firewall blocks all incoming traffic, thereby denying any connection requests aimed at your computer. However, there are instances where you may need to allow incoming traffic to a specific port, such as when hosting a server or playing online games. On the other hand, you might want to block traffic to certain ports to prevent unauthorized access or the entry of malware into your system.
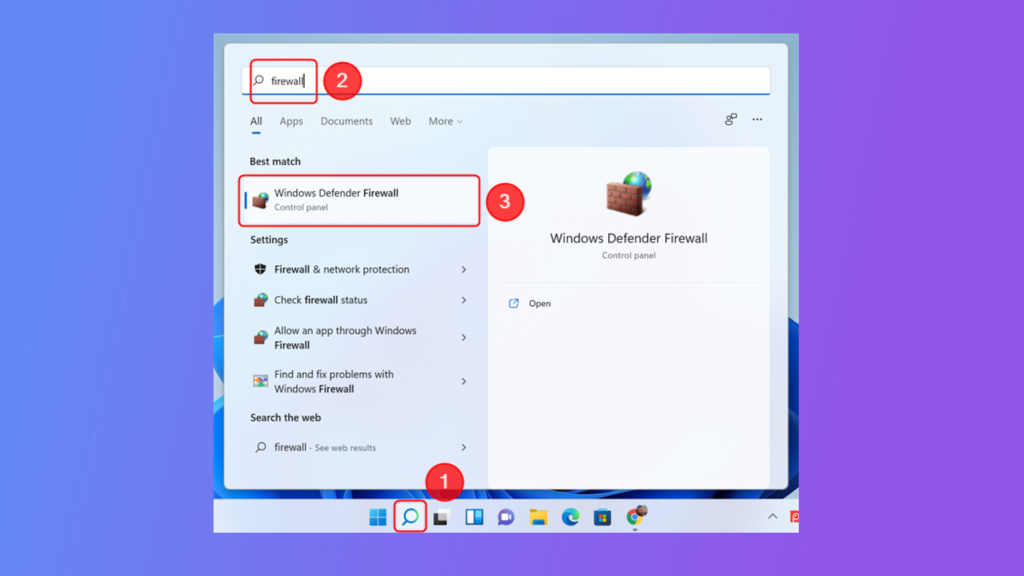
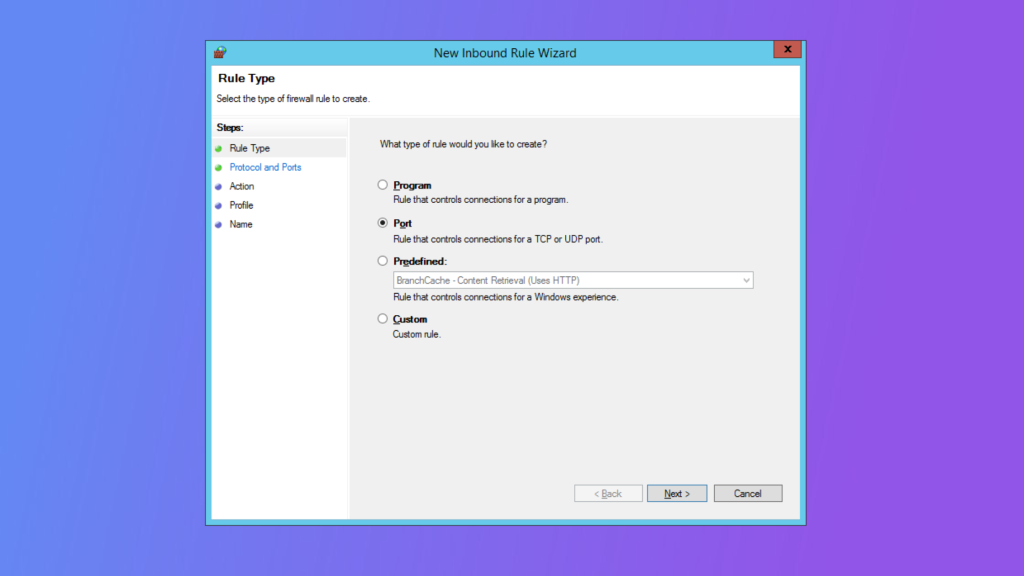
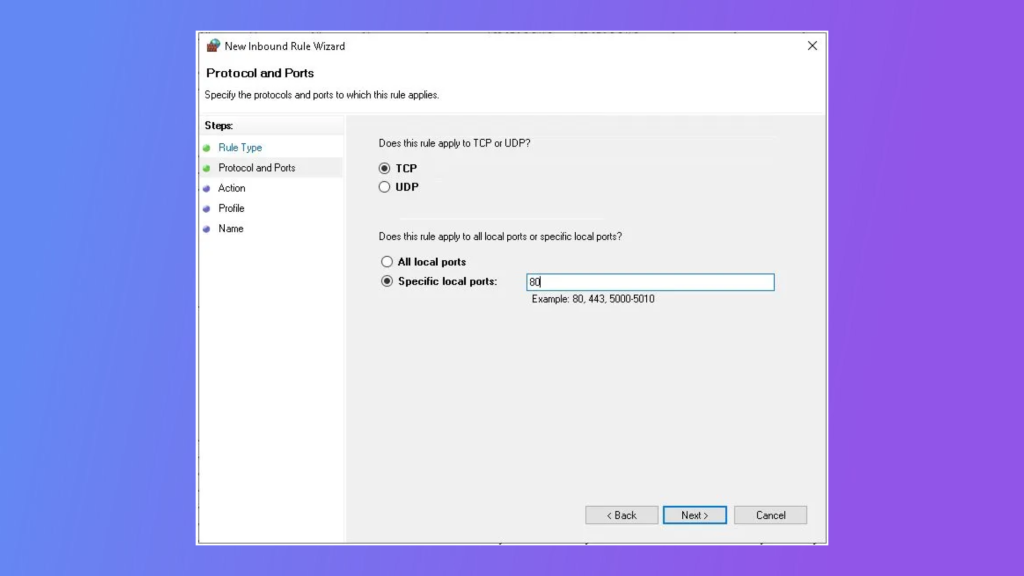
To open a port using Windows Firewall, follow these steps:

To block a port using Windows Firewall, follow these steps:
To check which ports are open or blocked using Windows Firewall, follow these steps:
If you no longer require a firewall rule in Windows or want to temporarily disable it, you can do so by disabling or deleting it using the Windows Firewall with Advanced Security tool. Here’s how:
To delete a firewall rule, follow these steps:
The rule will now be permanently removed from the list of inbound or outbound rules. It’s important to note that deleting a rule will prevent any associated applications or services from receiving incoming or outgoing traffic based on that specific rule.
In conclusion, understanding how to open or block ports using Windows Firewall is crucial for optimizing network security on your computer. By following the steps outlined in this article, you can effectively control incoming and outgoing traffic, allowing authorized connections while protecting against unauthorized access and potential threats. Whether you need to open ports for specific purposes or block them to enhance security, Windows Firewall provides the necessary features to customize and manage your network communication effectively. By utilizing these capabilities, you can ensure a secure and controlled network environment for your computer.
Windows FirewallWindows Firewall
Streamline your Firewall setup on Windows with Ultahost’s secure VDS hosting, offering powerful processing, increased memory, and ample storage, Ultahost lets you focus on managing your projects effortlessly while delivering the performance and resources needed for smooth operations.
Go to Windows Firewall settings, create a new inbound rule, and specify the port to open.
Create a new inbound or outbound rule and set the action to “Block the connection” for the desired port.
Access it via Control Panel > System and Security > Windows Defender Firewall > Advanced settings.
Yes, you can choose TCP, UDP, or both when creating a new rule.
Yes, administrative privileges are required to add or change firewall rules.
Open the firewall’s Advanced Settings, find the rule under Inbound/Outbound Rules, right-click and delete it.
Yes, opening unused or unnecessary ports can expose your system to security risks.