
How to Use the Linux Sleep Command
The sleep command in Linux is designed to introduce a d...


A firewall safeguards a system by managing what network traffic enters or leaves that system. Many Ubuntu administrators employ iptables as it gives full control over filtering rules and packet processing at the kernel. iptables offers access to the Linux netfilter framework while user-friendly wrappers such as UFW do not, so it is simple to use for basic firewalls or complex setups.
With iptables, administrators can set rules to allow, deny, or redirect traffic based upon using the IP address, port, or protocol. Each of these options offers a level of flexibility that can provide security for servers, prevent unauthorized access to resources, and even improve performance of networks.
This article will show the reader how to install and utilize iptables on Ubuntu. It will also provide readers with direction on how to create basic rules for common services, create complex setups, such as NAT or rate limiting, and how to create rules that survive reboots.
The foundation of the management of a Linux firewall is netfilter, a framework that operates in kernel-space to review and change network packets. Netfilter determines the handling of each packet when entering, leaving or passing through the system. iptables is the tool that operates in user-space to allow an administrator to decide the rules and pass them to netfilter.
Secure Your Ubuntu Server with Confidence!
Take full control of your system with powerful firewall configurations. Strengthen your security today and discover why Linux remains the trusted choice for developers and businesses worldwide.
Each rule in iptables is associated with a table, and each table has different chains. A chain is a sequence of rules to be processed in order. The three important chains are:
Tables relate to the purpose of the chains. For example, the filter table makes standard allow/deny decisions, the nat table manages address translations, and the mangle table alters packet headers for special use cases.
Most Ubuntu versions already include iptables. To check, run:
sudo iptables --version

If you see a version number, iptables is installed. If the command returns “command not found,” you need to install it. Use the package manager:
sudo apt update && sudo apt install iptables -y

This installs both the command-line tool and the required components. After installation, confirm again:
sudo iptables --version
Next, verify that iptables can load rules. Run:
sudo iptables -L
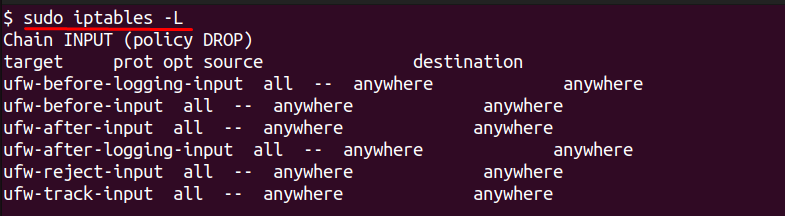
This displays the currently active rules. A new installation almost always shows empty chains with the default policies of “ACCEPT.” The fact that you see this output indicates you are in a position to configure iptables.
Once you know a few basic commands of iptables, you will find it easier to understand the basic functioning of iptables. These commands allow you to see and reset rules, and manage rules in a still simple format without creating confusion.
To see which rules are active, use the following command:
sudo iptables -L -v -n
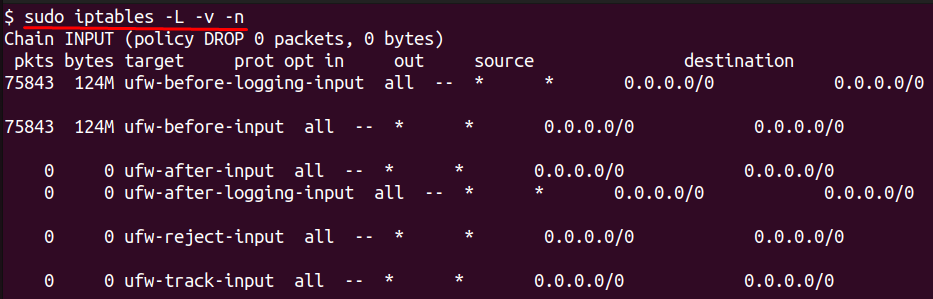
This lists the chains, their respective policies, and the applied rules. The -v flag provides more output detail while. The -n option displays addresses and ports as numbers.
If you want to start fresh, you can flush all rules with:
sudo iptables -F
This clears the chains but keeps the default policies.
You can set a default action when no rule matches a packet. For example, to use the default action to reject all incoming packets unless explicitly allowed in a rule would be done with:
sudo iptables -P INPUT DROP
iptables rules reset after a reboot unless saved. To save them into a file, use:
sudo iptables-save > rules.txt
To reload them later, run:
sudo iptables-restore < rules.txt
These basic commands give you control to check, reset, secure, and preserve your firewall configuration.
After understanding the overall design of iptables, you can start writing rules to control how your system deals with packet traffic. These examples all represent situations you’ve likely encountered when securing an Ubuntu server.
You can block traffic from a single IP address by adding a rule to the INPUT chain:
sudo iptables -A INPUT -s 192.168.1.100 -j DROP

This denies all traffic from the source 192.168.1.100. To allow a trusted IP instead, replace DROP with ACCEPT.
If you want to allow SSH connections so you can manage your server, use:
sudo iptables -A INPUT -p tcp --dport 22 -j ACCEPT

To allow web traffic, you can open ports 80 and 443 for HTTP and HTTPS:
sudo iptables -A INPUT -p tcp --dport 80 -j ACCEPT
sudo iptables -A INPUT -p tcp --dport 443 -j ACCEPT

Blocking unused or suspicious ports works the same way but with the target set to DROP.
You can allow or block entire protocols. For example, to allow ICMP packets (used for ping):
sudo iptables -A INPUT -p icmp -j ACCEPT
To block all UDP traffic:
sudo iptables -A INPUT -p udp -j DROP
These basic rules give you precise control over who can connect and which services remain available.
Once you have satisfactory basic rules in place, you will be able to start extending iptables into scenarios of greater complexity. The features of iptables will enhance security and offer a more flexible platform for managing your network.
When a server is made accessible across the internet, attackers will invariably attempt to guess the passwords for SSH by attempting new login operations repeatedly. You can mitigate this risk by assessing the number of new SSH connections that an IP address to your server can make. The following rules limit the number of new SSH connection attempts to three, per IP, every minute:
sudo iptables -A INPUT -p tcp --dport 22 -m state --state NEW -m recent --set
sudo iptables -A INPUT -p tcp --dport 22 -m state --state NEW -m recent --update --seconds 60 --hitcount 3 -j DROP
This configuration will block excessive connection attempts but allow normal usage for your legitimate users.
iptables will allow you to redirect incoming traffic to a different port. This is useful when a service runs on one port but you would like your users to access the service through a different port. For instance, to redirect all TCP traffic from port 8080 to port 80 you can use:
sudo iptables -t nat -A PREROUTING -p tcp --dport 8080 -j REDIRECT --to-port 80
This command is useful for running a web server or when running any other service that needs traffic to be redirected from one port to another.
Stateful packet inspections will add intelligence to your firewall by only allowing packets that are part of an already established connection, or related connection. This disallows an attacker or any unknown source from creating a new unwanted session:
sudo iptables -A INPUT -m state --state ESTABLISHED,RELATED -j ACCEPT
This makes the firewall smarter by distinguishing between safe traffic and unwanted connection attempts.
By default, iptables rules will only exist in memory. When the system reboots, all rules you have created will disappear, and the default configuration of empty rules will load. To keep your firewall active after a reboot, you will have to make it persistent.
Ubuntu has a package called iptables-persistent that saves your current rules and loads them back into place when the system starts. You can install the package with the following command:
sudo apt install iptables-persistent -y
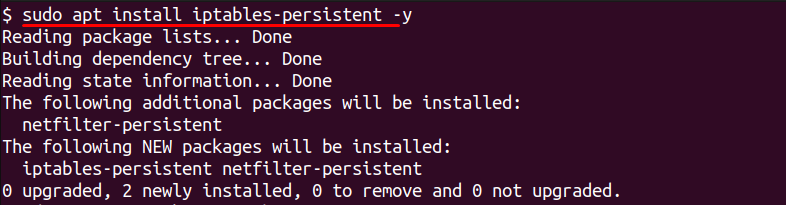
While installing the iptables-persistent package, it will also prompt you whether to save the existing rules that you already have in place that are IPv4 and IPv6, at which you should choose the Yes option so that it can save them.
If you make changes later, you can update the saved rules with:
sudo netfilter-persistent save

Once prompted, the command will write your current configuration that you have in place to the file /etc/iptables/rules.v4 for IPv4 and /etc/iptables/rules.v6 for IPv6 respectively. These file(s) will then reload themselves on every reboot of your system.
To apply saved rules without restarting, run:
sudo netfilter-persistent reload

With this setup, you do not need to recreate your firewall rules each time the system boots.
In this article, we described how iptables functions on Ubuntu and the precise control it enables over network traffic. We first explained the underlying netfilter framework and its components, type of data structures called tables, chains, and rules, followed by specific examples applicable to managing firewall rules. Then we demonstrated how to set a fallback policy for chained rules, apply specific allow/block rules based on ip address, port, or protocol. This gives you the tools you need to secure a server.
We then turned towards advanced configurations such as rate limiting for brute-force protections, NAT and port forwarding for when you want to manage connections, and stateful packet inspection for the ability to filter packets based on established connections. Finally, we followed up the advanced topics by demonstrating how to persist iptables rules through reboot.
Want to strengthen your Ubuntu experience even further? With optimized Ultahost’s Ubuntu VPS hosting, you get the ideal mix of performance, security, and flexibility. Whether you’re hosting web applications, managing online projects, or building development environments, these solutions are built to give you reliable speed and simplified control.
sudo iptables -L -v -n to list all active rules with detailsiptables-persistent or custom scripts.sudo iptables -A INPUT -s <IP> -j DROP to block traffic from a specific IP.UltaAI – Smart AI Assistant for Ultahost Clients
UltaAI is your advisor for anything related to domain or hosting. Experience personalised suggestions.
The sleep command in Linux is designed to introduce a d...
The apropos command in Linux is an essential tool for b...
Vim and Vi are two of the most popular text editors in ...
Managing and transferring files efficiently is a key pa...

When working on Linux, keeping track of system performa...
Users of Kali Linux, an operating system which is frequ...