
How to Configure Windows Server 2012 Firewall
Configuring the Windows Server 2012 Firewall is an impo...


Iptables is a firewall utility that can be used to control network traffic on Linux systems. It is a complex tool, but it can be used to create very simple firewall rules to protect your VPS from unauthorized access. Iptables is a tool that controls the flow of data in and out of your Linux server whether it’s a CentOS, Debian, or Ubuntu Server. It can be used to block or allow specific traffic for data security based on things like the IP address of the sender or receiver, the port number they are using, and more.
If you are new to learning, it is best to start by learning about the basic concepts of iptables, such as chains, rules, and targets. Once you have a good understanding of the basics, you can start to create custom rules to on your own needs.
In this post, we will guide using iptables to secure a VPS. We will start by installing iptables and then configuring some basic firewall rules. We will also discuss some more advanced topics, such as using iptables to control traffic by IP address and port number.
Learn How to install and configure the csf config server and the firewall on Centos – 7 64-bit
We all know the network is made up of packets. Iptables identify the packets received and then use a set of rules to decide what to do with them. These tables contain a set of rules known as chains, that will filter in and out of data packets. When a packet matches a rule, it is given a target, which can be led to another chain. Following are the fundamental concepts of iptables:
Tables and Chains: Iptables organize rules into tables, The four main tables are:
Each table contains a series of chains, which are rule sets that packets as they move to the firewalls, It consists of three chains:
Targets: A target is what happens after a packet matches a rule in this case it is also known as a terminating target. following are the terminating targets of Linux iptables are:
Before we begin this you have prerequisites to follow:
Iptables are installed default on most Linux systems. If it is not installed you can do the following below:
If iptables is not already installed on your VPS, you can install it using the following command:
sudo apt install iptables
To check the current iptables configuration, you can use the following command, This will display a list of all of the firewall rules that are currently in effect.
sudo iptables -L
By typing the above command it shows chains and policies that are discussed above, as image shown below:
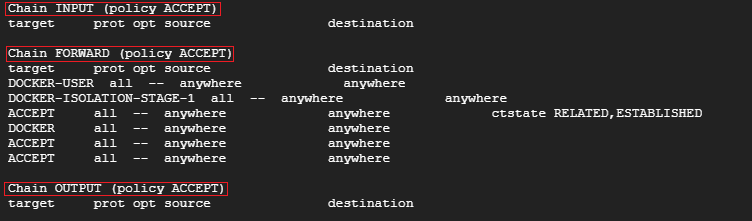
You can notice that all chains are set to accept and have no rules. This is not secure since any packet can come through without filtering. You have defined rules as discussed below.
Here are some basic iptables firewall rules that you can use to secure your VPS, Considering that you allow all traffic on the loopback interface you can type the following command:
iptables -A INPUT -i lo -j ACCEPT
Similarly, if you allow traffic from your local system, then type the following command:
iptables -A INPUT -s 127.0.0.1/8 -j ACCEPT
If you want to allow the traffic from SSH you need to pass on port 22 which is the default port number of SSH. You can type the following command:
iptables -A INPUT -p tcp --dport 22 -j ACCEPT
Let’s just say you want to drop the target you can type the following command:
iptables -A INPUT -j DROP
Once you set the rules you can apply these rules by typing the following Command:
sudo iptables -A
You can use iptables to control traffic by IP address by using the -s and -d options. For example, the following rule would allow all traffic from the IP address 192.168.1.100:
iptables -A INPUT -s 192.168.1.100 -j ACCEPT
You can also use the -i option to specify the interface that the traffic should be coming from. For example, the following rule would allow all traffic from the IP address 192.168.1.100 on the eth0 interface:
iptables -A INPUT -i eth0 -s 192.168.1.100 -j ACCEPT
You can use iptables to control traffic by port number by using the -p option. For example, the following rule would allow all traffic on port 80 which is the port no of HTTP or if you want HTTPS you can replace the port number with 443:
iptables -A INPUT -p tcp --dport 80 -j ACCEPT
If you want to secure your VPS with iptables you need to consider these tips that are described below
Iptables is a powerful tool that can be used to secure your VPS from unauthorized access. By following the above fundamentals, you can create a firewall configuration that will help to protect your server from attack.
Choosing a Linux VPS provider can be a difficult task, with so many options available. That’s why Ultahost understands your specific needs and requirements, and brings you a perfect solution. Our Linux VPS hosting plans are designed to be scalable and flexible, so you can always choose the right amount of resources for your needs.