
How to Install Laravel on Ubuntu 22.04
Laravel is a renowned open-source framework meant for P...


Apache Hive serves as an enterprise-level system for a data warehouse that offers an interface for high-level querying of information contained within the Hadoop Distributed File System (HDFS). An enterprise data warehouse can be defined as a system for querying, managing, and analyzing information contained within the Hadoop Distributed File System.
In this article, we will focus on every step of the process of installing Apache Hive on Ubuntu and provide explanations of the processes to help you understand.
The queries to be executed within a Hive are issued using the Hive Query Language (HiveQL), which can be executed in a Hive CLI shell. Beeline is a JDBC client that allows connection from any environment to Hive so it can query and run.
The functionality offered by Hive helps in the generation of SQL queries, which are interpreted as MapReduce jobs and executed by the engines that process data in a Hadoop cluster in a distributed manner. This capability is useful for organizations that analyze large data sets, as they do not have to learn complicated programming in MapReduce.
Hive relies on HDFS for data storage and uses several execution engines (MapReduce, Tez, or Spark) for query processing. Without Hadoop, Hive becomes non-functional. Hive is a data warehouse software built on top of Hadoop.
Install Apache Hive with our Ubuntu VPS!
Install Apache Hive effortlessly with Ultahost’s reliable Ubuntu VPS hosting. Enjoy quick setup, seamless performance, and expert support for all your development projects!
Check the following requirements before starting the hive installation on Ubuntu:
The first step to install Hive on Ubuntu is to check your version of Hive relative to the installed Hadoop version:
hadoop version
This command will give you a descriptive output for your Hadoop installation, such as the version number, date of compilation, and many other relevant details. For selecting your Hive version, make sure to capture at least the major version number (for instance, 3.3, 3.4):

Just like with any other software, you have to download the appropriate version of Hive from the official page. Make sure to check which version would be compatible with your local installation of Hadoop:

On the provided site, Apache Hive offers a compatibility matrix on which Hive versions are compatible with which Hadoop versions.
Download Using wget (Recommended):
wget <a href="https://downloads.apache.org/hive/hive-4.0.1/apache-hive-4.0.1-bin.tar.gz">https://downloads.apache.org/hive/hive-4.0.1/apache-hive-4.0.1-bin.tar.gz</a>
The wget command enables you to directly download files to your current directory. If needed, you can rename the file using the -O option. This method is preferred because it’s scriptable and doesn’t require a web browser:

Extract the Archive:
The binary distribution (bin.tar.gz) includes all the Hive components of the already compiled versions, which are ready for immediate use. This is in contrast to source distributions, which need to be compiled and tend to be time-consuming. The binary distribution consists of:
tar xzf apache-hive-4.0.1-bin.tar.gz
After extracting files, a directory named apache-hive-4.0.1-bin is created, which contains all the files and directories of Hive.

Read also How to Install Apache on Ubuntu
Setting environment variables is essential for recognizing Hive commands and for the proper functioning of other components of the Hadoop ecosystem. A new bash session runs a script called .bashrc. If you set environment variables here, they will be available in every terminal session.
Let’s modify the .bashrc file:
nano ~/.bashrc
Here, set environment variables for Hive:
export HIVE_HOME="/home/hdoop/apache-hive-4.0.1-bin"
Above, the HIVE_HOME variable locates the installation folder of Hive on your system. This variable is referenced by several Hive scripts and configuration files. Make sure to substitute /home/hdoop/apache-hive-4.0.1-bin with the actual path to where you extracted Hive.
export PATH=$PATH:$HIVE_HOME/bin
Here, PATH allows the system to know where to search for specific command files to execute. With the addition of $HIVE_HOME/bin, it becomes possible to execute Hive commands (hive, beeline, schematool) from any directory.

Save and exit the editor.
Apply Changes:
The .bashrc file needs to be updated with the new variables after executing the source command in the current terminal session. If you do not use the source command, you will need to start a fresh terminal session to access the variables.
source ~/.bashrc

Verify Configuration:
This command verifies that the environment variables were set properly.
echo $HIVE_HOME

Now, verify that your PATH contains the Hive bin directory.
echo $PATH | grep hive

Hadoop has specific configurations that need to be set for integration with other Hadoop components to work, especially around permissions and proxy settings.
The core-site.xml file is one of the most critical configuration files within Hadoop since it contains core properties that impact the entire Hadoop ecosystem. Here, Hive-specific configuration helps in the proper setting of authentication and authorization.
Edit core-site.xml:
Change the file core-site.xml with the command:
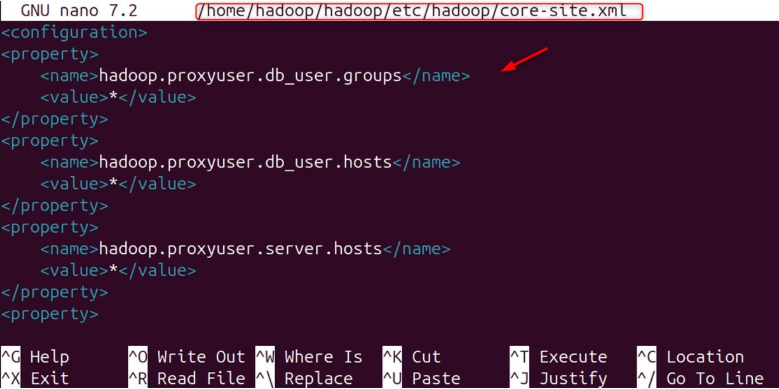
sudo nano $HADOOP_HOME/etc/hadoop/core-site.xml
Add Proxy User Configurations:
Proxy users in Hadoop are designed to act on behalf of other users. Services like Hive, which require access to HDFS and other Hadoop components, rely on proxy users as they help maintain appropriate security boundaries.
<configuration>
<property>
    <name>hadoop.proxyuser.db_user.groups</name>
    <value>*</value>
</property>
<property>
    <name>hadoop.proxyuser.db_user.hosts</name>
    <value>*</value>
</property>
<property>
    <name>hadoop.proxyuser.server.hosts</name>
    <value>*</value>
</property>
<property>
    <name>hadoop.proxyuser.server.groups</name>
    <value>*</value>
</property>
</configuration>
Here,
Security Considerations: For production environments, replace the wildcard * with precise group names and host names to improve security. This configuration is useful in development and testing environments.
HDFS Houses specific directories for Hive to store temporary data and warehouse tables. It is important to understand the purpose of each directory for the smooth functioning of Hive.
In HDFS, the /tmp directory acts as a temporary workspace for Hive operations. To start, execute the following command to make the directory:
hadoop fs -mkdir /tmp
The primary function of the directory is to store intermediate datasets for a given task. It is used by Hive for storing temporary data when executing complex queries that require the generation of intermediate files and datasets.

Set appropriate permissions:
hadoop fs -chmod g+w /tmp
The g+w permission allows members of the same group to write into subdirectories. In this case, it is granted to allow multiple users to create temporary files during their Hive sessions.

Verify creation:
hadoop fs -ls /

Custom configuration is not mandatory to run Hive, but it will help it perform better and work well within your environment. Every distribution of Apache Hive comes with some files that are configuration templates. These files can be found in the Hive conf directory and contain default settings for Hive.
Navigate to the configuration directory:
Proceed to the configuration directory using the cd command:
cd apache-hive-4.0.1-bin/conf

List available configuration files:
See available configuration files using the ls -l command:
ls -l
You will see several template files, with hive-default.xml.template being the main template configuration file.

Copy and modify the template:
cp hive-default.xml.template hive-site.xml

Edit the configuration:
Open the hive-site.xml file and edit it:
nano hive-site.xml
Among the key parameters, the hive.metastore.warehouse.dir setting should correctly reflect the directory in the HDFS warehouse.
<property>
    <name>hive.metastore.warehouse.dir</name>
    <value>/user/hive/warehouse</value>
</property>

Importance of Custom Configurations
Within Hive, there is a database dedicated to storing metadata of each table, its columns, partitions, and even additional structural details. This metadata is distinct from the actual data stored in HDFS.
To store metadata, Apache Hive relies on the Derby database. Derby is a lightweight embedded Java database that is suitable for development and small-scale deployments. Now go to the Hive home directory:
cd apache-hive-4.0.1-bin

Now, initialize the schema:
bin/schematool -dbType derby -initSchema

Schema initialization creates the requisite database tables and structures that are necessary to store Hive metadata. These are:
If the schema is not properly set up, it will not be possible for Hive to maintain and keep track of table structures, column definitions, or even where the data is stored. Moreover, the metadata store is critical for mapping SQL queries to the required data access methods.
Derby is the default metadata store for Hive. In the hive-site.xml file, set the database type with the hive.metastore.warehouse.db.type parameter if you wish to use a different database solution like Postgres or MySQL.
Now that all the components are configured, you can start the Hive services and conduct the installation tests. HiveServer2 is the server-side component that enables numerous clients to connect to Hive at the same time.
Launch HiveServer2:
bin/hiveserver2
HiveServer2 provides a Thrift-based interface supporting multiple client connections, which makes it the preferred access method to Hive in multi-user environments.

The server must wait till it starts, when it can show the Hive Session ID. It will log messages indicating successful startup along with the session ID that identifies your HiveServer2 instance.

Verify the installation, and execute a simple query:
CREATE TABLE IF NOT EXISTS student_details(
name STRING,
marks FLOAT)
ROW FORMAT DELIMITED
FIELDS TERMINATED BY ',';
The command creates a table, student_details, including the columns. Finally, it confirms successful creation.

You have installed Apache Hive on Ubuntu and configured it with a step-by-step guide on every procedure. The installation serves as a robust starting point for performing big data analytics through SQL-like queries on data stored in Hadoop. Make sure you meet the prerequisites, such as Java 8 or higher, a working Hadoop installation, etc., and you are good to go with the Apache Hive installation on your Ubuntu machine.
Experience Ultahost’s cheap Linux VPS hosting for better performance and reliability at a budget-friendly cost. Ultahost offers complete flexibility and control while handling all server management, ensuring everything runs smoothly and reliably with guaranteed uptime!
Yes. You must install MySQL, create a corresponding database and user, and adjust the configurations in hive-site.xml. Use schematool -dbType mysql -initSchema for the schema initialization.
The /tmp directory in HDFS is for storing temporary files generated during Hive operations, whereas /user/hive/warehouse is the default location of Hive table data.
Proxy user settings allow Beeline or HiveServer2 to log in as a Hadoop user to access files on HDFS. You may run into permission problems without these settings enabled.
There is no reason to use Hive CLI as it is deprecated. Using Beeline with HS2 provides stronger security, better JDBC integration, and production-level features.
You can execute HiveQL queries such as “SHOW DATABASES;” or create a new table. If Hive can work with HDFS through Hadoop, then everything is integrated.
Make sure that Hive’s bin directory is included by executing echo $PATH. If not, you will need to add it to your ~/.bashrc or .profile to modify the path.
The execution frameworks of Hive queries and the storage of results in HDFS make Hadoop a prerequisite.