
How to Install Unity on Ubuntu
Unity is a popular, widely-used game engine that enable...


Bitwarden is a useful and secure password manager that works great for both individuals and teams. What makes it even more useful is that it also offers a command-line version. If you’re someone who often works with servers that don’t have a graphical interface, or if you simply prefer using the terminal, Bitwarden has a solution for you. While the command-line tool isn’t as user-friendly as the desktop app, it’s still a practical option for managing your vault directly from the terminal.
In this article, we’ll show you a step-by-step process of installing a self-hosted instance of Bitwarden on Ubuntu using Docker and Docker Compose.
Installing Bitwarden on Ubuntu lets you manage your passwords securely using a web interface or the command line. In this section, I’ll show you how to set it up with Docker and Docker Compose in a few simple steps.
Install Bitwarden in Seconds with Our Ubuntu VPS!
Install Bitwarden easily on Ultahost’s high-performance Ubuntu VPS. Enjoy quick setup, secure password management, and expert support every step of the way!
You can install essential packages required to fetch files over HTTPS, manage GPG keys, and add third-party repositories. These are necessary before setting up Docker:
sudo apt install apt-transport-https ca-certificates curl gnupg-agent software-properties-common -y

After installing required packages, add Docker’s official GPG key to ensure that the downloaded packages are verified and trusted by your system.
curl -fsSL https://download.docker.com/linux/ubuntu/gpg | sudo gpg --dearmor -o /usr/share/keyrings/docker-archive-keyring.gpg

Next, you need to add Docker’s stable repository to your system’s sources list so that you can install Docker directly from Docker’s official package server:
echo "deb [arch=$(dpkg --print-architecture) signed-by=/usr/share/keyrings/docker-archive-keyring.gpg] https://download.docker.com/linux/ubuntu $(lsb_release -cs) stable" | sudo tee /etc/apt/sources.list.d/docker.list > /dev/null

Then, update the list of installed packages on your system to make sure the latest package listings, including the new Docker repository, are available:
sudo apt update

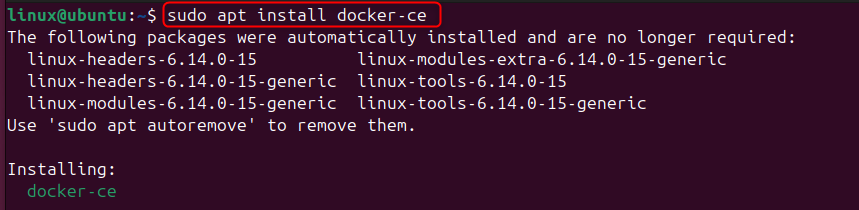
You can now install the Docker engine, which is essential for running containers like Bitwarden on your Ubuntu system:
sudo apt install docker-ce
After this, start the Docker service and also enable it to start every time your system boots up automatically:
sudo systemctl start docker && sudo systemctl enable docker

Also, confirm if the Docker service is active and running properly by viewing its status:
sudo systemctl status docker

Now, install Docker Compose, which helps in managing multi-container applications like Bitwarden using a single YAML configuration file.
sudo apt install docker-compose -y

Read also How to Install Python 3 on Ubuntu
You can create a new system user named bitwarden with its own directory under /opt. This user will have permission to use Docker and sudo commands:
sudo useradd -G docker,sudo -s /bin/bash -m -d /opt/bitwarden bitwarden

Set a password for the new Bitwarden user so you can switch to it later and perform installation steps securely:
sudo passwd bitwarden

After this, visit the Bitwarden’s official hosting page to request your installation ID and key. These are required during the installation process to validate your self-hosted instance:

Click the submit button to get your installation ID and installation key from Bitwarden:

After that, switch to the Bitwarden user environment to keep all Bitwarden files organized under its dedicated user account:
su - bitwarden
Now, download the official Bitwarden installation script directly into your current directory.
curl -Lso bitwarden.sh https://go.btwrdn.co/bw-sh

Make the installation script executable:
chmod +x bitwarden.sh

Now start the Bitwarden installation process. It will prompt you for your domain name, installation ID, key, and admin email:
sudo ./bitwarden.sh install

It will prompt you to specify the domain name and your email. Also, type y to generate a free SSL certificate:

Finally, you can now open your web browser and visit your configured domain (e.g., https://yourdomain.com) to access the Bitwarden web interface and log in.
You can install Bitwarden on Ubuntu using Docker and Docker Compose to manage your passwords securely. If you prefer working in the terminal or need a tool that runs without a graphical interface, Bitwarden gives you that flexibility. Once you complete the setup, you can open your browser, access the web vault, and start managing your credentials with confidence.
Experience top-tier performance with UltaHost’s Linux VPS Hosting, featuring ultra-fast NVMe SSD storage, full root access, and quick server deployment. Whether you’re hosting websites, running databases, or managing development tools, our Linux VPS offers the reliability, flexibility, and control your projects need to thrive.
No. You can run the self-hosted version for free. Paid plans only add extra features like advanced reports and encrypted file storage.
Docker keeps all Bitwarden files in isolated containers, makes upgrades easier, and avoids package conflicts on your host system.
Yes, but Compose lets you manage all Bitwarden containers with one docker-compose.yml file, so updates and restarts take a single command.
Bitwarden will stop serving over HTTPS. Set up a cron job for Certbot or rerun ./bitwarden.sh renewcert to renew the certificate.
Yes. Back up the bwdata folder (found in /opt/bitwarden) and your database dumps. Store them in a secure, off-site location.
Stop the containers with “./bitwarden.sh stop”, then remove the bwdata directory and the bitwarden user. Finally, uninstall Docker and Docker Compose if you no longer need them.
Yes, you can specify a namespace using the --namespace flag when installing or managing a Helm release.
UltaAI – Smart AI Assistant for Ultahost Clients
UltaAI is your advisor for anything related to domain or hosting. Experience personalised suggestions.