
How to Install Power BI on Windows
Power BI is a business analytics service provided by Mi...


Drupal is a powerful tool for creating and managing online content. As a popular open-source content management system (CMS), it offers a flexible and scalable solution for building websites, blogs, and web applications. With its modular design and extensive library of themes and extensions, Drupal provides a high degree of customization and flexibility. This makes it an ideal choice for individuals and organizations looking to create a unique online presence.
After setup Drupal on Windows, users can tap into its many benefits, including improved website performance, enhanced security, and easy integration with other tools and services. With Drupal, Windows users can create engaging online experiences, simplify content management, and increase their online presence.
In this article, we’ll provide a comprehensive guide on how to install Drupal Windows 10, covering all the necessary steps to get you started with building your Drupal-powered website.
Before we can install Drupal, we need to set up a local development environment on our Windows machine. Xampp is a popular, free, and open-source solution that provides a complete web development environment, including a web server, database, and scripting language.
Xampp stands for Cross-Platform, Apache, MySQL, PHP, and Perl. It’s a one-stop solution that allows us to run and test our web applications locally, without the need for a remote server.
When installing Xampp, make sure to select the following components:
For a detailed guide on downloading and installing Xampp, please refer to our guide on how to install XAMPP on Windows. Once you’ve installed Xampp, we can move on to the next step.
Now that we have Xampp installed, we can download Drupal without using Composer. Composer is a dependency manager for PHP, but since we’ve already installed Xampp, we can proceed with a manual download.
To download Drupal, visit the official Drupal website and click on the “Download” button. Select the “Zip” file option, which will download the Drupal core files as a compressed archive.
Click on the “Download” button to start the download process. Once the download is complete, you should have a zip file in your downloads folder.
Now that we’ve downloaded the Drupal zip file, we need to extract its contents to a location where our web server can access it. This step is crucial because it allows our web server to serve the Drupal files and make them accessible to the world.
The htdocs folder, short for “hypertext documents”, is a special folder inside the Xampp installation directory. It’s the default document root for Xampp, which means it’s the folder where our web server looks for files to serve when we access our local website through a web browser.
By extracting the Drupal files to a subfolder inside htdocs, we’re essentially telling our web server to make the Drupal files available at a specific URL.
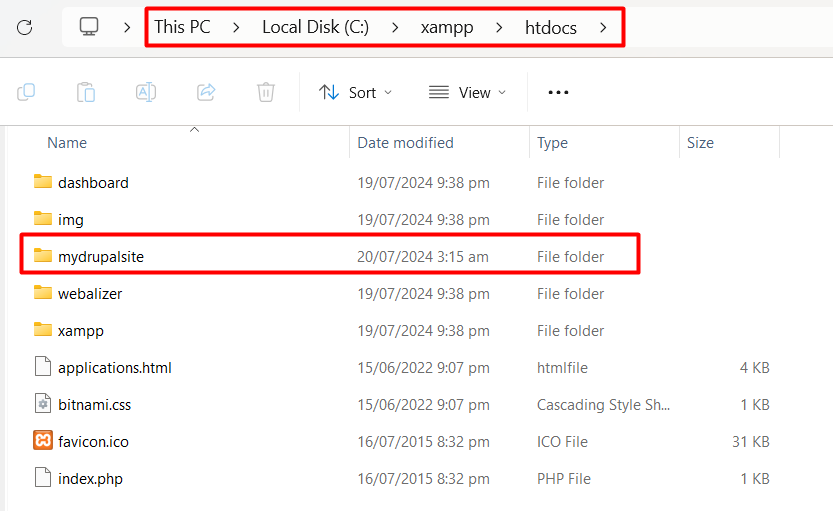
For example, if we extract the files to C:\xampp\htdocs\mydrupalsite, we can access our Drupal website by visiting http://localhost/mydrupalsite in our web browser.
To extract the Drupal files, follow these steps:
Create a new folder inside the htdocs folder, which is usually located at C:\xampp\htdocs. Name this folder something related to your website, such as mydrupalsite.
Open the Drupal zip file and click on the “Extract” button. In the extraction dialog box, provide the path to the htdocs folder, followed by the name of the folder you created in step 1. For example: C:\xampp\htdocs\mydrupalsite. Click “Extract” to extract the Drupal files to the specified location:
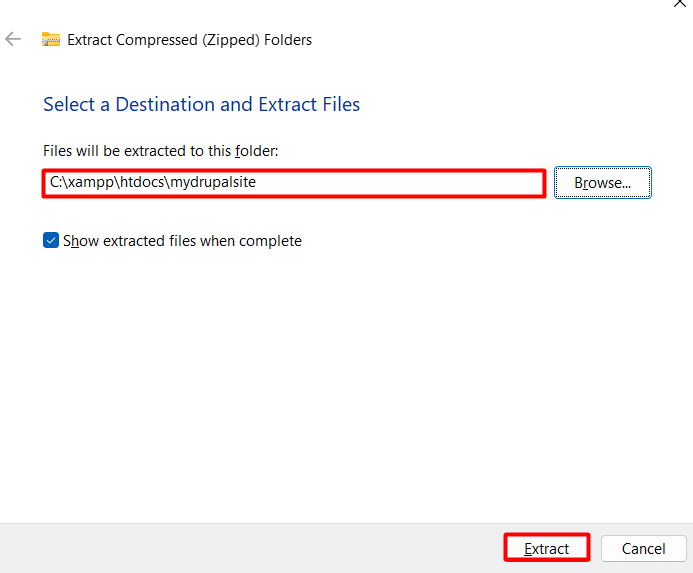
This will extract the Drupal core files to the mydrupalsite folder inside htdocs, making them accessible to our web server and ready for the next step in the installation process.
Please be patient as the extraction process may take some time. You may see a progress bar with a percentage indicator, which shows the extraction progress. This is because the Drupal zip file contains a large number of files and folders, which need to be extracted and copied to the specified location.
Now that we have extracted the Drupal files to the htdocs folder, we need to configure the database to store our Drupal website’s data. In this step, we’ll use phpMyAdmin, a web-based tool that comes bundled with Xampp, to create a new database for our Drupal website.
Open a web browser and type localhost in the address bar. This will take you to the Xampp welcome page. From here, click on the phpMyAdmin link, which is usually located at the top-right corner of the page.

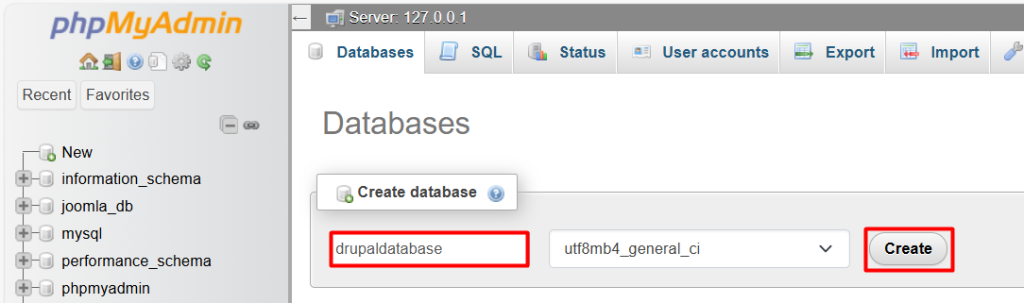
Once you’re logged in, you’ll see the phpMyAdmin dashboard. In the left-hand sidebar, click on the Databases tab. Then, click on the Create database button.
In the Create database dialog box, enter a name for your database, such as drupaldatabase. You can choose any name you like, but make sure it’s easy to remember and unique.
Click on the Create button to create the new database. You’ll see a success message indicating that the database has been created successfully. Take note of the database name, as we’ll need it in the next step to complete the Drupal installation process:
Now that we’ve created a new database for our Drupal website, we’re ready to start the installation process. In this step, we’ll access the Drupal installation setup by visiting the URL where we extracted the Drupal files.
Open a web browser and type localhost/mydrupalsite in the address bar. mydrupalsite is the name of the folder where we extracted the Drupal files in Step 3. This folder is located inside the htdocs folder of our Xampp installation:
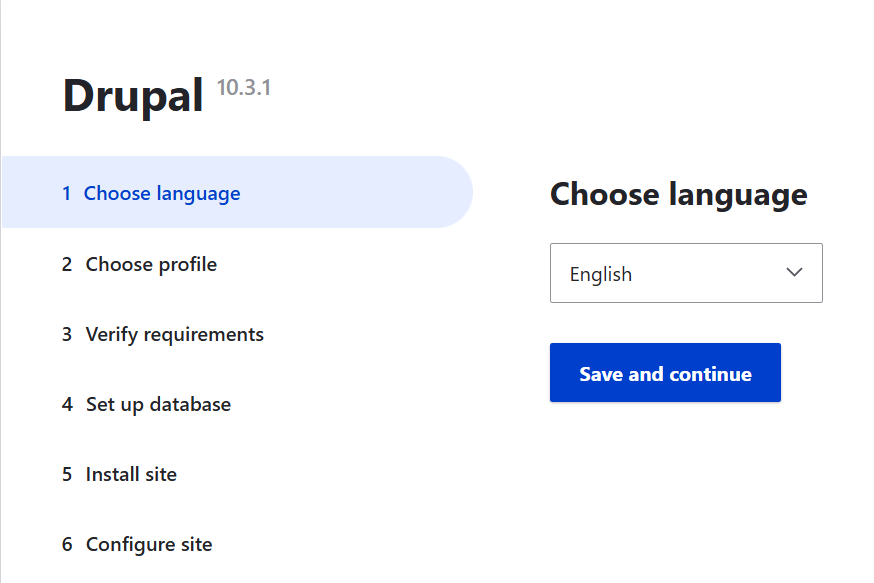
Press Enter to load the page. After a few moments, you should see the Drupal installation setup page. This page is the starting point for installing Drupal on our Windows machine.
Explore the Blazing Fast Speed of Windows VPS!
With Ultahost, hosting a Windows VPS is simpler and quicker than ever. Enjoy ultra-fast SSD NVMe speeds with zero interruptions or slowdowns.
The installation setup page will display a welcome message and ask you to select the language for your Drupal installation. You can choose from a variety of languages, including English, Spanish, French, and many others.
Note: If you see any errors or issues on this page, make sure that you have extracted the Drupal files correctly to the htdocs folder and that the folder name matches the URL you’re using.
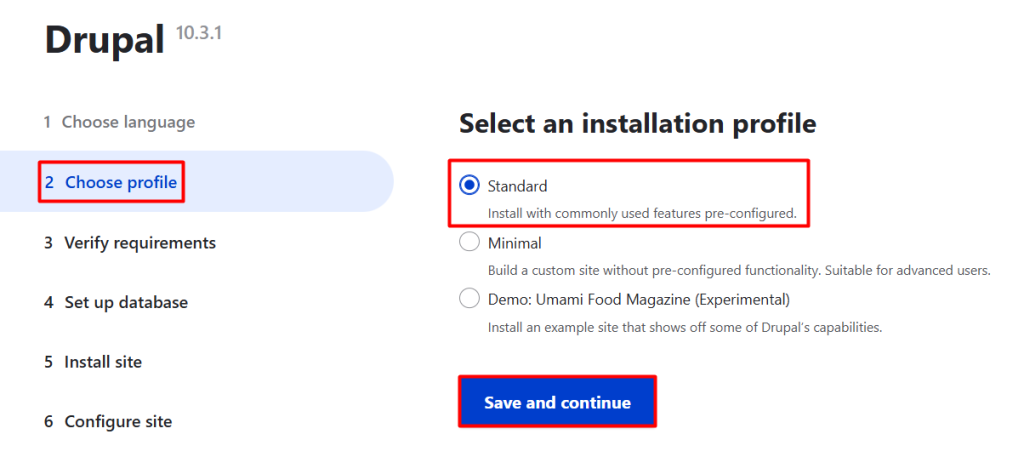
On the Drupal installation setup page, you’ll see a section titled “Select an installation profile”. This is where we choose the type of installation we want to perform.
For our purposes, we’ll select the “Standard” installation profile. This profile provides a basic Drupal installation with a set of core modules and a default theme.
Select the “Standard” profile from the dropdown list, and then click on the “Save and continue” button.
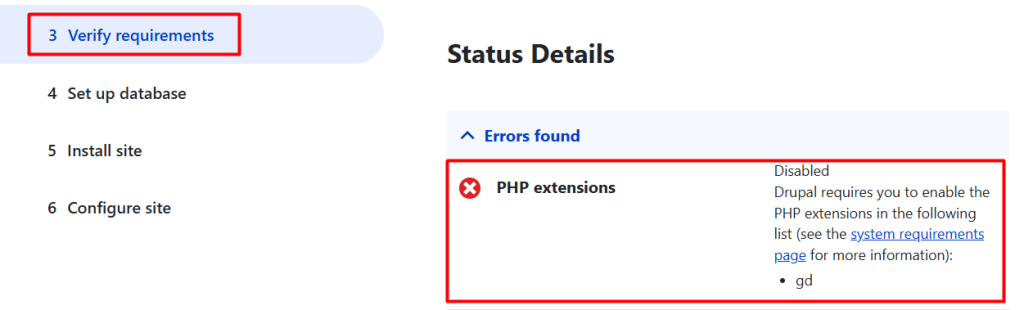
On the next page, Drupal will verify that your system meets the necessary requirements for a successful installation. This step is crucial, as it ensures that your system is configured correctly to run Drupal.
As you scroll down the page, you’ll see a “Status” section on the right-hand side, which displays the results of the verification process. Unfortunately, you may see an error message indicating that the PHP gd extension is not enabled:
To resolve this issue, we need to enable the gd extension in our PHP configuration. To do this, follow these steps:
Open the Xampp control panel and click on the “Apache Config” button.
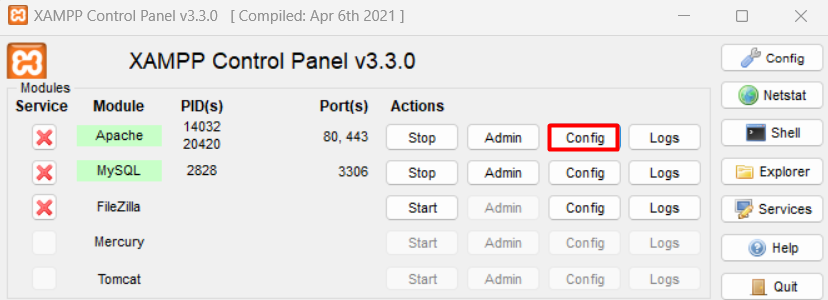
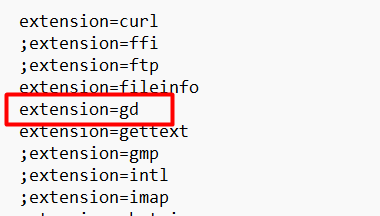
After that, select the php.ini file from the dropdown list. This file contains the PHP configuration settings. In the php.ini file, search for the line ;extension=gd. This line is currently commented out, which means the gd extension is disabled.
So remove the semicolon (;) from the beginning of the line to uncomment it. This will enable the gd extension.Save the changes to the php.ini file:
Now stop both the Apache and MySQL services in the Xampp control panel and then start both services again to apply the changes.
Once you’ve completed these steps, refresh the Drupal installation page in your web browser. The error message regarding the gd extension should now be gone, and you can proceed with the installation process.
Now that we’ve resolved the PHP extension issue, we can proceed with setting up the database for our Drupal installation.
On the next page, you’ll see a “Set up database” section. Here, we need to provide the necessary information to connect to the database we created earlier using phpMyAdmin.
Fill in the following details:
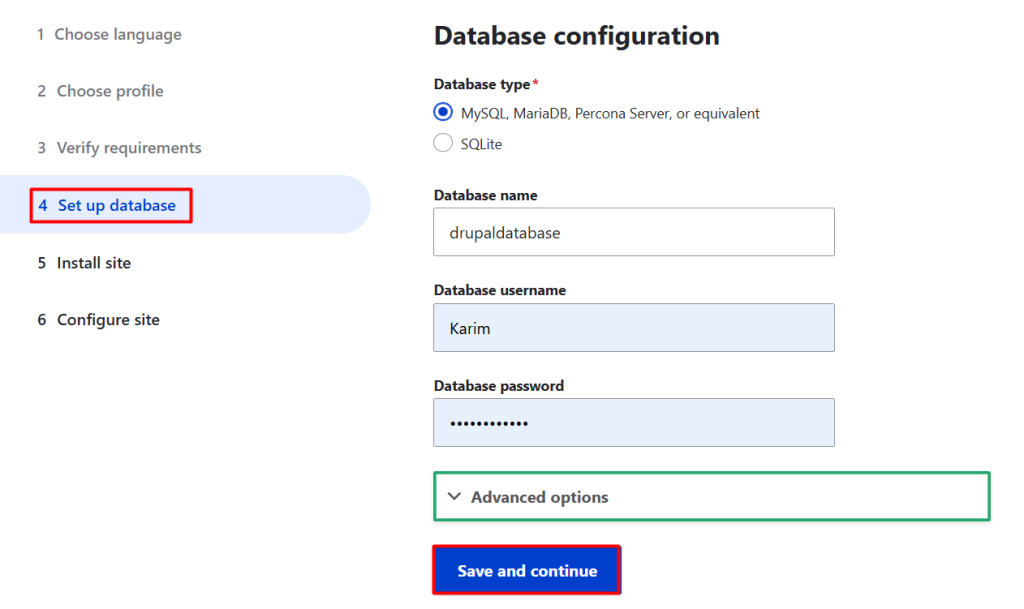
Once you’ve entered the necessary information, click on the “Save and continue” button.
Read also Installing Drupal on Ubuntu 16 VPS Server.
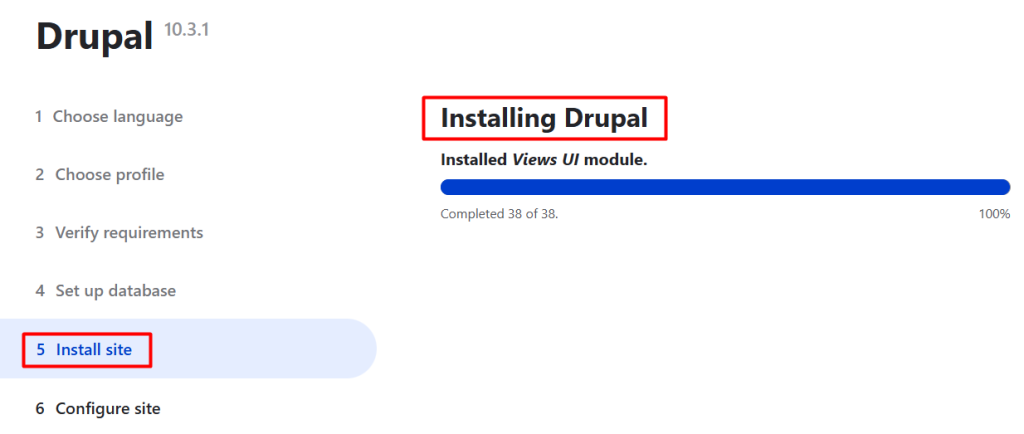
The Drupal installation process will now begin. This may take a few minutes, as Drupal sets up the database, creates the necessary tables, and configures the site’s basic settings:
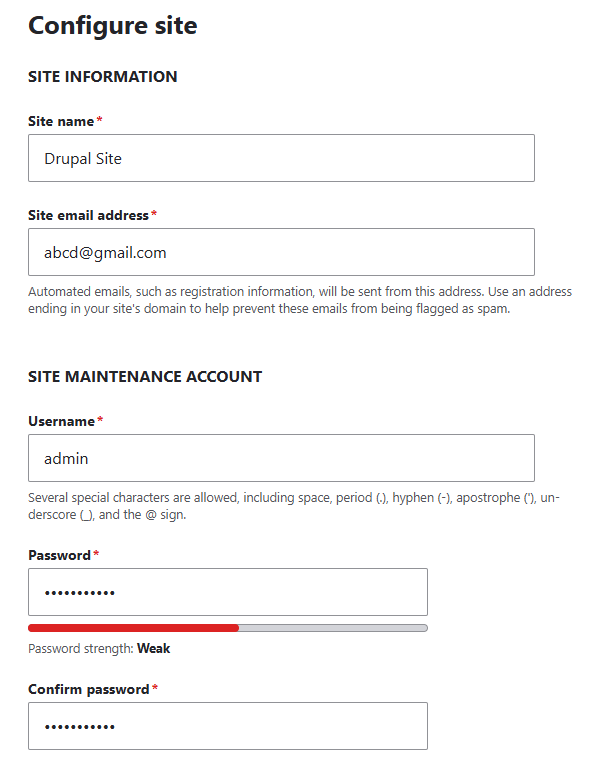
The final step in the installation process is to configure the site’s basic settings.
On the “Configure site” page, you’ll need to provide the following information:
Once you’ve entered the necessary information, click on the “Save and continue” button.
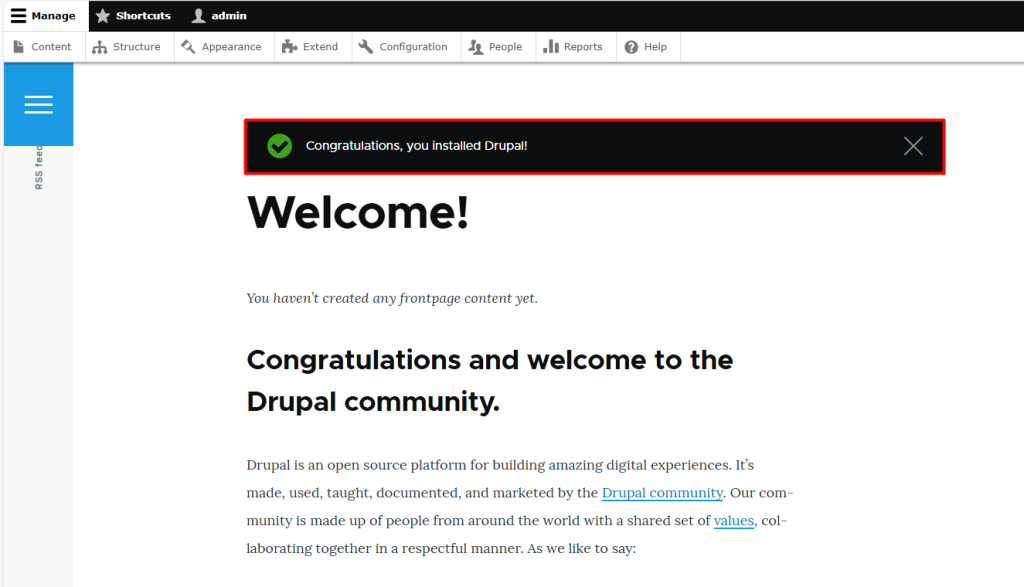
After a few moments, you’ll see a message indicating that the installation process has been completed successfully. Congratulations! You have successfully installed Drupal on your Windows machine.
In this article, we provided a comprehensive guide on how to install Drupal on a Windows machine. We covered the necessary steps to set up a local development environment using Xampp, download and extract the Drupal files, configure the database, and install Drupal. By following these steps, readers can successfully install Drupal and start building their own websites, blogs, or web applications.
The installation process may seem daunting at first, but by breaking it down into smaller steps, we made it more manageable. From downloading Xampp to configuring the site’s basic settings, we walked through each step in detail. With this guide, readers can now take advantage of Drupal’s powerful features and flexibility to create a unique online presence.
After completing these steps, you have successfully installed Drupal on your Windows system. You are now ready to develop robust and powerful websites with Drupal. Remember, for optimal performance and seamless development, always follow best practices and keep your software up to date, consider using Ultahost Windows hosting. You get reliable and high-speed hosting tailored to your needs.
You’ll need a web server like Apache or Nginx, PHP, and a database system like MySQL or MariaDB. For Windows, you can use packages like XAMPP or WampServer that include these components.
Drupal 9 requires PHP 7.3.0 or higher. Make sure your PHP version meets this requirement.
Yes, you might need to adjust PHP settings like memory_limit and upload_max_filesize in php.ini. For Apache, ensure that mod_rewrite is enabled for clean URLs in Drupal.
Minimum requirements include a web server (like Apache or Nginx), PHP 7.3.0+, and a supported database system (like MySQL 5.7.8+ or MariaDB 10.3.7+).
Yes, you can use IIS. You’ll need to configure PHP and set up the site in IIS, following similar steps for PHP configuration and database setup.
Power BI is a business analytics service provided by Mi...
VLC Media Player or simply VLC has become ass...
Not long ago, the process of installing Linux on a Wind...
October CMS is a popular free and open-source CMS built...
phpPgAdmin is a free, web-based interface for managing ...
ASP.NET is a free, open-source framework designed by Mi...