
How to Install XAMPP on Windows
XAMPP is a free cross-platform solution stack package f...


Genymotion stands as a powerful Android emulator, allowing you to test and develop mobile applications on your Windows PC without needing a physical device. It offers a wide range of Android versions and virtual device configurations making it an exceptional tool for developers of all levels.
This guide will navigate you through the installation process of Genymotion on Windows make sure a smooth setup for your Android development.
Before moving into the installation make sure your system meets the minimum requirements for running the Genymotion emulator effectively:
If your system doesn’t meet the VT-x/AMD-V requirement, Genymotion won’t function properly. Double-check your BIOS/UEFI settings to enable virtualization.
1. To download Genymotion for Windows, navigate to the official Genymotion download page. Here you will find two download options:
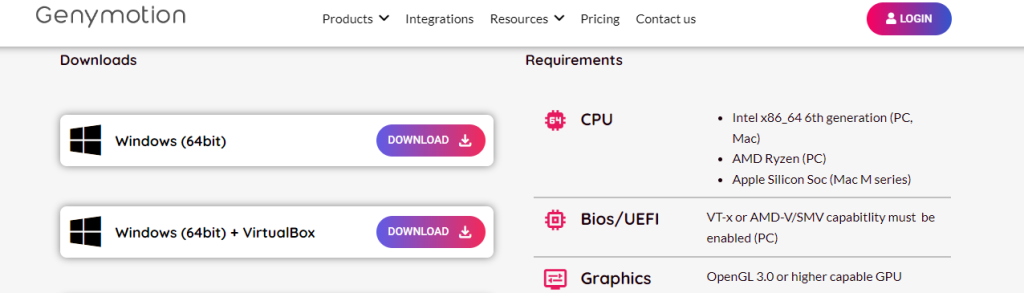
If you want to install VirtualBox separately check our guide on how to install VirtualBox on Windows 10 operating system.
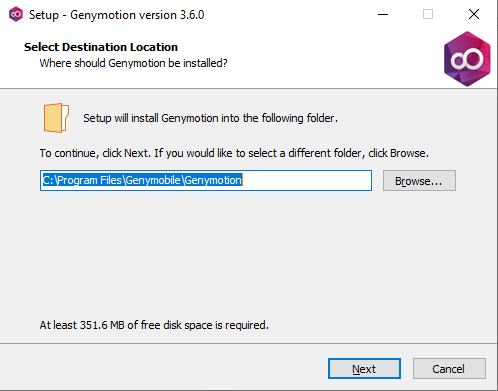
2. Choose the appropriate download based on your needs and run the installer. The Genymotion setup wizard will launch. Click “Next” to proceed. Select the desired installation location for Genymotion. The default path is usually C:\Program Files\Genymobile\Genymotion. You can change this by clicking “Browse”. Click “Next” to continue.
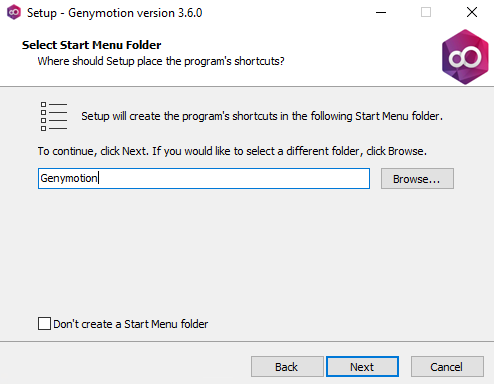
3. Here, you can choose where to create a shortcut for Genymotion in your Start Menu. You can either select a specific folder or choose “Don’t create a Start menu folder” if you prefer a cleaner approach. Click “Next” to move on.
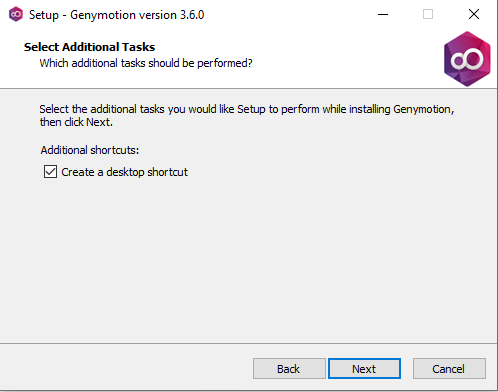
6. Decide whether you want a desktop shortcut for Genymotion. Select “Create a desktop icon” if desired. Click “Next” to confirm.
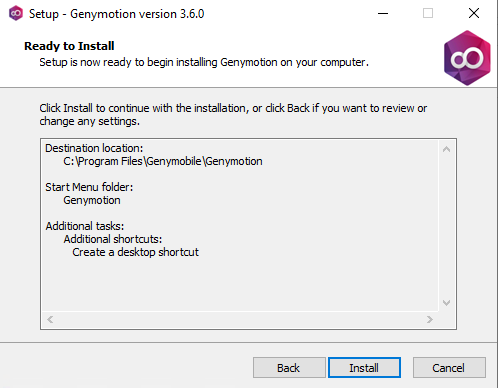
7. Review the installation summary. If everything looks good, click “Install” to begin the installation process.
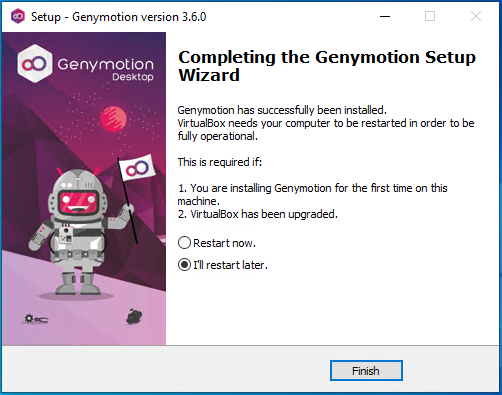
8. Once the installation completes, you’ll be prompted to restart your computer. This is important for applying any necessary system changes. Select “Restart now” and click “Finish” to trigger the restart.
If you downloaded the installer with VirtualBox including Genymotion-X.Y.Z-vbox.exe, the VirtualBox installation will automatically proceed after Genymotion finishes installing.
Install Genymotion on Our Cheap Windows VPS!
Get the reliability of the world’s most popular Windows hosting and the flexibility of a virtual server. Enjoy blazing-fast speeds and low latency at a low cost.
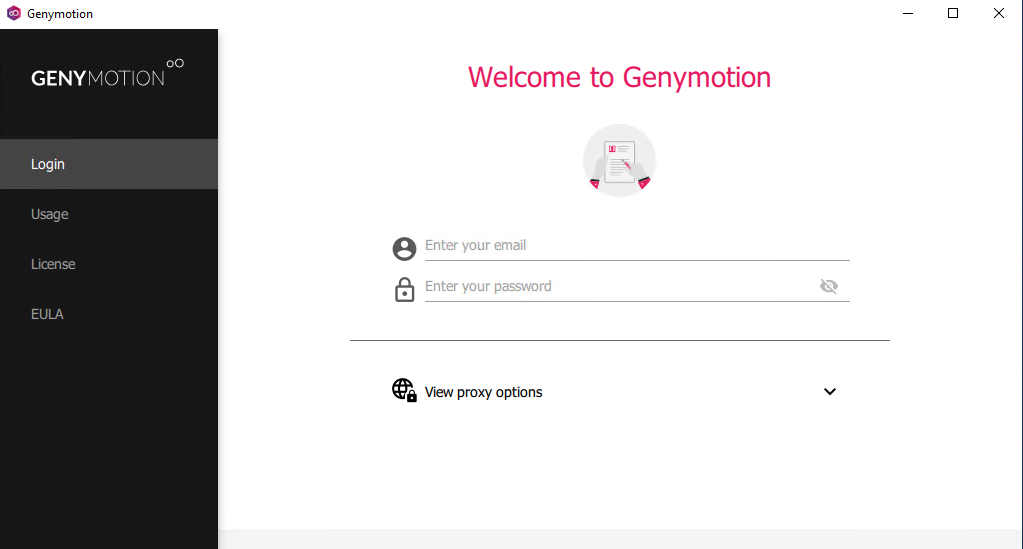
After restarting your system, locate the Genymotion shortcut and launch the application.
Upon the first launch, you’ll be prompted to create a Genymotion account. This is free and required to access and manage virtual devices. Fill in the necessary information and complete the registration process.
If you installed the separate Genymotion installer without VirtualBox you will need to configure it to integrate with VirtualBox. Genymotion will usually detect and prompt you to do this during the first launch. Follow the on-screen instructions to complete the integration.
Learn about How to Install BlueStack Android on Windows.
Now that Genymotion is set up, you can start using it to create and run virtual Android devices.
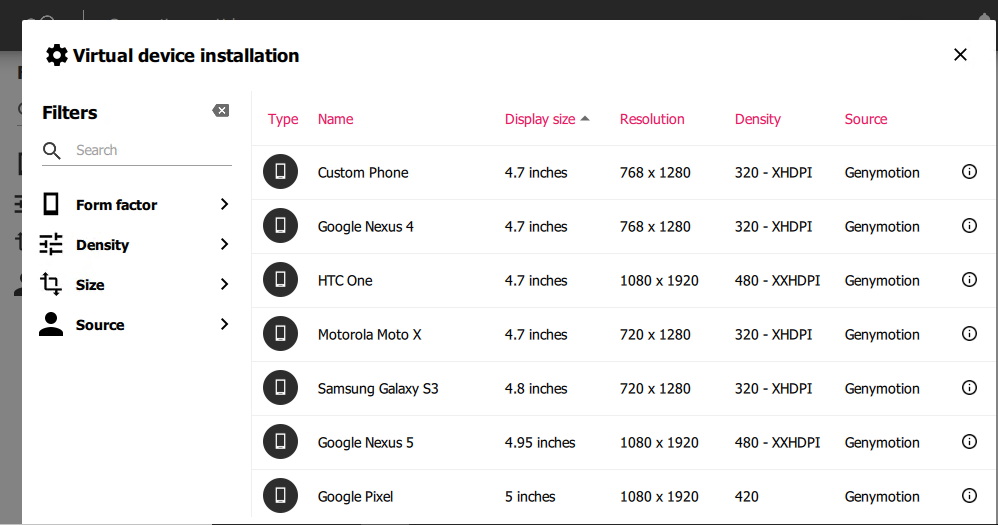
1. Genymotion provides a vast library of pre-configured virtual devices spanning various Android versions and device specifications. Browse through the available options and choose one that aligns with your development needs. You can filter and search for specific devices based on desired features.
2. Click the “Download” button next to the chosen virtual device. Once downloaded, click the “Play” button to launch the virtual device. Genymotion will utilize VirtualBox to create and run the Android environment within your PC.
3. After launching a virtual Android device window will appear mimicking a real Android phone or tablet. You can interact with it using your mouse and keyboard simulating touch inputs and gestures.
4. Genymotion offers various functionalities to enhance your development experience:
Following are the important notes for optimal performance on how to install Genymotion on Windows:
By following the above steps you will have Genymotion up and running on your Windows PC providing you with a powerful tool to develop and test Android applications. With its vast library of virtual devices, intuitive interface, and advanced features, Genymotion empowers you to create and iterate on your apps within a controlled environment.
Installing Genymotion on Windows allows you to emulate Android devices for testing it can be resource-intensive and lacks the flexibility for advanced development on your local environment. Ultahost offers an Android VPS hosting which helps to configure the Android simulator allowing you to customize the environment to precisely match your testing needs.
Genymotion is an Android emulator for running and testing apps on your computer.
Visit the Genymotion website, sign up, and download the installer for Windows.
You need Windows 7 or higher, at least 4GB of RAM, and VirtualBox installed.
Run the installer and follow the above instructions to complete the installation.
Yes, VirtualBox is required for Genymotion to function properly on Windows.