
How to Install NGINX on Ubuntu 22.04
NGINX, which is known for its great performance, scalab...


Apache Virtual Hosts give you full control over managing and running numerous sites on one server as well as letting you host multiple domains on a single physical machine. In this article, we’ll take you step-by-step in setting up Apache Virtual Hosts on Ubuntu 22.04 so you can manage your web hosting environment with ease.
In simple terms, Apache Virtual Hosts is one of the features that allows an Apache web server to serve multiple websites at the same time. In addition, every website, termed as a virtual host, is provided with its own configuration which increases flexibility and further simplifies management.
Read also How to Install Apache on Ubuntu
Before setting up Apache Virtual Hosts on Ubuntu 22.04, ensure you have the following prerequisites in place:
The apache2 generally comes pre-installed on Ubuntu and you can check its version by executing the below command:
$ apache2 -v

If for any reason it’s not installed then you can install it using the following command:
$ sudo apt install apache2

Next, you can check the status of apache2 web server if it’s up and running by executing:
$ systemctl status apache2
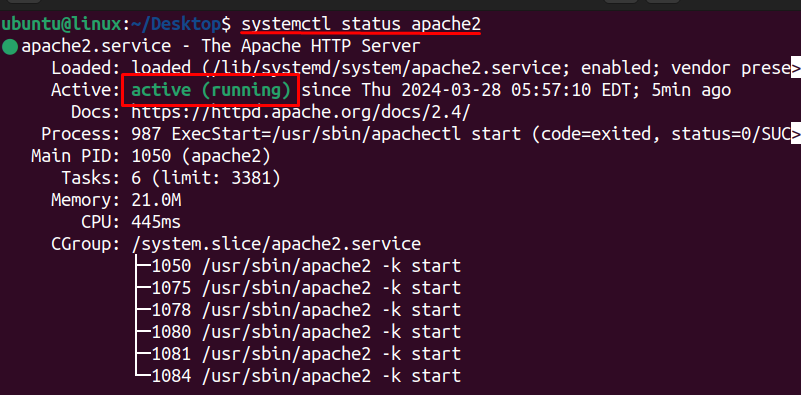
You can see in the above image that the apache2 web server is currently active.
Another method to verify this is by opening your desired web browser on Ubuntu and typing “localhost”:
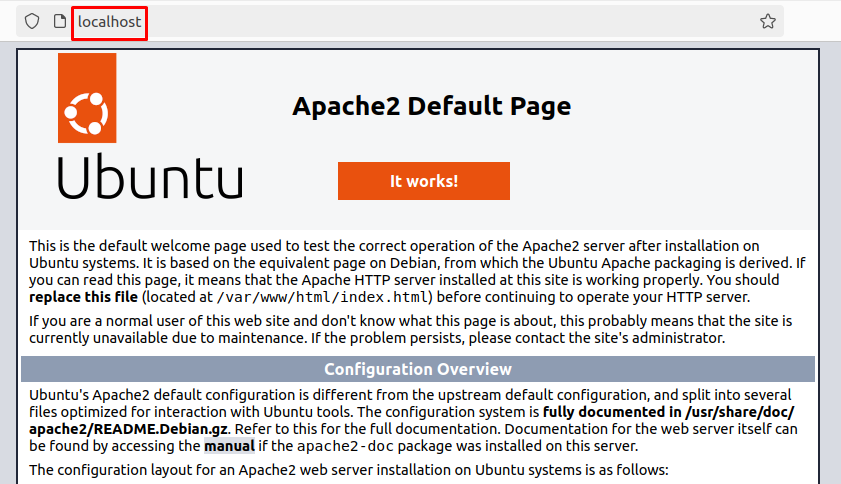
When you visit “localhost” in your browser, the Apache2 server responds to your request by serving up its default web page. So, seeing Apache2 means that the server is up and running correctly, and ready to serve web pages.
When you’re setting up a web server using Apache2, you’ll often want to put your website files in a location where the server can access them. By navigating to “/var/www”, you’re positioning yourself within the directory where Apache2 expects to find web content. This means that when you add or create web files here, Apache2 can serve them to visitors who access your website through their web browsers.
Set up Apache Virtual Host on Our Cheap Ubuntu 22.04
Get the reliability of the world’s most popular Linux distro and the flexibility of a virtual server. Enjoy blazing-fast speeds and low latency at a cheap cost.
Execute the following command to navigate there:
cd /var/www

You need to create a directory for each website you want to host. For example:
sudo mkdir -p /var/www/example.com/

The purpose of this command is to create a directory named “example.com” inside the “/var/www” directory on the file system. The “-p” option ensures that if the “/var/www” directory doesn’t exist, it and any intermediate directories needed to reach it will be created.
By creating the directory “/var/www/example.com/”, you’re preparing a location to store files specific to that domain within the web server’s file system.
Next, you need to change the ownership of the directory “/var/www/example.com” and all its contents to the user and group “www-data.” By doing so, you are ensuring that the Apache2 web server process running on your system has the necessary permissions to access and serve the files within this directory.
sudo chown -R www-data:www-data /var/www/example.com

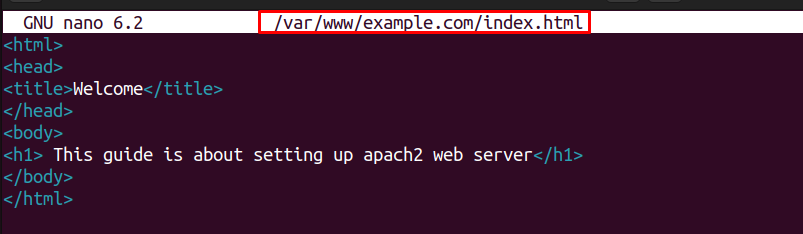
After that, you need to set up the HTML home page for your apache2 web server which is “index.html” in this case.
sudo nano /var/www/example.com/index.html
The nano text editor has been used for this purpose and then we need to write the following HTML code inside this file:
<html>
<head>
<title>Welcome</title>
</head>
<body>
<h1> This guide is about setting up apache2 web server</h1>
</body>
</html>
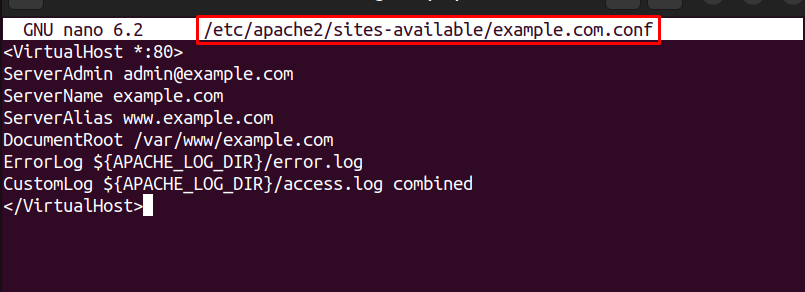
When setting up a website on an Apache2 web server, it’s essential to configure Apache2 to serve the website correctly. This includes defining how Apache2 should handle requests for specific domains, such as “example.com” in this case:
$ sudo nano /etc/apache2/sites-available/example.com.conf
<VirtualHost *:80>
ServerAdmin [email protected]
ServerName example.com
ServerAlias www.example.com
DocumentRoot /var/www/example.com
ErrorLog ${APACHE_LOG_DIR}/error.log
CustomLog ${APACHE_LOG_DIR}/access.log combined
</VirtualHost>
The configuration file specified by this command allows you to define settings such as the document root directory, server name, virtual hosts, and other directives related to how Apache2 should serve the website.
Next, you need to open the Apache configuration file with superuser privileges, allowing you to view and modify the global settings for your Apache web server:
sudo nano /etc/apache2/apache2.conf
After opening this file add the following line and exit the file after saving it:
ServerName example.com
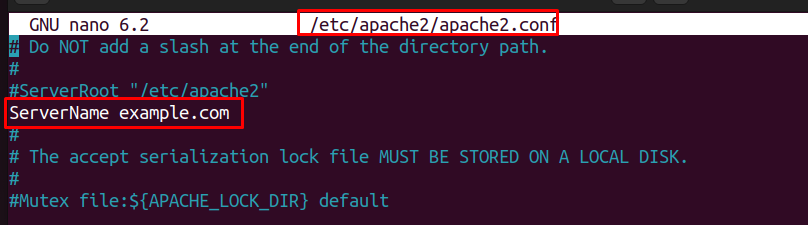
Adding ServerName example.com ensures that Apache accurately identifies itself and handles requests appropriately. Here, you need to provide your desired name in place of example.com.
Now, you need to enable a virtual host configuration file that allows Apache to serve content for the associated domain or website. Once enabled, Apache will read the configuration settings from this file during server startup or reload:
sudo a2ensite example.com.conf

You also need to disable the default virtual host configuration to stop the Apache from serving content for the associated domain or website:
sudo a2dissite 000-default.conf

After disabling a virtual host configuration file, you usually need to reload Apache for the changes to take effect:
sudo systemctl reload apache2

Lastly, if you need to verify that all the configurations that you made are correct and there is no error that can occur then you can do that by executing:
sudo apache2ctl configtest

Running this command after modifying your Apache configuration files is recommended to guarantee the continued smooth operation of your web server.
You can see that there is no error showing in the output which means that the Apache virtual host has been set up successfully on Ubuntu 22.04.
Setting up Apache Virtual Hosts on Ubuntu 22.04 provides a robust solution for efficiently managing multiple websites on a single server. By following the outlined steps, you can establish separate configurations for each virtual host. Also, ensuring flexibility and organization in your web hosting environment.
Setting up Apache Virtual Hosts on Ubuntu 22.04 enables efficient management of multiple websites on a single server, optimizing resource utilization. Moreover, each website can have its own configuration, enhancing flexibility and organization. Additionally, Apache Virtual Hosts facilitate seamless hosting of multiple domains, simplifying website management tasks.
Apache provides value flexibility and extensive customization. Ultimately, the best web server for you depends on your unique project requirements. Rent a VPS server reliable to you with scalability that adapts your resources to meet your growing needs.
Apache Virtual Host allows you to host multiple websites/domains on a single server by using separate configuration files for each site.
Virtual Hosts enable you to efficiently manage multiple websites on a single server, providing isolation and customization for each site.
You can install Apache on Ubuntu 22.04 by running the command sudo apt update && sudo apt install apache2.
Virtual Host configuration files are typically stored in the /etc/apache2/sites-available/ directory.