How to Install Jupyter Notebook on Windows
Jupyter Notebook is one of the most widely-used tools a...

MySQL is an open-source relational database system that is used to store and administer structured data. MySQL can perform SQL-based operations, and is the underlying database engine for many different kinds of applications, from websites to enterprise tools. Developers use MySQL because of its speed and reliability, and because MySQL works across many different platforms and environments.
Installing MySQL on Windows gives users the option to create and manage multiple databases on their local computer for the sake of development, testing, and or learning. The Windows interface will allow for either command line tools, or a graphical interface when interacting with MySQL, which also makes it an easy way to interact with your MySQL functionality, depending on your experience level or preference.
This guide will walk through installing and configuring MySQL 8.x LTS for Windows 10, Windows 11, and Windows Server. This guide will discuss how to use the official MySQL Installer, then how to configure important settings, and how to verify that you have a working database setup that is ready to use!
The official MySQL Installer for Windows is the easiest and most reliable way to install MySQL. It’s ideal for users looking to install MySQL Windows without manually configuring packages. It is available in two versions: the web installer (smaller download, requires internet) and the full installer (larger download, includes all components). You can download both from the official MySQL website:
If you’re unsure how to setup MySQL in Windows, the MySQL Installer provides the most beginner-friendly method with guided steps.
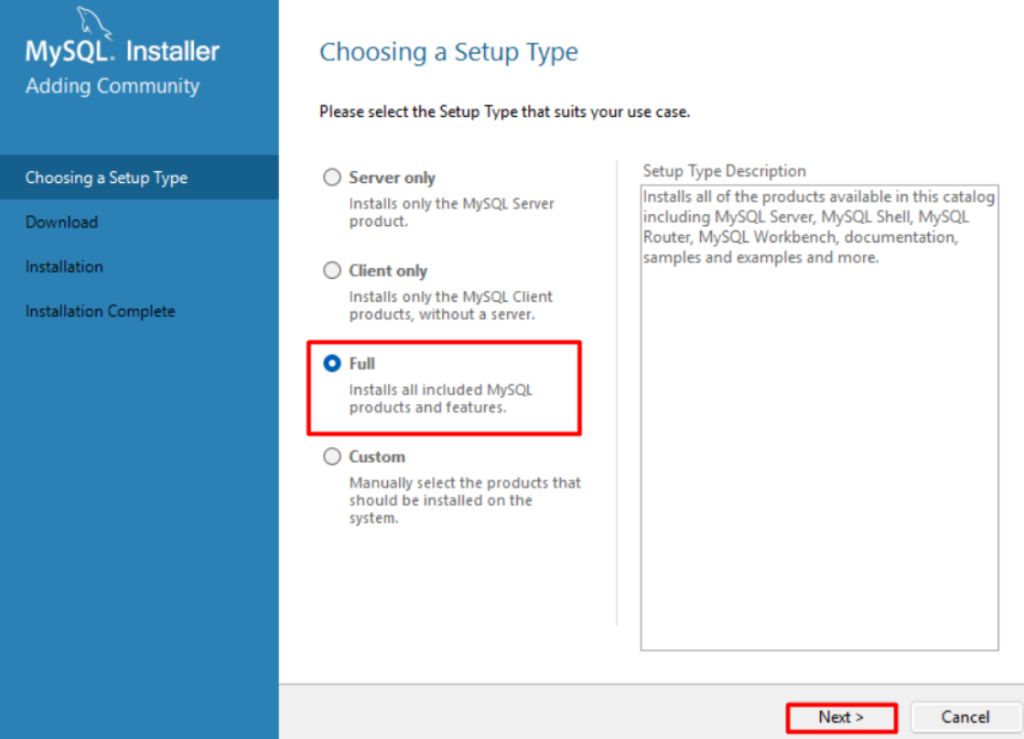
After launching the installer, you’ll be prompted to choose a setup type. This allows you to install MySQL Server with the exact components you need for your local or remote development:

For local development, testing, or SQL practice, the Full option is the best choice. It includes everything needed to run and manage a MySQL environment on Windows without additional downloads or manual configuration.
Fuel Up Your website with MySQL hosting today!
Is your website bogged down by a slow, unreliable database? Experience Ultahost blazing-fast speeds, and reliability, for management of MySQL databases.
After selecting your installation type and downloading the required components, the MySQL Installer will guide you through the server configuration process. Each step sets up critical functions needed for secure and stable operation.
First, choose the configuration type based on your system’s intended use:
Development Computer – Optimized for low resource usage. Recommended for local development and testing.
Server Computer – Balanced performance settings. Suitable for general-purpose database hosting.
Dedicated Computer – Uses maximum available system resources. Best for production environments running only MySQL.
Next, confirm the default port (3306) for MySQL connections. If another service is already using this port, change it manually. Enable the “Open Windows Firewall port for network access” option to allow external connections if needed. For local-only use, you can leave this unchecked:
Read also How to Back up a MySQL Database
Choose the recommended authentication method that uses strong password encryption (caching SHA-2). This enhances security and ensures compatibility with modern applications.
If you plan to connect MySQL with older clients or legacy applications, select the legacy authentication method (native password) to avoid compatibility issues. However, this is not advised for new setups:
Create a strong root password using a mix of uppercase, lowercase, numbers, and symbols. The root user has full control over the database, so use a secure and memorable password:
Optionally, add new MySQL user accounts during this step. Use these for day-to-day development instead of working directly as root. This helps prevent accidental data loss and improves access control.
MySQL runs as a Windows service, allowing it to start automatically with the system. Enable “Start the MySQL Server at System Startup” for convenience.
You can keep the default service name (usually MySQL80) or assign a custom one if needed—for example, when managing multiple instances.
Review your configuration summary. Click the “Execute” button to apply all changes and initialize the server.
The installer will display status updates for each task. Wait for all steps to complete successfully. Once finished, the server is ready for use, and you can proceed to connect through MySQL Workbench or the command line.
Installing and configuring MySQL on Windows is a straightforward process when using the official MySQL Installer. This guide covered the key requirements, including supported Windows versions, necessary permissions, hardware specs, and software dependencies like the Visual C++ Redistributable. We also explained how to use the Installer, choose the correct setup type, and configure essential components such as networking, authentication, and Windows services.
By following these steps, you can set up a fully functional MySQL environment suitable for development, learning, or application testing. The Full installation option provides all necessary tools, while proper configuration ensures secure and efficient database performance. Once installed, you can begin creating databases, running SQL queries, and managing data directly from your local Windows machine.
Deploy MySQL on UltaHost’s Windows VPS for Seamless Performance and Control. Run MySQL databases effortlessly with full administrative access, fast NVMe storage, and native Windows compatibility. UltaHost’s Windows Private Server offers a powerful, GUI-friendly environment ideal for developers, growing teams, and businesses that prefer Windows-based hosting. Experience reliable uptime, remote desktop access (RDP), flexible scaling, and 24/7 expert support—perfect for stable and scalable MySQL hosting.
Yes, MySQL 8.x is fully compatible with 64-bit versions of Windows 10, 11, and Windows Server editions.
Choose “Full” to install the server, Workbench, Shell, and all required tools for local development.
Yes, MySQL 8.0+ requires the Microsoft Visual C++ 2019 Redistributable. The installer will prompt you if it’s missing.
Yes, it includes secure authentication methods and can be limited to local access unless network access is enabled.
Yes, you can manage MySQL through the command line, third-party tools, or scripts without Workbench.
During installation, you can configure MySQL as a Windows service and enable auto-start at system boot.
By default, MySQL uses port 3306. You can change it during configuration if needed.
UltaAI – Smart AI Assistant for Ultahost Clients
UltaAI is your advisor for anything related to domain or hosting. Experience personalised suggestions.