How to Install Sublime Text on Windows
Sublime Text is a powerful and versatile text editor wi...
phpPgAdmin is a free, web-based interface for managing PostgreSQL databases. Developed in PHP, this tool provides an intuitive and user-friendly way to administer PostgreSQL databases, making it an essential tool for database administrators, developers, and users. By installing phpPgAdmin on Windows 10, users can easily manage their PostgreSQL databases, perform queries, and optimize database performance.
With phpPgAdmin, Windows 10 users can enjoy a range of benefits, including easy database administration, improved data management, and enhanced security features. phpPgAdmin supports a wide range of PostgreSQL features, including SQL execution, database design, and user management. By installing phpPgAdmin on Windows 10, users can streamline their database management tasks and improve their overall productivity.
In this guide, we will walk you through the step-by-step process of downloading phpPgAdmin Windows 10, ensuring that you can start managing your PostgreSQL databases with ease and efficiency.
phpPgAdmin relies on a PostgreSQL database to function. Therefore, installing PostgreSQL is a necessary step before installing phpPgAdmin. In this section, we will guide you through the process of installing phpPgAdmin on Windows 10.
Before installing phpPgAdmin, you need to download and install PostgreSQL on Windows 10 system.
You can download the latest version of PostgreSQL from the official EnterpriseDB website.
At the time of writing, the latest version available is 17.0. You can select the correct version for your system architecture (32-bit or 64-bit) and operating system:

Installing PostgreSQL is necessary because phpPgAdmin is a web-based interface for managing PostgreSQL databases. phpPgAdmin communicates with the PostgreSQL database server to perform various administrative tasks, such as creating and managing databases, running SQL queries, and managing user permissions. By installing PostgreSQL, you will have a database server that phpPgAdmin can connect to.
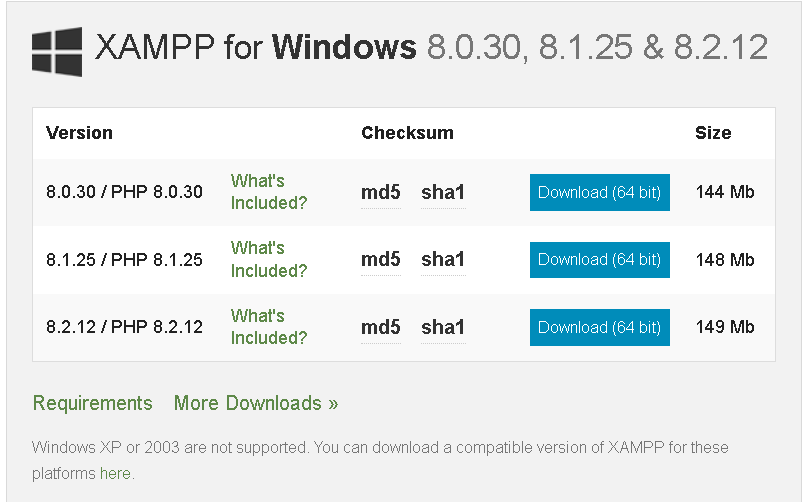
To run phpPgAdmin, we need a web server and PHP interpreter. XAMPP is a popular open-source software package that includes Apache, MySQL, PHP, and Perl, making it an ideal choice for our needs. We’ll be using XAMPP to access Apache and PHP, which are required to run phpPgAdmin. Apache is a web server that will host phpPgAdmin, while PHP is the programming language that phpPgAdmin is built on. By using XAMPP, we can easily set up a local web server and PHP environment on our Windows 10 system.
To install XAMPP, download the XAMPP installer from the official Apache Friends website. Run the installer and follow the prompts to install XAMPP. Make sure to select the components you want to install, including Apache and PHP:

After installing XAMPP, we need to configure the PHP settings to enable PostgreSQL support. To do this, we need to edit the php.ini file. The php.ini file can be found in the C:\xampp\php directory, assuming you installed XAMPP in the default location:
Open the php.ini file in a text editor and search for the lines extension=pdo_pgsql and extension=pgsql. These lines are likely commented out by default, with a semicolon at the beginning of each line. To enable the PDO PostgreSQL and PostgreSQL extensions in PHP, we need to uncomment these lines. Remove the semicolon at the beginning of each line, so that the lines read extension=pdo_pgsql and extension=pgsql:

Uncommenting these lines is necessary to enable the required extensions, allowing phpPgAdmin to connect to the PostgreSQL database server. PDO (PHP Data Objects) is a database abstraction layer that provides a uniform interface for accessing different databases, while the PostgreSQL extension provides the necessary functions for interacting with PostgreSQL databases.
By uncommenting these lines, we’re telling PHP to load the required extensions, allowing phpPgAdmin to communicate with the PostgreSQL database server. Save the changes to the php.ini file and proceed to the next step.
Now that we have our PostgreSQL database server and XAMPP installed, it’s time to download phpPgAdmin. phpPgAdmin is a web-based interface for managing PostgreSQL databases, and it’s the tool we’ll be using to interact with our PostgreSQL database.
To download phpPgAdmin, visit the official GitHub repository. At the time of writing, the current version is 7.13.0. Download the zip file for the latest version:

Once the download is complete, extract the contents of the zip file. We need to place the extracted files in a location where our web server can access them. Since we’re using XAMPP, we’ll extract the files into the htdocs directory, which is located inside the XAMPP directory.
The htdocs directory is the default document root for the Apache web server in XAMPP. This is where we’ll place our phpPgAdmin files so that we can access them through a web browser. By extracting the files into the htdocs directory, we’re making them available to the web server, which will allow us to access phpPgAdmin through a URL.
Once you’ve extracted the files, you should see a new directory called phppgadmin (or the version number, e.g., phppgadmin-7.13.0) inside the htdocs directory. This is where our phpPgAdmin installation is located. We’ll configure and access phpPgAdmin in the next steps.
Install phpPgAdmin on Our Windows 10 VPS!
With Ultahost, Hosting Windows 10 VPS easily installs phpPgAdmin. Enjoy ultra-fast SSD NVME speeds with no dropouts and slowdowns.
Now that we have phpPgAdmin installed and extracted into the htdocs directory, we’re ready to launch the interface. To do this, we need to start the Apache and PHP services using XAMPP.
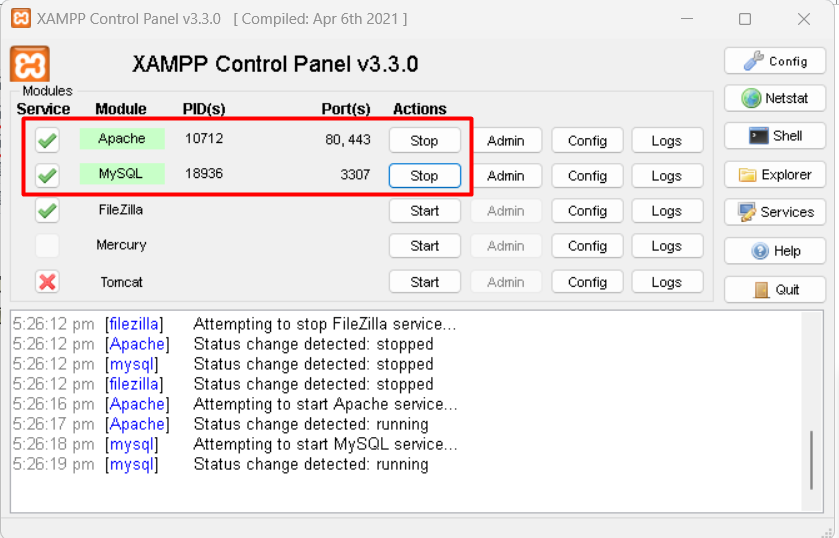
Open the XAMPP Control Panel and click on the “Start” button next to Apache and PHP to start the services. This will launch the Apache web server and PHP interpreter, making our phpPgAdmin installation accessible through a web browser:

Once the services are running, open a web browser and type the following URL: http://localhost/phppgadmin (assuming you extracted the phpPgAdmin files into a directory called “phppgadmin” inside the htdocs directory). This will launch the phpPgAdmin interface, allowing you to interact with your PostgreSQL database.

The “localhost” part of the URL refers to the local machine, which is the computer you’re currently using. The “/phppgadmin” part of the URL refers to the .directory where we extracted the phpPgAdmin files. By typing this URL into your browser, you’re telling the browser to access the phpPgAdmin interface on your local machine.
After typing the URL, press Enter, and the phpPgAdmin login page should appear. This is where you’ll enter your PostgreSQL database credentials to access your database.
Learn also How to Install phpPgAdmin on Ubuntu 24.04.
phpPgAdmin offers a wide range of features that make it an ideal tool for managing PostgreSQL databases. Some of the key features include:
In this guide, we cover the process to download phpPgAdmin Windows 10. We covered the necessary prerequisites, including installing PostgreSQL and XAMPP, and then showed you how to download and extract phpPgAdmin into the htdocs directory. Finally, we launched the phpPgAdmin interface and accessed it through a web browser.
Throughout the installation process, we configured various settings and made necessary changes to enable PostgreSQL support. With phpPgAdmin now up and running, you can manage your PostgreSQL databases with ease and efficiency.
Installing phpPgAdmin on Windows can be a simple process for beginners. Upgrading to an Ultahost cheap VPS hosting provides a more streamlined and efficient solution which is the ideal environment for phpPgAdmin development. This eliminates compatibility issues and simplifies the installation process.
phpPgAdmin is a web-based administration tool for managing PostgreSQL databases through a user-friendly interface.
A working installation of PostgreSQL. A web server like Apache or Nginx with PHP support. PHP (version 7.4 or higher recommended). Required PHP extensions: pdo_pgsql, pgsql, mbstring, xml, json.
You can download the latest version of phpPgAdmin from its official GitHub repository.
You can install software like XAMPP or WAMP, which include Apache, MySQL, and PHP, making setup easier. Simply download and install one of these packages.
Extract the downloaded phpPgAdmin ZIP file. Move the extracted folder to your web server’s root directory (e.g., C:\xampp\htdocs\ for XAMPP). Rename the folder to something simpler if desired (e.g., phppgadmin).
Navigate to the phpPgAdmin directory and open the conf/config.inc.php file. Set the PostgreSQL server connection details, including host, port, and authentication settings.
Change the default URL to something less predictable. Set up basic authentication in Apache. Limit access to specific IP addresses.