
How to Install TeamViewer on Ubuntu
TeamViewer is a popular remote desktop software that en...


Vim (Vi IMproved) is one of the best Linux text editors with extensive customization features. It is a must-have for any Ubuntu user who is a terminal enthusiast, system administrator, or software developer. With command knowledge, no other text editor allows for extensive editing like Vim.
This guide is meant to help you install Vim on Ubuntu, from the simplest to the more involved methods.
Vim is an upgraded version of the vi editor, which comes standard with every Unix system. It features:
Acquiring Vim requires a bit of research regarding its different versions. For Ubuntu, the following apply:
Depending on whether you prefer a GUI or require additional languages, select the variant that matches your work style.
Ubuntu has a default package manager, the Advanced Package Tool (APT). This section helps you get started with Vim on Ubuntu using the APT package by describing multiple installation methods. To install the standard version of Vim, follow the below steps:
Install Vim Efficiently with our Ubuntu VPS!
Install Vim effortlessly with Ultahost’s reliable Ubuntu VPS hosting. Enjoy quick setup, seamless performance, and expert support for all your development projects!
Before proceeding with the Vim installation, first, check the Ubuntu version to avoid compatibility issues.
Make sure you update the package list because it will add any more recent changes made to the repositories. Doing so makes sure that all installed packages, as well as the operating system, are up to date. It helps to avoid problems while installing new packages:
sudo apt update

This is the simplest method to install Vim on Ubuntu. These are the available packages for Vim:
1. Minimal Package (vim-tiny)
For Basic functionality, install the Vim tiny editor:
sudo apt install vim-tiny

2. Vim Install Ubuntu (Standard Version)
This is more suited for the average user. To install the standard version of Vim, use the below command. It installs the regular version of Vim with standard features.
sudo apt install vim

3. Install Vim Full Version (vim-gtk3 or vim-gnome)
For the GUI version with GTK3 support, install the below package. It includes a GUI and additional features:
sudo apt install vim-gtk3

4. All Variants – Installs All Available Vim Packages
For those who want all available packages for Vim installed in one go:
sudo apt install vim-*

As Vim is now installed, let’s check whether it has been installed correctly. For this purpose, you can check the version installed:
vim --version

This command shows the version and details of a compilation of Vim installed.
Snap is a type of universal package manager used in many distributions of Linux. Installing Snap ensures you get the same experience when using Vim.
Most modern versions of Ubuntu come with Snap pre-installed. Check that with:
snap --version

If not installed, you can install Snap on Ubuntu with:
sudo apt install snapd

Remember that when installing Snap, you might have to use the command vim-editor instead of vim to access it:
sudo snap install --edge vim-editor

After installation, check the installed version:
vim-editor --version

Read also How to Install PHP on Ubuntu 24.04
For those who prefer a graphical interface, this method is fit for you. Let’s follow the instructions below:
Open “Ubuntu Software” from the application window. Then in the search bar, look for “vim”; if not installed, get the most up-to-date version (vim, vim-gtk3, etc.):

Click “Install” and enter your password when prompted. After confirmation, your machine will wait to complete the installation:

If you desire the most updated features of Vim or have specific alteration needs you want fulfilled. Getting a custom version of the software is often most easily done by compiling from source.
Use the following command to set up the required dependencies:
sudo apt update & sudo apt install build-essential libncurses5-dev libncursesw5-dev git

After that, download and get the available repository using the git command:
git clone https://github.com/vim/vim.git

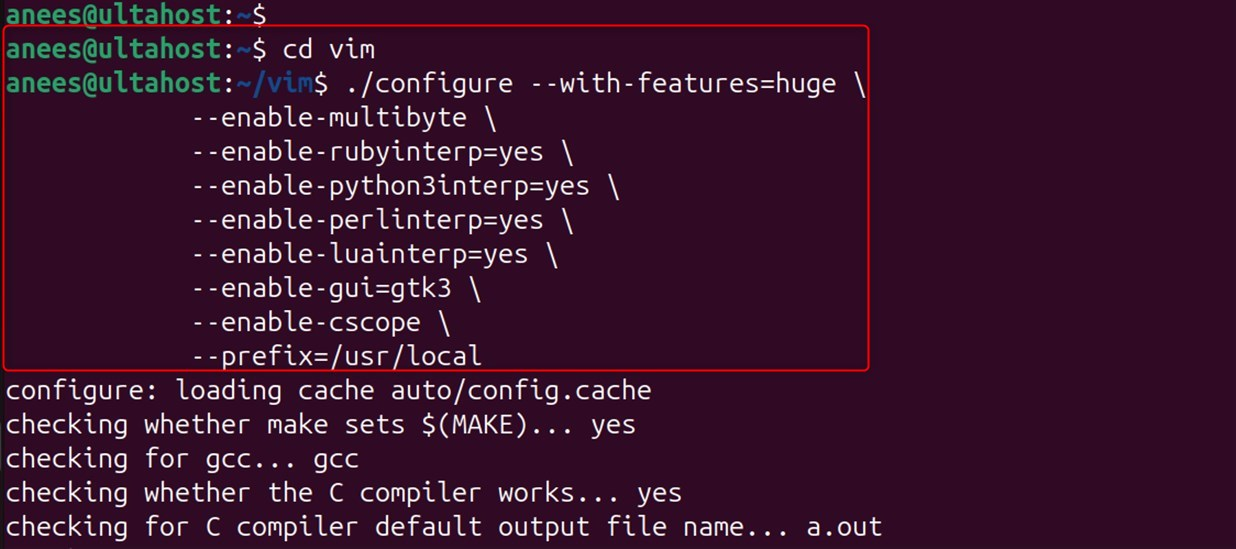
In addition to adding support for Ruby, Python 3, Perl, Lua, and GTK3 GUI, the configuration also adds support for them. For this, execute the below command to navigate to the vim directory:
cd vim
After this, execute the following code:
./configure --with-features=huge \
            --enable-multibyte \
            --enable-rubyinterp=yes \
            --enable-python3interp=yes \
            --enable-perlinterp=yes \
            --enable-luainterp=yes \
            --enable-gui=gtk3 \
            --enable-cscope \
            --prefix=/usr/local
Keep in mind that, depending on the speed of your system, compiling the source can take quite a bit of time:
make

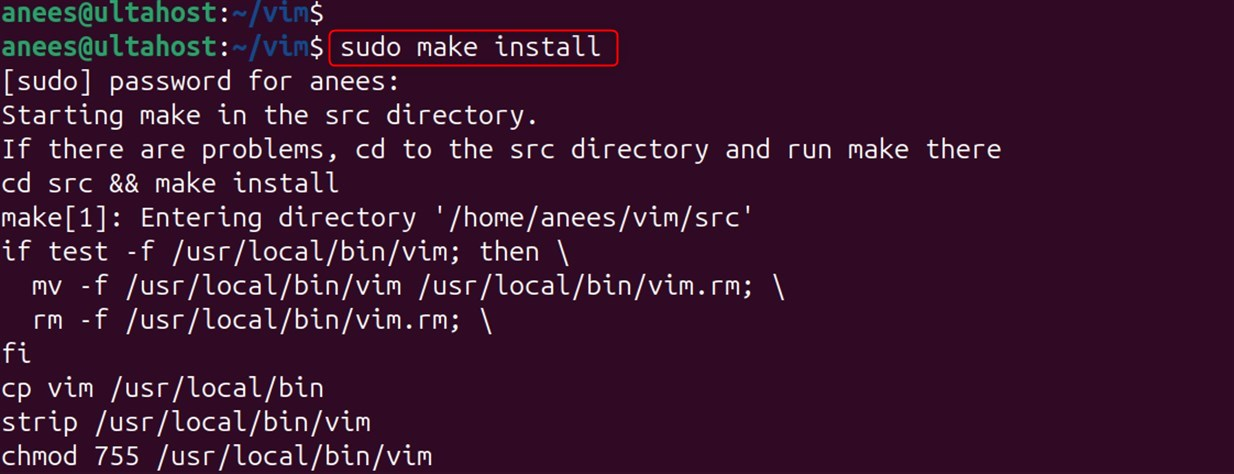
Finally, install Vim using the below command:
sudo make install
Let’s confirm the installation of Vim:
/usr/local/bin/vim --version

Once everything is aligned as it should be, now is a good time to use the device for the first time and test whether all operations are seamless. Let’s launch Vim:
vim

You can exit Vim by typing :q and pressing Enter.
If you need to remove Vim from the Ubuntu operating system, follow the below instructions:
For APT Installations
If the software was added via APT, use:
sudo apt autoremove vim vim-*

For Snap installations:
To erase the software that’s installed using snap, try using this command in the console:
sudo snap remove vim-editor

For GUI installations:
If you installed Vim using the Ubuntu Software Center (GUI), you can remove it just as easily through the same interface:

For Source installations:
If the software was added via source file, navigate to the vim directory using cd ~/vim and run:
sudo make uninstall

That is all from the guide. You now have the tools to install and configure Vim according to your needs, from APT installation to compiling from source.
For Linux operating systems, Vim is certainly one of the most efficient and popular text editors available. The text editor VIM is highly efficient and, when used properly, can greatly increase productivity. There are several ways to install it on Ubuntu; the APT way is the easiest for most users, while the source installation is best for those who require specific features or need the latest version.
Experience Ultahost’s cheap Linux VPS hosting for better performance and reliability at a budget-friendly cost. Ultahost offers complete flexibility and control while handling all server management, ensuring everything runs smoothly and reliably with guaranteed uptime!
Vim expands the functionality of Vi and stands for Vi IMproved. Additional features of Vim include syntax highlighting, separating windows, visual mode for selection, an undo/redo history, plugins, and extensive customization. Unlike Vi, which is typically preinstalled in most Unix-like systems, Vim offers unparalleled editing capabilities.
This is probably the most frequent question people have asked about Vim. To exit Vim, follow these steps: Ensure you’re in normal mode by hitting Esc. If you are in command mode (no changes made), type :q and hit Enter to quit. To force quit without saving changes, type :q! and hit Enter. In case you want to save changes before exiting, type :wq or 😡 and then hit Enter.
When it comes to programming, it’s best to use vim-nox since it comes with support for Python, Perl, and Ruby. This lets you use accompanying advanced plugins that may require these languages. If you prefer working with a graphical interface, vim-gtk3 is also capable of these scripting options but comes with a GUI.
Vim does support hundreds of programming languages as well as different file formats and their corresponding syntax out of the box. To turn on highlighting, simply add syntax to your .vimrc file or type :syntax on after launching Vim. For syntax not included by default, you can install additional files via plugins.
To configure clipboard interaction between Vim and other applications, make sure you have a version of Vim that has clipboard functionality (such as vim-gkt3). In visual mode, after highlighting the text, you can use the command “+y to copy it to the clipboard. You can paste from the clipboard using the command “+p. Alternatively, you can add set clipboard=unnamedplus to your .vimrc file, which sets it to use the clipboard by default.
Installing Vim from the source has the following benefits: You can access the newest updates of features and bug fixes much earlier than when they become available through package repositories. Having the ability to decide which features to include in your compiled installation of Vim. Control over the implementation of scripting languages or interfaces that are incorporated. Having the option to add custom patches or other changes to the code base. Installation specifically optimized for the system in use can lead to enhanced performance.
Some users prefer Neovim because it has been designed to be more modern and developer-friendly, while others stick to traditional Vim due to its stability and popularity. Both editors have a common set of commands and functions; hence, skills are easily transferable.