
How to Enable or Disable IPV6 on Ubuntu Linux
IPv6, also known as Internet Protocol version 6, offers...


CyberPanel is a control panel designed to simplify the management of web servers, particularly on Linux-based systems like Ubuntu. It provides a user-friendly interface to manage various aspects of your web server, including websites, databases, email accounts, and security settings.
With CyberPanel, you can easily create and manage multiple websites, assign domain names, and configure SSL certificates. It also allows you to manage databases, create and manage email accounts, and set up FTP and SFTP connections.
With CyberPanel, users can easily manage domains, create and configure websites, set up databases, handle email accounts, monitor server resources, and perform other administrative tasks. It aims to streamline the process of deploying and maintaining web applications, making it accessible to both novice and experienced users. CyberPanel’s intuitive interface and automation features help reduce the complexity often associated with server administration, enabling users to focus more on their web projects and content creation.
This article will provide you with an in-depth detail on how you can install CyberPanel on Ubuntu.
In order to install CyberPanel, you need to ensure that you meet the following requirements:
If you meet these requirements then you can follow the below discussed steps to install CyberPanel on Ubuntu.
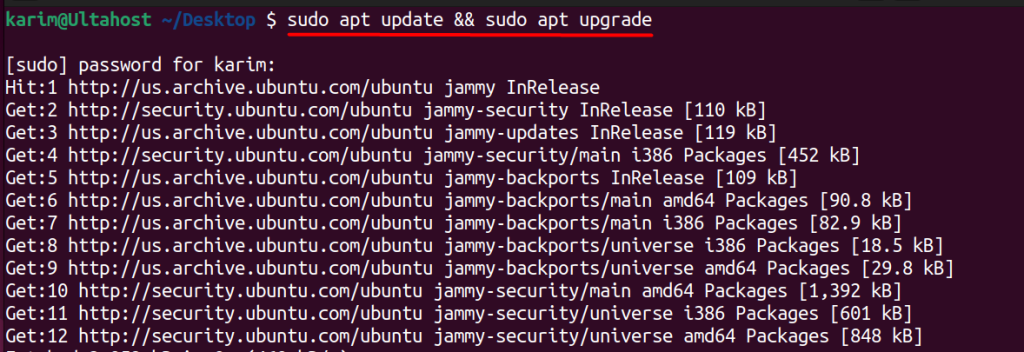
Update your server OS first (Because it updated overall services because it provides much better compatibility). Run this command
For Ubuntu:
sudo apt update && sudo apt upgrade
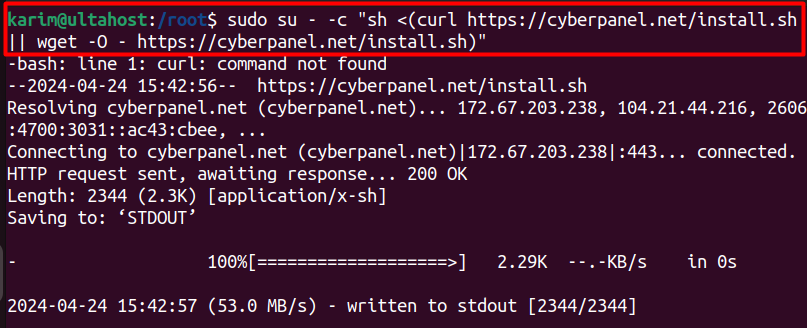
Execute the provided command to initiate the automated installation script. This script will guide you through several decisions regarding the LiteSpeed version and additional add-ons you wish to install.
sudo su - -c "sh <(curl https://cyberpanel.net/install.sh || wget -O - https://cyberpanel.net/install.sh)"
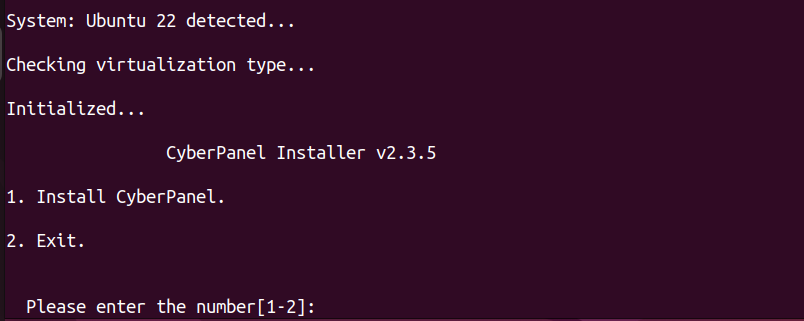
Running this command will analyze the operating system you are using. After that it will prompt you whether you want to install CyberPanel or not. You need to press 1 here to start the installation process:
After that it will analyze the system hardware and display it on the terminal so that you can understand if you are fulfilling the requirements or not.
At this stage you can either install CyberPanel with OpenLiteSpeed or with LiteSpeed Enterprise. For this article, we are choosing OpenLiteSpeed:
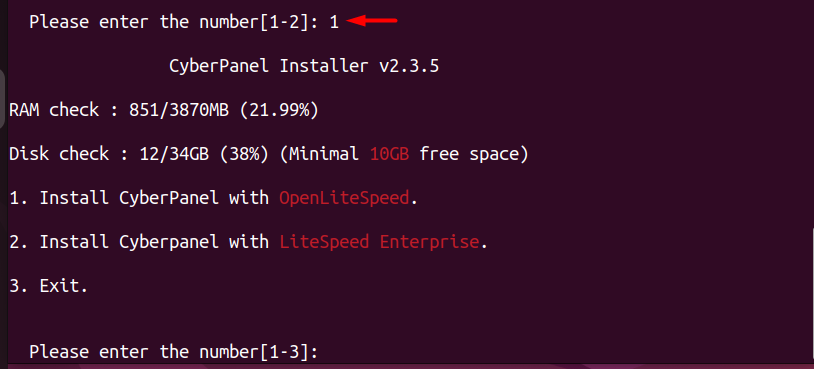
OpenLiteSpeed is an open-source version of the LiteSpeed web server, which is free to use but has fewer features and less performance compared to the commercial LiteSpeed Enterprise version.
LiteSpeed Enterprise is the commercial, paid version of the LiteSpeed web server. It offers more advanced features, better performance, and additional tools compared to the open-source OpenLiteSpeed version.
When installing CyberPanel with OpenLiteSpeed, you get a free and open-source web server solution, but with potentially fewer features and lower performance than the Enterprise version. This option is suitable for individuals or small projects with modest requirements.
On the other hand, installing CyberPanel with LiteSpeed Enterprise provides a more powerful and feature-rich web server solution. It offers better performance, more advanced caching mechanisms, and additional tools for website management and optimization. However, you will need to purchase a license key from LiteSpeed Technologies to use the Enterprise version.
Upgrade Your Hosting Experience Now!
Ready to supercharge your website with CyberPanel on Ubuntu? Explore our CyberPanel VPS hosting plans at Ultahost and take your online presence to the next level.
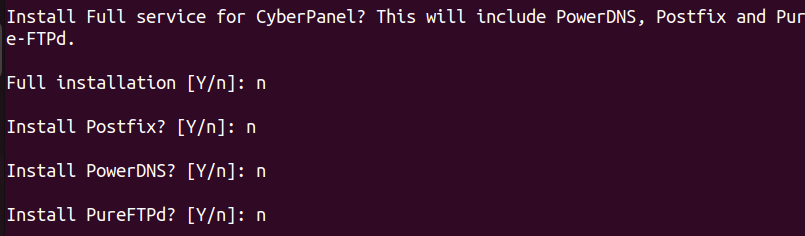
When installing CyberPanel with OpenLiteSpeed, you have the option to install the “Full service” or not. Here’s what each option means:
If you press “Y” (Yes):
It will install additional services like PowerDNS (for DNS management), Postfix (for email handling), and Pure-FTPd (for FTP server).
This “Full service” option provides a complete web hosting environment with additional features like domain name management, email hosting, and FTP access.
It’s recommended if you want to use CyberPanel as a comprehensive web hosting control panel with additional services beyond just web server management.
If you press “N” (No):
It will install only the core CyberPanel components and the web server (OpenLiteSpeed).
This minimal installation is suitable if you only need a web server and basic web hosting management features.
You won’t have additional services like DNS (Domain Name System), email, or FTP management out of the box. So for the sake of this article, we are choosing the minimal installation and wont install these packages:
Next, it will ask you whether to set up the remote MySQL or not. Here we again enter the n key. The primary purpose of remote MySQL in CyberPanel is to provide flexibility and scalability in database management:

After that it prompts you for the installation of memcached and PHP extension:

Memcached is a high-performance, distributed memory object caching system. It allows you to store frequently accessed data in memory (RAM) instead of retrieving it from a database or file system. This can significantly improve the performance of your web applications by reducing the number of database queries and disk I/O operations.
The PHP extension for Memcached is a PHP module that allows your PHP applications to interact with the Memcached service. It provides a way for PHP to store and retrieve data from Memcached.
WatchDog is a monitoring tool that watches over your web server and database services, ensuring they’re running smoothly and restarting them if they fail or become unresponsive. This can help prevent downtime and minimize the impact of service failures:

This would be the last step before the installation. After that it will take around 10 minutes to complete the installation process depending on your internet speed.
After installing CyberPanel on Ubuntu, you can access the CyberPanel web interface using the server’s IP address or domain name. Here are the typical steps:
If you don’t know your server’s IP address, you can find it by running the following command in the terminal:
ip addr show
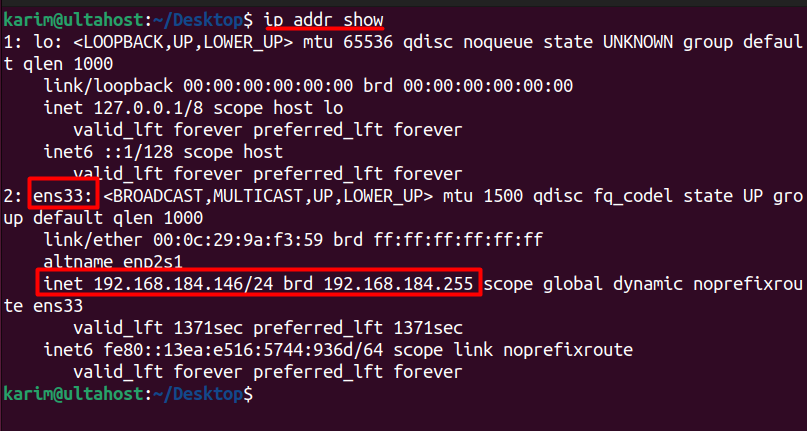
Look for the `inet` entry under the appropriate network interface (e.g., `eth0`, `ens3`, etc.) to get the IP address.
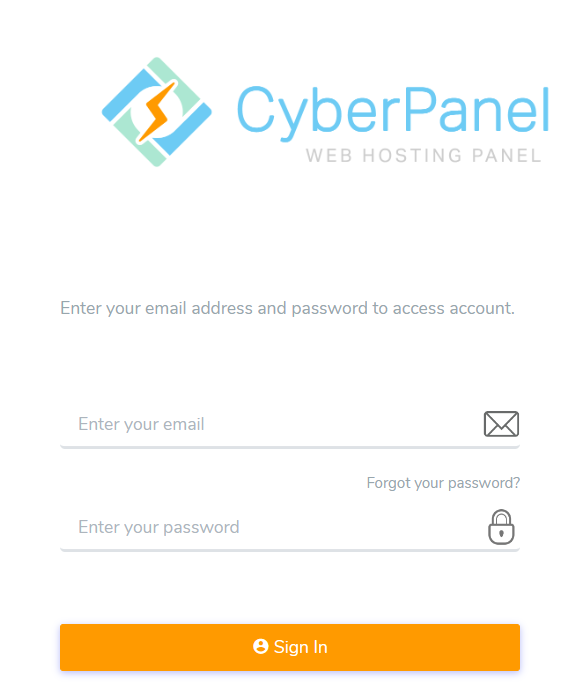
Open a web browser on your local machine or any other computer connected to the internet, and enter the server’s IP address or domain name in the address bar. For example:
http://your_server_ip:8090
Replace `your_server_ip` with the actual IP address of your server.
You should see the CyberPanel login page. Use the default credentials (username: `admin` and password: `passwd`) to log in. You will be prompted to change the default password upon your first login.
After logging in, it’s strongly recommended to change the default password for security reasons. You can do this by navigating to the “Settings” section in the CyberPanel dashboard and updating the password under the “Administrator” tab.
That’s it! You should now be able to access the CyberPanel web interface and start managing your server, creating websites, configuring SSL certificates, and more.
Note: If you’re accessing CyberPanel from a remote machine, ensure that the appropriate firewall rules are configured to allow incoming connections on port 8090 (or the custom port you set during installation).
CyberPanel simplifies web server management on Linux-based systems like Ubuntu. It provides a user-friendly interface to manage websites, databases, email accounts, and security settings. Users can easily manage domains, create WordPress websites, set up databases, handle email accounts, and monitor server resources. CyberPanel streamlines web server administration, making it accessible to both novice and experienced users.
By following the installation steps, users can successfully install CyberPanel on Ubuntu. They can then access the CyberPanel web interface to manage their server, create websites, and configure SSL certificates. With CyberPanel, users can focus on their web projects and content creation, rather than complex server administration tasks.
Discover the power of CyberPanel on Ubuntu and learn seamless management and enhanced performance. Explore our Ubuntu VPS hosting solutions at Ultahost to unleash the full potential of your website today!
CyberPanel is a web hosting control panel powered by OpenLiteSpeed. It provides a user-friendly interface to manage web servers, domains, databases, and more.
CyberPanel requires a fresh Ubuntu installation (preferably Ubuntu 18.04 or later) with at least 1GB RAM and 10GB of disk space.
Yes, during the installation, you’ll be prompted to set a MySQL root password and an email address for administrative purposes. Make sure to provide valid information.
You can access the CyberPanel web interface by navigating to https://your_server_ip:8090 in your web browser.
Yes, you can install CyberPanel on a remote server by SSHing into the server and following the installation instructions mentioned earlier.